Here is a list of main deliverables of the project; their details are given in the subsequent sections.
- Product
- Documentation
- Product Demo
- Practical Exams, PE-1 and PE-2
- Peer testing results
- Peer evaluation
Deliverable: Executable
- The product should be delivered as an executable jar file.
- Ideally, the product delivered at v1.4 should be a
releasable product. However, in the interest of lowering your workload, we do not penalize if the product isnot releasable , as long as the product isacceptance testable .
Deliverable: Source code
- The source code should match the executable, and should include the revision history of the source code, as a Git repo.
Deliverable: User Guide (UG)
- The User Guide (UG) of the product should match the proposed v2.0 of the product and in sync with the current version of the product.
- Features not implemented yet should be clearly marked as
Coming in v2.0 - Ensure the UG matches the product precisely, as it will be used by peer testers (and any inaccuracy in the content will be considered bugs).
Deliverable: Developer Guide (DG)
- The Developer Guide (DG) of the product should match the proposed v2.0 of the product and should be in sync with the current version of the product.
- ❗️ The appendix named Instructions for Manual Testing of the Developer Guide should include testing instructions to cover all your major and minor enhancements. There is no need to add testing instructions for existing features if you did not touch them.
💡 What to include in the appendix Instructions for Manual Testing? This appendix is meant to give some guidance to the tester to chart a path through the features, and provide some important test inputs the tester can copy-paste into the app. There is no need to give a long list of test cases including all possible variations. It is upto the tester to come up with those variations. However, if the instructions are inaccurate or deliberately misses/mis-states information to make testing harder i.e. annoys the tester, the tester can report it as a bug (because flaws in developer docs are considered as bugs). - Ensure the DG matches the product precisely, as it will be used by peer evaluators (and any inaccuracy in the content will be considered bugs).
Deliverable: Product Website
- Include an updated version of the online UG and DG that match v1.4 executable
- README : Ensure the
Ui.pngmatches the current product - AboutUs : Ensure the following:
- Use a suitable profile photo
-
The purpose of the profile photo is for the teaching team to identify you. Therefore, you should choose a recent individual photo showing your face clearly -- somewhat similar to a passport photo. Some examples can be seen in the 'Teaching team' page. Given below are some examples of good and bad profile photos.
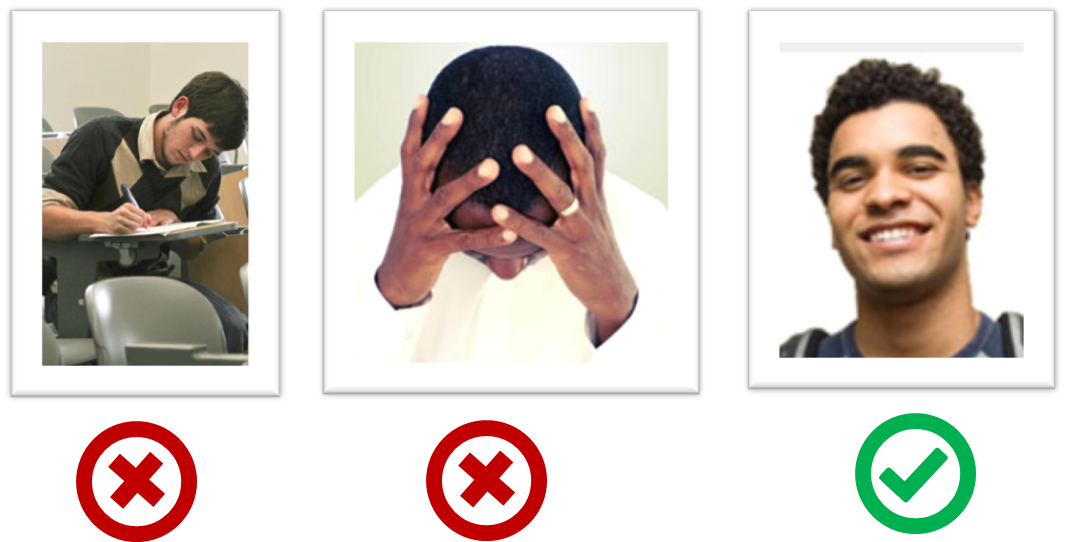
-
If you are uncomfortable posting your photo due to security reasons, you can post a lower resolution image so that it is hard for someone to misuse that image for fraudulent purposes. If you are concerned about privacy, you can request permission to omit your photo from the page by writing to prof.
- Contains a link to each person's Project Portfolio page
- Team member names match full names used by IVLE
Deliverable: Project Portfolio Page (PPP)
At the end of the project each student is required to submit a Project Portfolio Page.
-
Objective:
- For you to use (e.g. in your resume) as a well-documented data point of your SE experience
- For us to use as a data point to evaluate your,
- contributions to the project
- your documentation skills
-
Sections to include:
-
Overview: A short overview of your product to provide some context to the reader.
-
Summary of Contributions:
- Code contributed: Give a link to your code on Project Code Dashboard, which should be
https://nuscs2113-ay1819s1.github.io/dashboard/#=undefined&search=githbub_username_in_lower_case(replacegithbub_username_in_lower_casewith your actual username in lower case e.g.,johndoe). This link is also available in the Project List Page -- linked to the icon under your photo. - Main feature implemented: A summary of the main feature you implemented
- Other contributions:
- Contributions to project management e.g., setting up project tools, managing releases, managing issue tracker etc.
- Evidence of helping others e.g. responses you posted in our forum, bugs you reported in other team's products,
- Evidence of technical leadership e.g. sharing useful information in the forum
- [Optional] Other minor enhancements: If you have other enhancements that you implemented, which are not related to your main feature, you can include it here. If you have written a significant amount of code that can be advertised as a feature by itself, but does not belong to your main feature, you can choose to include it as a part of the optional enhancements.
- Code contributed: Give a link to your code on Project Code Dashboard, which should be
-
Contributions to the User Guide: Reproduce the parts in the User Guide that you wrote. This can include features you implemented as well as features you propose to implement.
The purpose of allowing you to include proposed features is to provide you more flexibility to show your documentation skills. e.g. you can bring in a proposed feature just to give you an opportunity to use a UML diagram type not used by the actual features. -
Contributions to the Developer Guide: Reproduce the parts in the Developer Guide that you wrote. Ensure there is enough content to evaluate your technical documentation skills and UML modelling skills. You can include descriptions of your design/implementations, possible alternatives, pros and cons of alternatives, etc.
-
If you plan to use the PPP in your Resume, you can also include your SE work outside of the module (will not be graded)
-
-
Format:
-
File name:
docs/team/githbub_username_in_lower_case.adoce.g.,docs/team/johndoe.adoc -
Follow the example in the AddressBook-Level4, but ignore the following two lines in it.
- Minor enhancement: added a history command that allows the user to navigate to previous commands using up/down keys.
- Code contributed: [Functional code] [Test code] {give links to collated code files}
-
💡 You can use the Asciidoc's
includefeature to include sections from the developer guide or the user guide in your PPP. Follow the example in the sample. -
It is assumed that all contents in the PPP were written primarily by you. If any section is written by someone else e.g. someone else wrote described the feature in the User Guide but you implemented the feature, clearly state that the section was written by someone else (e.g.
Start of Extract [from: User Guide] written by Jane Doe). Reason: Your writing skills will be evaluated based on the PPP -
Page limit: If you have more content than the limit given below, shorten (or omit some content) so that you do not exceed the page limit. Having too much content in the PPP will be viewed unfavorably during grading. Note: the page limits given below are after converting to PDF format. The actual amount of content you require is actually less than what these numbers suggest because the HTML → PDF conversion adds a lot of spacing around content.
Content Limit Overview + Summary of contributions 0.5-1 Contributions to the User Guide 1-3 Contributions to the Developer Guide 3-6 Total 5-10
-
Deliverable: Demo
-
Duration: Strictly
(teamSize x 3.5) + 1minutes e.g. 19 minutes for a 5-person team. Exceeding this limit will be penalized. The extra minute is for the first speaker to give an overview of the product. -
Target audience: Assume you are giving a demo to a higher-level manager of your company, to brief him/her on the current capabilities of the product. This is the first time they are seeing the new product you developed but they are familiar with the AddressBook-level4 (AB4) product.
-
Scope:
- Each person should demo the enhancements they added. However, it's ok for one member to do all the typing.
- Subjected to the constraint mentioned in the previous point, as far as possible, organize the demo to present a cohesive picture of the product as a whole, presented in a logical order. Remember to explain the target user profile and value proposition early in the demo.
- It is recommended you showcase how the feature improves the user’s life rather than simply describe each feature.
- No need to cover design/implementation details as the manager is not interested in those details.
- Mention features you inherited from AB4 only if they are needed to explain your new features. Reason: existing features will not earn you marks, and the audience is already familiar with AB4 features.
-
Structure:
- Demo the product using the same executable you submitted, on your own laptop, using the TV.
- It can be a sitting down demo: You'll be demonstrating the features using the TV while sitting down. But you may stand around the TV if you prefer that way.
- It will be uninterrupted demo: The audience members will not interrupt you during the demo. That means you should finish within the given time.
- The app should be populated with a significant amount of
realistic data at the start. e.g at least 20 contacts. Trying to demo a product using just 1-2 sample data creates a bad impression. - Dress code : The level of formality is up to you, but it is recommended that the whole team dress at the same level. However, do avoid running shorts and flip-flops!
-
Optimizing the time:
- Spend as much time as possible on demonstrating the actual product. Not recommended to use slides (if you do, use them sparingly) or videos or lengthy narrations.
Avoid skits, re-enactments, dramatizations etc. This is not a sales pitch or an informercial. While you need to show how a user use the product to get value, but you don’t need to act like an imaginary user. For example, [Instead of this]Jim get’s a call from boss. "Ring ring", "hello", "oh hi Jim, can we postpone the meeting?" "Sure". Jim hang up and curses the boss under his breath. Now he starts typing ..etc.[do this]If Jim needs to postpone the meeting, he can type …It’s not that dramatization is bad or we don’t like it. We simply don’t have enough time for it.
Note that CS2101 demo requirements may differ. Different context → Different requirements. - Rehearse the steps well and ensure you can do a smooth demo. Poor quality demos can affect your grade.
- Don’t waste time repeating things the target audience already knows. e.g. no need to say things like "We are students from NUS, SoC".
- Bring sufficient amount of sample data and know how to load them to the system. You should not plan to type all the sample data during the demo itself.
- Plan the demo to be in sync with the impression you want to create. For example, if you are trying to convince that the product is easy to use, show the easiest way to perform a task before you show the full command with all the bells and whistles.
- Limit the demo to CLI inputs only. Do not explain GUI inputs because they don't earn marks.
- Spend as much time as possible on demonstrating the actual product. Not recommended to use slides (if you do, use them sparingly) or videos or lengthy narrations.
Deliverable: Practical Exam (Round 1)
What: The v1.3 is subjected to a round of peer acceptance/system testing, also called the Practical Exam Round 1 (PE-1). This round of testing will be graded similar to the
When, where: 45 minute slot at the end of week 11 lecture, in the Lecture venue
Objectives:
- Evaluate your,
- manual testing skills
- product evaluation skills
- effort estimation skills
- Peer-evaluate your
- product design
- implementation effort
- documentation quality
When, where: Week 13 lecture
Grading:
- Your performance in the practical exams will be considered for your final grade (under the QA category and under Implementation category, about 10 marks in total).
- You will be graded based on your effectiveness as a tester (e.g., the percentage of the bugs you found, the nature of the bugs you found) and how far off your evaluation/estimates are from the evaluator consensus. Explanation: we understand that you have limited expertise in this area; hence, we penalize only if your inputs don't seem to be based on a sincere effort to test/evaluate.
- The bugs found in your product by others will affect your v1.4 marks. You will be given a chance to reject false-positive bug reports.
Preparation:
-
Ensure that you can access the relevant issue tracker given below:
-- for PE-1: nusCS2113-AY1819S1/pe-1
-- for PE-2: nusCS2113-AY1819S1/pe-2- These are private repos!. If you cannot access the relevant repo, you may not have accepted the invitation to join the GitHub org used by the module. Go to https://github.com/orgs/nusCS2113-AY1819S1/invitation to accept the invitation.
- If you cannot find the invitation, post in our forum.
-
Ensure you have access to a computer that is able to run module projects e.g. has the right Java version.
-
Have a good screen grab tool with annotation features so that you can quickly take a screenshot of a bug, annotate it, and post in the issue tracker.
- 💡 You can use Ctrl+V to paste a picture from the clipboard into a text box in GitHub issue tracker.
-
Charge your computer before coming to the PE session. The testing venue may not have enough charging points.
During:
- Take note of your team to test. It will be given to you by the teaching team (distributed via IVLE gradebook).
- Download from IVLE all files submitted by the team (i.e. jar file, User Guide, Developer Guide, and Project Portfolio Pages) into an empty folder.
- [~45 minutes] Test the product and report bugs as described below:
Testing instructions for PE-1 and PE-2
-
What to test:
- PE-1 (at v1.3):
- Test the product based on the User Guide (the UG is most likely accessible using the
helpcommand). - Do system testing first i.e., does the product work as specified by the documentation?. If there is time left, you can do acceptance testing as well i.e., does the product solve the problem it claims to solve?.
- Test the product based on the User Guide (the UG is most likely accessible using the
- PE-2 (at v1.4):
- Test the product based on the Developer Guide (Appendix named Instructions for Manual Testing) and the User Guide. The testing instructions in the Developer Guide can provide you some guidance but if you follow those instructions strictly, you are unlikely to find many bugs. You can deviate from the instructions to probe areas that are more likely to have bugs.
- Do system testing only i.e., verify actual behavior against documented behavior. Do not do acceptance testing.
- PE-1 (at v1.3):
-
What not to test:
- Omit features that are driven by GUI inputs (e.g. buttons, menus, etc.) Reason: Only CLI-driven features can earn credit, as per given project constraints. Some features might have both a GUI-driven and CLI-driven ways to invoke them, in which case test only the CLI-driven way of invoking it.
- Omit feature that existed in AB-4.
-
These are considered bugs:
- Behavior differs from the User Guide
- A legitimate user behavior is not handled e.g. incorrect commands, extra parameters
- Behavior is not specified and differs from normal expectations e.g. error message does not match the error
- Problems in the User Guide e.g., missing/incorrect info
-
Where to report bugs: Post bug in the following issue trackers (not in the team's repo):
- PE-1 (at v1.3): nusCS2113-AY1819S1/pe-1.
- PE-2 (at v1.4): nusCS2113-AY1819S1/pe-2.
-
Bug report format:
- Post bugs as you find them (i.e., do not wait to post all bugs at the end) because the issue tracker will close exactly at the end of the allocated time.
- Do not use team ID in bug reports. Reason: to prevent others copying your bug reports
- Each bug should be a separate issue.
- Write good quality bug reports; poor quality or incorrect bug reports will not earn credit.
- Use a descriptive title.
- Give a good description of the bug with steps to reproduce and screenshots.
- Use the template(s) in the issue tracker as much as possible.
- Assign a severity to the bug report. Bug report without a priority label are considered
severity.Low(lower severity bugs earn lower credit):
Bug Severity labels:
severity.Low: A flaw that is unlikely to affect normal operations of the product. Appears only in very rare situations and causes a minor inconvenience only.severity.Medium: A flaw that causes occasional inconvenience to some users but they can continue to use the product.severity.High: A flaw that affects most users and causes major problems for users. i.e., makes the product almost unusable for most users.
-
About posting suggestions:
- PE-1 (at v1.3): You can also post suggestions on how to improve the product. 💡 Be diplomatic when reporting bugs or suggesting improvements. For example, instead of criticising the current behavior, simply suggest alternatives to consider.
- PE-2 (at v1.4): Do not post suggestions.
-
If the product doesn't work at all: If the product fails catastrophically e.g., cannot even launch, contact the lecturer immediately to obtain a new product to test.
-
[~45 minutes] Evaluate the following aspects. Note down your evaluation in a hard copy (as a backup). Submit via TEAMMATES.
-
A. Cohesiveness of product features []: Do the features fit together and match the stated target user and the value proposition?
unable to judge: You are unable to judge this aspect for some reason.low: One of these- target user is too general i.e. wider than AB4
- target user and/or value proposition is not clear from the user guide
- features don't seem to fit together for the most part
medium: Some features fit together but some don't.high: All features fit together but the features are not very high value to the target user.excellent: The target user is clearly defined (not too general) and almost all new features are of high-value to the target user. i.e. the product is very attractive to the target user.
-
B. Quality of user docs []: Evaluate based on the parts of the user guide written by the person, as reproduced in the project portfolio. Evaluate from an end-user perspective.
unable to judge: Less than 1 page worth of UG content written by the student.low: Hard to understand, often inaccurate or missing important information.medium: Needs some effort to understand; some information is missing.high: Mostly easy to follow. Only a few areas need improvements.excellent: Easy to follow and accurate. Just enough information, visuals, examples etc. (not too much either).
-
C. Quality of developer docs []: Evaluate based on the developer docs cited/reproduced in the respective project portfolio page. Evaluate from the perspective of a new developer trying to understand how the features are implemented.
unable to judge: One of these- no content at all.
- less than 0.5 pages worth of content.
- other problems in the document e.g. looks like included wrong content.
low: One of these- Very small amount of content (i.e., 0.5 - 1 page).
- Hardly any use to the reader (i.e., content doesn't make much sense or redundant).
- Uses ad-hoc diagrams where UML diagrams could have been used instead.
- Multiple notation errors in UML diagrams.
medium: Some diagrams, some descriptions, but does not help the reader that much e.g. overly complicated diagrams.high: Enough diagrams (at lest two kinds of UML diagrams used) and enough descriptions (about 2 pages worth) but explanations are not always easy to follow.excellent: Easy to follow. Just enough information (not too much). Minimum repetition of content/diagrams. Good use of diagrams to complement text descriptions. Easy to understand diagrams with just enough details rather than very complicated diagrams that are hard to understand.
-
D. Depth of feature []: Evaluate the feature done by the student for difficulty, depth, and completeness. Note: examples given below assumes AB4 did not have the commands
edit,undo, andredo.unable to judge: You are unable to judge this aspect for some reason.low: An easy feature e.g. make the existing find command case insensitive.medium: Moderately difficult feature, barely acceptable implementation e.g. an edit command that requires the user to type all fields, even the ones that are not being edited.high: One of the below- A moderately difficult feature but fully implemented e.g. an edit command that allows editing any field.
- A difficult feature with a reasonable implementation but some aspects are not covered undo/redo command that only allows a single undo/redo.
excellent: A difficult feature, all reasonable aspects are fully implemented undo/redo command that allows multiple undo/redo.
-
E. Amount of work []: Evaluate the amount of work, on a scale of 0 to 30.
- Consider this PR (
historycommand) as 5 units of effort which means this PR (undo/redocommand) is about 15 points of effort. Given that 30 points matches an effort twice as that needed for theundo/redofeature (which was given as an example of anAgrade project), we expect most students to be have efforts lower than 20. - Consider the main feature only. Exclude GUI inputs, but consider GUI outputs of the feature. Count all implementation/testing/documentation work as mentioned in that person's portfolio page. Also look at the actual code written by the person. We understand that it is not possible to know exactly which part of the code is for the main feature; make a best guess judgement call based on the available info.
- Do not give a high value just to be nice. If your estimate is wildly inaccurate, it means you are unable to estimate the effort required to implement a feature in a project that you are supposed to know well at this point. You will lose marks if that is the case.
- Consider this PR (
-
Bug Review Period:
There will be a review period for you to respond to the bug reports you received.
Duration: The review period will start around 1 day after the PE (exact time to be announced) and will last until the following Tuesday midnight.
Bug reviewing is recommended to be done as a team as some of the decisions need team consensus.
Instructions for Reviewing Bug Reports
-
First, don't freak out if there are lot of bug reports. Many can be duplicates and some can be false positives. In any case, we anticipate that all of these products will have some bugs and our penalty for bugs is not harsh. Furthermore, it depends on the severity of the bug. Some bug may not even be penalized.
-
Do not edit the subject or the description. Do not close bug reports. Your response (if any) should be added as a comment.
-
If the bug is reported multiple times, mark all copies EXCEPT one as duplicates using the
duplicatetag (if the duplicates have different severity levels, you should keep the one with the highest severity). In addition, use this technique to indicate which issue they are duplicates of. Duplicates can be omitted from processing steps given below. -
If a bug seems to be for a different product (i.e. wrongly assigned to your team), let us know (email prof).
-
Decide if it is a real bug and apply ONLY one of these labels.
Response Labels:
response.Accepted: You accept it as a bug.response.Rejected: What tester thought as a bug is in fact expected behavior. ❗️ The penalty for rejecting a bug using an unjustifiable explanation is higher than the penalty if the same bug was accepted. You can also reject bugs that you inherited from AB4.response.CannotReproduce: You are unable to reproduce the behavior reported in the bug after multiple tries.response.IssueUnclear: The issue description is not clear.
- If applicable, decide the type of bug. Bugs without
type-are consideredtype-FunctionalityBugby default (which are liable to a heavier penalty):
Bug Type Labels:
type-FunctionalityBug: the bug is a flaw in how the product works.type-DocumentationBug: the bug is in the documentation.
- If you disagree with the original severity assigned to the bug, you may change it to the correct level, in which case add a comment justifying the change. All such changes will be double-checked by the teaching team and unreasonable lowering of severity will be penalized extra.:
Bug Severity labels:
severity.Low: A flaw that is unlikely to affect normal operations of the product. Appears only in very rare situations and causes a minor inconvenience only.severity.Medium: A flaw that causes occasional inconvenience to some users but they can continue to use the product.severity.High: A flaw that affects most users and causes major problems for users. i.e., makes the product almost unusable for most users.
-
Decide who should fix the bug. Use the
Assigneesfield to assign the issue to that person(s). There is no need to actually fix the bug though. It's simply an indication/acceptance of responsibility. If there is no assignee, we will distribute the penalty for that bug (if any) among all team members. -
Add an explanatory comment explaining your choice of labels and assignees.
Grading: Taking part in the PE-1 is strongly encouraged as it can affect your grade in the following ways.
- We will consider your performance in both PE-1 as well as PE-2 when grading.
- You will be graded based on your effectiveness as a tester (e.g., the percentage of the bugs you found, the nature of the bugs you found) and how far off your evaluation/estimates are from the evaluator consensus. Explanation: we understand that you have limited expertise in this area; hence, we penalize only if your inputs don't seem to be based on a sincere effort to test/evaluate.
- There is no penalty for bugs reported in your product. Every bug you find is a win-win for you and the team whose product you are testing.
Objectives:
- To train you to do manual testing, bug reporting, bug
triaging, bug fixing, communicating with users/testers/developers, evaluating products etc. - To help you improve your product before the final submission.
Preparation:
-
Ensure that you can access the relevant issue tracker given below:
-- for PE-1: nusCS2113-AY1819S1/pe-1
-- for PE-2: nusCS2113-AY1819S1/pe-2- These are private repos!. If you cannot access the relevant repo, you may not have accepted the invitation to join the GitHub org used by the module. Go to https://github.com/orgs/nusCS2113-AY1819S1/invitation to accept the invitation.
- If you cannot find the invitation, post in our forum.
-
Ensure you have access to a computer that is able to run module projects e.g. has the right Java version.
-
Have a good screen grab tool with annotation features so that you can quickly take a screenshot of a bug, annotate it, and post in the issue tracker.
- 💡 You can use Ctrl+V to paste a picture from the clipboard into a text box in GitHub issue tracker.
-
Charge your computer before coming to the PE session. The testing venue may not have enough charging points.
During the session:
- Take note of your team to test. Distributed via IVLE gradebook.
- Download the latest jar file from the team's GitHub page. Copy it to an empty folder.
Testing instructions for PE-1 and PE-2
-
What to test:
- PE-1 (at v1.3):
- Test the product based on the User Guide (the UG is most likely accessible using the
helpcommand). - Do system testing first i.e., does the product work as specified by the documentation?. If there is time left, you can do acceptance testing as well i.e., does the product solve the problem it claims to solve?.
- Test the product based on the User Guide (the UG is most likely accessible using the
- PE-2 (at v1.4):
- Test the product based on the Developer Guide (Appendix named Instructions for Manual Testing) and the User Guide. The testing instructions in the Developer Guide can provide you some guidance but if you follow those instructions strictly, you are unlikely to find many bugs. You can deviate from the instructions to probe areas that are more likely to have bugs.
- Do system testing only i.e., verify actual behavior against documented behavior. Do not do acceptance testing.
- PE-1 (at v1.3):
-
What not to test:
- Omit features that are driven by GUI inputs (e.g. buttons, menus, etc.) Reason: Only CLI-driven features can earn credit, as per given project constraints. Some features might have both a GUI-driven and CLI-driven ways to invoke them, in which case test only the CLI-driven way of invoking it.
- Omit feature that existed in AB-4.
-
These are considered bugs:
- Behavior differs from the User Guide
- A legitimate user behavior is not handled e.g. incorrect commands, extra parameters
- Behavior is not specified and differs from normal expectations e.g. error message does not match the error
- Problems in the User Guide e.g., missing/incorrect info
-
Where to report bugs: Post bug in the following issue trackers (not in the team's repo):
- PE-1 (at v1.3): nusCS2113-AY1819S1/pe-1.
- PE-2 (at v1.4): nusCS2113-AY1819S1/pe-2.
-
Bug report format:
- Post bugs as you find them (i.e., do not wait to post all bugs at the end) because the issue tracker will close exactly at the end of the allocated time.
- Do not use team ID in bug reports. Reason: to prevent others copying your bug reports
- Each bug should be a separate issue.
- Write good quality bug reports; poor quality or incorrect bug reports will not earn credit.
- Use a descriptive title.
- Give a good description of the bug with steps to reproduce and screenshots.
- Use the template(s) in the issue tracker as much as possible.
- Assign a severity to the bug report. Bug report without a priority label are considered
severity.Low(lower severity bugs earn lower credit):
Bug Severity labels:
severity.Low: A flaw that is unlikely to affect normal operations of the product. Appears only in very rare situations and causes a minor inconvenience only.severity.Medium: A flaw that causes occasional inconvenience to some users but they can continue to use the product.severity.High: A flaw that affects most users and causes major problems for users. i.e., makes the product almost unusable for most users.
-
About posting suggestions:
- PE-1 (at v1.3): You can also post suggestions on how to improve the product. 💡 Be diplomatic when reporting bugs or suggesting improvements. For example, instead of criticising the current behavior, simply suggest alternatives to consider.
- PE-2 (at v1.4): Do not post suggestions.
-
If the product doesn't work at all: If the product fails catastrophically e.g., cannot even launch, contact the lecturer immediately to obtain a new product to test.
At the end of the project each student is required to submit a Project Portfolio Page.
-
Objective:
- For you to use (e.g. in your resume) as a well-documented data point of your SE experience
- For us to use as a data point to evaluate your,
- contributions to the project
- your documentation skills
-
Sections to include:
-
Overview: A short overview of your product to provide some context to the reader.
-
Summary of Contributions:
- Code contributed: Give a link to your code on Project Code Dashboard, which should be
https://nuscs2113-ay1819s1.github.io/dashboard/#=undefined&search=githbub_username_in_lower_case(replacegithbub_username_in_lower_casewith your actual username in lower case e.g.,johndoe). This link is also available in the Project List Page -- linked to the icon under your photo. - Main feature implemented: A summary of the main feature you implemented
- Other contributions:
- Contributions to project management e.g., setting up project tools, managing releases, managing issue tracker etc.
- Evidence of helping others e.g. responses you posted in our forum, bugs you reported in other team's products,
- Evidence of technical leadership e.g. sharing useful information in the forum
- [Optional] Other minor enhancements: If you have other enhancements that you implemented, which are not related to your main feature, you can include it here. If you have written a significant amount of code that can be advertised as a feature by itself, but does not belong to your main feature, you can choose to include it as a part of the optional enhancements.
- Code contributed: Give a link to your code on Project Code Dashboard, which should be
-
Contributions to the User Guide: Reproduce the parts in the User Guide that you wrote. This can include features you implemented as well as features you propose to implement.
The purpose of allowing you to include proposed features is to provide you more flexibility to show your documentation skills. e.g. you can bring in a proposed feature just to give you an opportunity to use a UML diagram type not used by the actual features. -
Contributions to the Developer Guide: Reproduce the parts in the Developer Guide that you wrote. Ensure there is enough content to evaluate your technical documentation skills and UML modelling skills. You can include descriptions of your design/implementations, possible alternatives, pros and cons of alternatives, etc.
-
If you plan to use the PPP in your Resume, you can also include your SE work outside of the module (will not be graded)
-
-
Format:
-
File name:
docs/team/githbub_username_in_lower_case.adoce.g.,docs/team/johndoe.adoc -
Follow the example in the AddressBook-Level4, but ignore the following two lines in it.
- Minor enhancement: added a history command that allows the user to navigate to previous commands using up/down keys.
- Code contributed: [Functional code] [Test code] {give links to collated code files}
-
💡 You can use the Asciidoc's
includefeature to include sections from the developer guide or the user guide in your PPP. Follow the example in the sample. -
It is assumed that all contents in the PPP were written primarily by you. If any section is written by someone else e.g. someone else wrote described the feature in the User Guide but you implemented the feature, clearly state that the section was written by someone else (e.g.
Start of Extract [from: User Guide] written by Jane Doe). Reason: Your writing skills will be evaluated based on the PPP -
Page limit: If you have more content than the limit given below, shorten (or omit some content) so that you do not exceed the page limit. Having too much content in the PPP will be viewed unfavorably during grading. Note: the page limits given below are after converting to PDF format. The actual amount of content you require is actually less than what these numbers suggest because the HTML → PDF conversion adds a lot of spacing around content.
Content Limit Overview + Summary of contributions 0.5-1 Contributions to the User Guide 1-3 Contributions to the Developer Guide 3-6 Total 5-10
-
After the session:
- We'll transfer the relevant bug reports to your repo over the weekend. Once you have received the bug reports for your product, it is up to you to decide whether you will act on reported issues before the final submission v1.4. For some issues, the correct decision could be to reject or postpone to a version beyond v1.4.
- You can post in the issue thread to communicate with the tester e.g. to ask for more info, etc. However, the tester is not obliged to respond.
- 💡 Do not argue with the issue reporter to try to convince that person that your way is correct/better. If at all, you can gently explain the rationale for the current behavior but do not waste time getting involved in long arguments. If you think the suggestion/bug is unreasonable, just thank the reporter for their view and close the issue.
Deliverable: Practical Exam (Round 2)
Objectives:
- Evaluate your,
- manual testing skills
- product evaluation skills
- effort estimation skills
- Peer-evaluate your
- product design
- implementation effort
- documentation quality
When, where: Week 13 lecture
Grading:
- Your performance in the practical exams will be considered for your final grade (under the QA category and under Implementation category, about 10 marks in total).
- You will be graded based on your effectiveness as a tester (e.g., the percentage of the bugs you found, the nature of the bugs you found) and how far off your evaluation/estimates are from the evaluator consensus. Explanation: we understand that you have limited expertise in this area; hence, we penalize only if your inputs don't seem to be based on a sincere effort to test/evaluate.
- The bugs found in your product by others will affect your v1.4 marks. You will be given a chance to reject false-positive bug reports.
Preparation:
-
Ensure that you can access the relevant issue tracker given below:
-- for PE-1: nusCS2113-AY1819S1/pe-1
-- for PE-2: nusCS2113-AY1819S1/pe-2- These are private repos!. If you cannot access the relevant repo, you may not have accepted the invitation to join the GitHub org used by the module. Go to https://github.com/orgs/nusCS2113-AY1819S1/invitation to accept the invitation.
- If you cannot find the invitation, post in our forum.
-
Ensure you have access to a computer that is able to run module projects e.g. has the right Java version.
-
Have a good screen grab tool with annotation features so that you can quickly take a screenshot of a bug, annotate it, and post in the issue tracker.
- 💡 You can use Ctrl+V to paste a picture from the clipboard into a text box in GitHub issue tracker.
-
Charge your computer before coming to the PE session. The testing venue may not have enough charging points.
During:
- Take note of your team to test. It will be given to you by the teaching team (distributed via IVLE gradebook).
- Download from IVLE all files submitted by the team (i.e. jar file, User Guide, Developer Guide, and Project Portfolio Pages) into an empty folder.
- [~45 minutes] Test the product and report bugs as described below:
Testing instructions for PE-1 and PE-2
-
What to test:
- PE-1 (at v1.3):
- Test the product based on the User Guide (the UG is most likely accessible using the
helpcommand). - Do system testing first i.e., does the product work as specified by the documentation?. If there is time left, you can do acceptance testing as well i.e., does the product solve the problem it claims to solve?.
- Test the product based on the User Guide (the UG is most likely accessible using the
- PE-2 (at v1.4):
- Test the product based on the Developer Guide (Appendix named Instructions for Manual Testing) and the User Guide. The testing instructions in the Developer Guide can provide you some guidance but if you follow those instructions strictly, you are unlikely to find many bugs. You can deviate from the instructions to probe areas that are more likely to have bugs.
- Do system testing only i.e., verify actual behavior against documented behavior. Do not do acceptance testing.
- PE-1 (at v1.3):
-
What not to test:
- Omit features that are driven by GUI inputs (e.g. buttons, menus, etc.) Reason: Only CLI-driven features can earn credit, as per given project constraints. Some features might have both a GUI-driven and CLI-driven ways to invoke them, in which case test only the CLI-driven way of invoking it.
- Omit feature that existed in AB-4.
-
These are considered bugs:
- Behavior differs from the User Guide
- A legitimate user behavior is not handled e.g. incorrect commands, extra parameters
- Behavior is not specified and differs from normal expectations e.g. error message does not match the error
- Problems in the User Guide e.g., missing/incorrect info
-
Where to report bugs: Post bug in the following issue trackers (not in the team's repo):
- PE-1 (at v1.3): nusCS2113-AY1819S1/pe-1.
- PE-2 (at v1.4): nusCS2113-AY1819S1/pe-2.
-
Bug report format:
- Post bugs as you find them (i.e., do not wait to post all bugs at the end) because the issue tracker will close exactly at the end of the allocated time.
- Do not use team ID in bug reports. Reason: to prevent others copying your bug reports
- Each bug should be a separate issue.
- Write good quality bug reports; poor quality or incorrect bug reports will not earn credit.
- Use a descriptive title.
- Give a good description of the bug with steps to reproduce and screenshots.
- Use the template(s) in the issue tracker as much as possible.
- Assign a severity to the bug report. Bug report without a priority label are considered
severity.Low(lower severity bugs earn lower credit):
Bug Severity labels:
severity.Low: A flaw that is unlikely to affect normal operations of the product. Appears only in very rare situations and causes a minor inconvenience only.severity.Medium: A flaw that causes occasional inconvenience to some users but they can continue to use the product.severity.High: A flaw that affects most users and causes major problems for users. i.e., makes the product almost unusable for most users.
-
About posting suggestions:
- PE-1 (at v1.3): You can also post suggestions on how to improve the product. 💡 Be diplomatic when reporting bugs or suggesting improvements. For example, instead of criticising the current behavior, simply suggest alternatives to consider.
- PE-2 (at v1.4): Do not post suggestions.
-
If the product doesn't work at all: If the product fails catastrophically e.g., cannot even launch, contact the lecturer immediately to obtain a new product to test.
-
[~45 minutes] Evaluate the following aspects. Note down your evaluation in a hard copy (as a backup). Submit via TEAMMATES.
-
A. Cohesiveness of product features []: Do the features fit together and match the stated target user and the value proposition?
unable to judge: You are unable to judge this aspect for some reason.low: One of these- target user is too general i.e. wider than AB4
- target user and/or value proposition is not clear from the user guide
- features don't seem to fit together for the most part
medium: Some features fit together but some don't.high: All features fit together but the features are not very high value to the target user.excellent: The target user is clearly defined (not too general) and almost all new features are of high-value to the target user. i.e. the product is very attractive to the target user.
-
B. Quality of user docs []: Evaluate based on the parts of the user guide written by the person, as reproduced in the project portfolio. Evaluate from an end-user perspective.
unable to judge: Less than 1 page worth of UG content written by the student.low: Hard to understand, often inaccurate or missing important information.medium: Needs some effort to understand; some information is missing.high: Mostly easy to follow. Only a few areas need improvements.excellent: Easy to follow and accurate. Just enough information, visuals, examples etc. (not too much either).
-
C. Quality of developer docs []: Evaluate based on the developer docs cited/reproduced in the respective project portfolio page. Evaluate from the perspective of a new developer trying to understand how the features are implemented.
unable to judge: One of these- no content at all.
- less than 0.5 pages worth of content.
- other problems in the document e.g. looks like included wrong content.
low: One of these- Very small amount of content (i.e., 0.5 - 1 page).
- Hardly any use to the reader (i.e., content doesn't make much sense or redundant).
- Uses ad-hoc diagrams where UML diagrams could have been used instead.
- Multiple notation errors in UML diagrams.
medium: Some diagrams, some descriptions, but does not help the reader that much e.g. overly complicated diagrams.high: Enough diagrams (at lest two kinds of UML diagrams used) and enough descriptions (about 2 pages worth) but explanations are not always easy to follow.excellent: Easy to follow. Just enough information (not too much). Minimum repetition of content/diagrams. Good use of diagrams to complement text descriptions. Easy to understand diagrams with just enough details rather than very complicated diagrams that are hard to understand.
-
D. Depth of feature []: Evaluate the feature done by the student for difficulty, depth, and completeness. Note: examples given below assumes AB4 did not have the commands
edit,undo, andredo.unable to judge: You are unable to judge this aspect for some reason.low: An easy feature e.g. make the existing find command case insensitive.medium: Moderately difficult feature, barely acceptable implementation e.g. an edit command that requires the user to type all fields, even the ones that are not being edited.high: One of the below- A moderately difficult feature but fully implemented e.g. an edit command that allows editing any field.
- A difficult feature with a reasonable implementation but some aspects are not covered undo/redo command that only allows a single undo/redo.
excellent: A difficult feature, all reasonable aspects are fully implemented undo/redo command that allows multiple undo/redo.
-
E. Amount of work []: Evaluate the amount of work, on a scale of 0 to 30.
- Consider this PR (
historycommand) as 5 units of effort which means this PR (undo/redocommand) is about 15 points of effort. Given that 30 points matches an effort twice as that needed for theundo/redofeature (which was given as an example of anAgrade project), we expect most students to be have efforts lower than 20. - Consider the main feature only. Exclude GUI inputs, but consider GUI outputs of the feature. Count all implementation/testing/documentation work as mentioned in that person's portfolio page. Also look at the actual code written by the person. We understand that it is not possible to know exactly which part of the code is for the main feature; make a best guess judgement call based on the available info.
- Do not give a high value just to be nice. If your estimate is wildly inaccurate, it means you are unable to estimate the effort required to implement a feature in a project that you are supposed to know well at this point. You will lose marks if that is the case.
- Consider this PR (
-
Bug Review Period:
There will be a review period for you to respond to the bug reports you received.
Duration: The review period will start around 1 day after the PE (exact time to be announced) and will last until the following Tuesday midnight.
Bug reviewing is recommended to be done as a team as some of the decisions need team consensus.
Instructions for Reviewing Bug Reports
-
First, don't freak out if there are lot of bug reports. Many can be duplicates and some can be false positives. In any case, we anticipate that all of these products will have some bugs and our penalty for bugs is not harsh. Furthermore, it depends on the severity of the bug. Some bug may not even be penalized.
-
Do not edit the subject or the description. Do not close bug reports. Your response (if any) should be added as a comment.
-
If the bug is reported multiple times, mark all copies EXCEPT one as duplicates using the
duplicatetag (if the duplicates have different severity levels, you should keep the one with the highest severity). In addition, use this technique to indicate which issue they are duplicates of. Duplicates can be omitted from processing steps given below. -
If a bug seems to be for a different product (i.e. wrongly assigned to your team), let us know (email prof).
-
Decide if it is a real bug and apply ONLY one of these labels.
Response Labels:
response.Accepted: You accept it as a bug.response.Rejected: What tester thought as a bug is in fact expected behavior. ❗️ The penalty for rejecting a bug using an unjustifiable explanation is higher than the penalty if the same bug was accepted. You can also reject bugs that you inherited from AB4.response.CannotReproduce: You are unable to reproduce the behavior reported in the bug after multiple tries.response.IssueUnclear: The issue description is not clear.
- If applicable, decide the type of bug. Bugs without
type-are consideredtype-FunctionalityBugby default (which are liable to a heavier penalty):
Bug Type Labels:
type-FunctionalityBug: the bug is a flaw in how the product works.type-DocumentationBug: the bug is in the documentation.
- If you disagree with the original severity assigned to the bug, you may change it to the correct level, in which case add a comment justifying the change. All such changes will be double-checked by the teaching team and unreasonable lowering of severity will be penalized extra.:
Bug Severity labels:
severity.Low: A flaw that is unlikely to affect normal operations of the product. Appears only in very rare situations and causes a minor inconvenience only.severity.Medium: A flaw that causes occasional inconvenience to some users but they can continue to use the product.severity.High: A flaw that affects most users and causes major problems for users. i.e., makes the product almost unusable for most users.
-
Decide who should fix the bug. Use the
Assigneesfield to assign the issue to that person(s). There is no need to actually fix the bug though. It's simply an indication/acceptance of responsibility. If there is no assignee, we will distribute the penalty for that bug (if any) among all team members. -
Add an explanatory comment explaining your choice of labels and assignees.
Notes for Those Using AB-2 or AB-3 for the Project
There is no explicit penalty for switching to a lower level AB. All projects are evaluated based on the same yardstick irrespective of on which AB it is based. As an AB is given to you as a 'free' head-start, a lower level AB gives you a shorter head-start, which means your final product is likely to be less functional than those from teams using AB-4 unless you progress faster than them. Nevertheless, you should switch to AB2/3 if you feel you can learn more from the project that way, as our goal is to maximize learning, not features.
If your team wants to stay with AB-4 but you want to switch to a lower level AB, let the us know so that we can work something out for you.
If you have opted to use AB-2 or AB-3 instead of AB-4 as the basis of your product, please note the following points:
- Set up auto-publishing of documentation similar to AB-4
- Add Project Portfolio Pages (PPP) for members, similar to the example provided in AB-4
- You can convert UG, DG, and PPP into pdf files using instructions provided in AB-4 DG
- Create an About Us page similar to AB-4 and update it as described in
mid-v1.1 progress guide
Overview: Set up project repo, start moving UG and DG to the repo, attempt to do local-impact changes to the code base.
Project Management:
- One team member:
Set up the team org andteam repo for your team if you haven't done that already.- Set up auto-publishing of docs
Organization setup
The instructions below are for setting up a GitHub organization for your team.
You can create your GitHub account after receiving your team ID. Here are the instructions (please follow the organization/repo name format closely because we use scripts to download your code. If the names are not as expected, our scripts will not work):
- One team member (e.g. team leader) should create an organization with the following details:
- Organization name :
CS2113-AY1819S1-TEAM_ID. e.g.CS2113-AY1819S1-W12-1 - Plan: Open Source ($0/month)
- After that, the same person can add members to the organization:
- Create a team called
developersto your organization. - Add your team members to the developers team.
Repo setup
Only one team member:
- Fork either Address Book Level 3 or Address Book Level 4 to your team org.
- Rename the forked repo as
main. This repo is to be used as the repo for your project. - Ensure your team members have the desired level of access to your team repo
All team members:
- Fork the
mainrepo (created above) to your personal GitHub account. - Clone the fork to your Computer.
- Set it up as an Intellij project (follow the instructions in the Developer Guide carefully).
Note that some of our download scripts depend on the following folder paths. Please do not alter those paths in your project.
/src/main/src/test/docs
- Note: If you fork from Address Book Level 3, ensure that the folder structure is similar to the one in Address Book Level 4
- All members: Set up your own forks of the team repo, so that you can submit PRs to your team repo using the forking workflow.
Setting Git Username to Match GitHub Username
We use various tools to analyze your code. For us to be able to identify your commits, you should use the GitHub username as your Git username as well. If there is a mismatch, or if you use multiple user names for Git, our tools might miss some of your work and as a result you might not get credit for some of your work.
In each Computer you use for coding, after installing Git, you should set the Git username as follows.
- Open a command window that can run Git commands (e.g., Git bash window)
- Run the command
git config --global user.name YOUR_GITHUB_USERNAME
e.g.,git config --global user.name JohnDoe
More info about setting Git username is here.
Documentation:
Recommended procedure for updating docs:
- Divide among yourselves who will update which parts of the document(s).
- Update the team repo by following the
forking workflow . - One member: create a PR from your team repo
masterbranch to [addressbook-level4] (or [addressbook-level3])masterbranch. PR name:[Team ID] Product Namee.g.,[W12-2] Contact List Pro. In the PR descriptionmention the other team members so that they get notified when the tutor adds comments to the PR.
Project Management → Revision Control →
Forking Flow
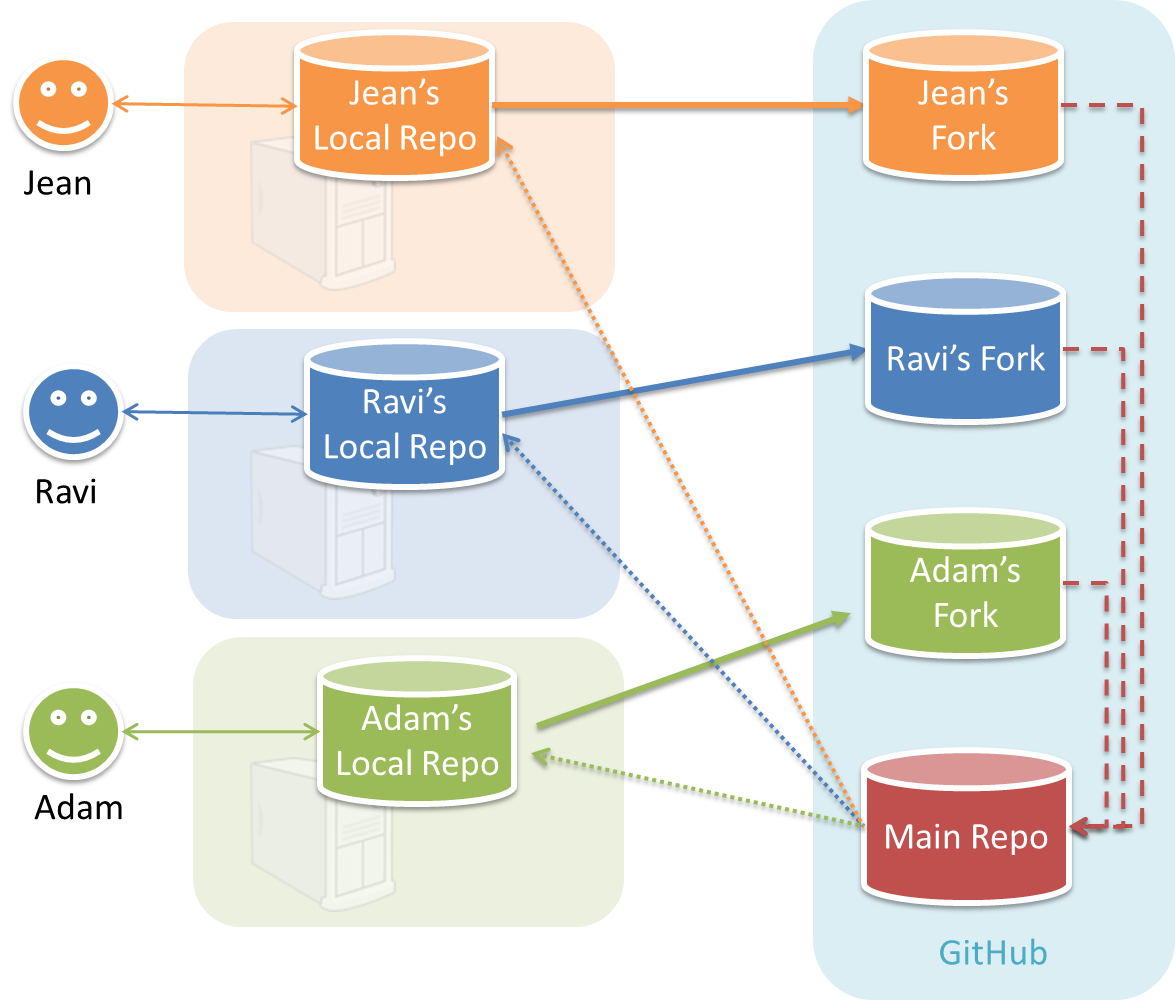
In the forking workflow, the 'official' version of the software is kept in a remote repo designated as the 'main repo'. All team members fork the main repo create pull requests from their fork to the main repo.
To illustrate how the workflow goes, let’s assume Jean wants to fix a bug in the code. Here are the steps:
- Jean creates a separate branch in her local repo and fixes the bug in that branch.
- Jean pushes the branch to her fork.
- Jean creates a pull request from that branch in her fork to the main repo.
- Other members review Jean’s pull request.
- If reviewers suggested any changes, Jean updates the PR accordingly.
- When reviewers are satisfied with the PR, one of the members (usually the team lead or a designated 'maintainer' of the main repo) merges the PR, which brings Jean’s code to the main repo.
- Other members, realizing there is new code in the upstream repo, sync their forks with the new upstream repo (i.e. the main repo). This is done by pulling the new code to their own local repo and pushing the updated code to their own fork.
- A detailed explanation of the Forking Workflow - From Atlassian
Update the following pages in your project repo:
- About Us page:
This page is used for module admin purposes. Please follow the format closely to avoid penalties.- Replace info of SE-EDU developers with info of your team, including a suitable photo as described
here . - Including the name/photo of the supervisor/lecturer is optional.
- The photo of a team member should be
doc/images/githbub_username_in_lower_case.pnge.g.docs/images/akshay.png.
- Replace info of SE-EDU developers with info of your team, including a suitable photo as described
-
The purpose of the profile photo is for the teaching team to identify you. Therefore, you should choose a recent individual photo showing your face clearly -- somewhat similar to a passport photo. Some examples can be seen in the 'Teaching team' page. Given below are some examples of good and bad profile photos.
-
If you are uncomfortable posting your photo due to security reasons, you can post a lower resolution image so that it is hard for someone to misuse that image for fraudulent purposes. If you are concerned about privacy, you can request permission to omit your photo from the page by writing to prof.
- Indicate the different roles played and responsibilities held by each team member. You can reassign these
roles and responsibilities (as explained in Admin Project Scope) later in the project, if necessary.
Roles indicate aspects you are in charge of and responsible for. E.g., if you are in charge of documentation, you are the person who should allocate which parts of the documentation is to be done by who, ensure the document is in right format, ensure consistency etc.
This is a non-exhaustive list; you may define additional roles.
- Team lead: Responsible for overall project coordination.
- Documentation (short for ‘in charge of documentation’): Responsible for the quality of various project documents.
- Testing: Ensures the testing of the project is done properly and on time.
- Code quality: Looks after code quality, ensures adherence to coding standards, etc.
- Deliverables and deadlines: Ensure project deliverables are done on time and in the right format.
- Integration: In charge of versioning of the code, maintaining the code repository, integrating various parts of the software to create a whole.
- Scheduling and tracking: In charge of defining, assigning, and tracking project tasks.
- [Tool ABC] expert: e.g. Intellij expert, Git expert, etc. Helps other team member with matters related to the specific tool.
- In charge of[Component XYZ]: e.g. In charge of
Model,UI,Storage, etc. If you are in charge of a component, you are expected to know that component well, and review changes done to that component in v1.3-v1.4.
Please make sure each of the important roles are assigned to one person in the team. It is OK to have a 'backup' for each role, but for each aspect there should be one person who is unequivocally the person responsible for it.
-
README.adoc page: Update it to match your project.
- Add a UI mockup of your intended final product.
Note that the image of the UI should bedocs/images/Ui.pngso that it can be downloaded by our scripts. - The original
README.adocfile (which doubles as the landing page of your project website) is written to read like the introduction to an SE learning/teaching resource. You should restructure this page to look like the home page of a real product (not a school project) targeting real users e.g. remove references to addressbook-level3, Learning Outcomes etc. mention target users, add a marketing blurb etc. On a related note, also removeLearning Outcomeslink and related pages. - Acknowledge the original source of the code i.e. AddressBook-Level4 project created by SE-EDU initiative at
https://github.com/se-edu/
- Add a UI mockup of your intended final product.
-
User Guide: Start moving the content from your User Guide (draft created in previous weeks) into the User Guide page in your repository.
-
Developer Guide: Similar to the User Guide, start moving the content from your Developer Guide (draft created in previous weeks) into the Developer Guide page in your team repository.
Product:
-
Each member can attempt to do a
local-impact change to the code base.Objective: To familiarize yourself with at least one component the code.
Description: Divide the
components among yourselves. Each member can do some small enhancements to their component(s) to learn the code of that component. Some suggested enhancements are given in the AddressBook-Level4 developer guide.Submission: Create PRs from your own fork to your team repo. Get it merged by following your team's workflow.
Before you start coding, please read
our reuse policy (in Admin: Appendix B) , in particular, how to give credit when you reuse code from Internet or classmates.
Policy on reuse
Reuse is encouraged. However, note that reuse has its own costs (such as the learning curve, additional complexity, usage restrictions, and unknown bugs). Furthermore, you will not be given credit for work done by others. Rather, you will be given credit for using work done by others.
- You are allowed to reuse work from your classmates, subject to following conditions:
- The work has been published by us or the authors.
- You clearly give credit to the original author(s).
- You are allowed to reuse work from external sources, subject to following conditions:
- The work comes from a source of 'good standing' (such as an established open source project). This means you cannot reuse code written by an outside 'friend'.
- You clearly give credit to the original author. Acknowledge use of third party resources clearly e.g. in the welcome message, splash screen (if any) or under the 'about' menu. If you are open about reuse, you are less likely to get into trouble if you unintentionally reused something copyrighted.
- You do not violate the license under which the work has been released. Please do not use 3rd-party images/audio in your software unless they have been specifically released to be used freely. Just because you found it in the Internet does not mean it is free for reuse.
- Always get permission from us before you reuse third-party libraries. Please post your 'request to use 3rd party library' in our GitHub forum. That way, the whole class get to see what libraries are being used by others.
Giving credit for reused work
Given below are how to give credit for things you reuse from elsewhere. These requirements are specific to this module i.e., not applicable outside the module (outside the module you should follow the rules specified by your employer and the license of the reused work)
If you used a third party library:
- Mention in the
README.adoc(under the Acknowledgements section) - mention in the
Project Portfolio Page if the library has a significant relevance to the features you implemented
If you reused code snippets found on the Internet e.g. from StackOverflow answers or
referred code in another software or
referred project code by current/past student:
- If you read the code to understand the approach and implemented it yourself, mention it as a comment
Example://Solution below adapted from https://stackoverflow.com/a/16252290 {Your implmentation of the reused solution here ...} - If you copy-pasted a non-trivial code block (possibly with minor modifications renaming, layout changes, changes to comments, etc.), also mark the code block as reused code (using
@@authortags
Format://@@author {yourGithubUsername}-reused //{Info about the source...} {Reused code (possibly with minor modifications) here ...} //@@authorpersons = getList() //@@author johndoe-reused //Reused from https://stackoverflow.com/a/34646172 with minor modifications Collections.sort(persons, new Comparator<CustomData>() { @Override public int compare(CustomData lhs, CustomData rhs) { return lhs.customInt > rhs.customInt ? -1 : (lhs.customInt < rhs.customInt) ? 1 : 0; } }); //@@author return persons;
Adding @@author tags indicate authorship
-
Mark your code with a
//@@author {yourGithubUsername}. Note the double@.
The//@@authortag should indicates the beginning of the code you wrote. The code up to the next//@@authortag or the end of the file (whichever comes first) will be considered as was written by that author. Here is a sample code file://@@author johndoe method 1 ... method 2 ... //@@author sarahkhoo method 3 ... //@@author johndoe method 4 ... -
If you don't know who wrote the code segment below yours, you may put an empty
//@@author(i.e. no GitHub username) to indicate the end of the code segment you wrote. The author of code below yours can add the GitHub username to the empty tag later. Here is a sample code with an emptyauthortag:method 0 ... //@@author johndoe method 1 ... method 2 ... //@@author method 3 ... method 4 ... -
The author tag syntax varies based on file type e.g. for java, css, fxml. Use the corresponding comment syntax for non-Java files.
Here is an example code from an xml/fxml file.<!-- @@author sereneWong --> <textbox> <label>...</label> <input>...</input> </textbox> ... -
Do not put the
//@@authorinside java header comments.
👎/** * Returns true if ... * @@author johndoe */👍
//@@author johndoe
/**
  * Returns true if ...
  */
What to and what not to annotate
-
Annotate both functional and test code There is no need to annotate documentation files.
-
Annotate only significant size code blocks that can be reviewed on its own e.g., a class, a sequence of methods, a method.
Claiming credit for code blocks smaller than a method is discouraged but allowed. If you do, do it sparingly and only claim meaningful blocks of code such as a block of statements, a loop, or an if-else statement.- If an enhancement required you to do tiny changes in many places, there is no need to annotate all those tiny changes; you can describe those changes in the Project Portfolio page instead.
- If a code block was touched by more than one person, either let the person who wrote most of it (e.g. more than 80%) take credit for the entire block, or leave it as 'unclaimed' (i.e., no author tags).
- Related to the above point, if you claim a code block as your own, more than 80% of the code in that block should have been written by yourself. For example, no more than 20% of it can be code you reused from somewhere.
- 💡 GitHub has a blame feature and a history feature that can help you determine who wrote a piece of code.
-
Do not try to boost the quantity of your contribution using unethical means such as duplicating the same code in multiple places. In particular, do not copy-paste test cases to create redundant tests. Even repetitive code blocks within test methods should be extracted out as utility methods to reduce code duplication. Individual members are responsible for making sure code attributed to them are correct. If you notice a team member claiming credit for code that he/she did not write or use other questionable tactics, you can email us (after the final submission) to let us know.
-
If you wrote a significant amount of code that was not used in the final product,
- Create a folder called
{project root}/unused - Move unused files (or copies of files containing unused code) to that folder
- use
//@@author {yourGithubUsername}-unusedto mark unused code in those files (note the suffixunused) e.g.
//@@author johndoe-unused
method 1 ...
method 2 ...
Please put a comment in the code to explain why it was not used.
- Create a folder called
-
If you reused code from elsewhere, mark such code as
//@@author {yourGithubUsername}-reused(note the suffixreused) e.g.//@@author johndoe-reused method 1 ... method 2 ... -
You can use empty
@@authortags to mark code as not yours when RepoSense attribute the to you incorrectly.-
Code generated by the IDE/framework, should not be annotated as your own.
-
Code you modified in minor ways e.g. adding a parameter. These should not be claimed as yours but you can mention these additional contributions in the Project Portfolio page if you want to claim credit for them.
-
At the end of the project each student is required to submit a Project Portfolio Page.
-
Objective:
- For you to use (e.g. in your resume) as a well-documented data point of your SE experience
- For us to use as a data point to evaluate your,
- contributions to the project
- your documentation skills
-
Sections to include:
-
Overview: A short overview of your product to provide some context to the reader.
-
Summary of Contributions:
- Code contributed: Give a link to your code on Project Code Dashboard, which should be
https://nuscs2113-ay1819s1.github.io/dashboard/#=undefined&search=githbub_username_in_lower_case(replacegithbub_username_in_lower_casewith your actual username in lower case e.g.,johndoe). This link is also available in the Project List Page -- linked to the icon under your photo. - Main feature implemented: A summary of the main feature you implemented
- Other contributions:
- Contributions to project management e.g., setting up project tools, managing releases, managing issue tracker etc.
- Evidence of helping others e.g. responses you posted in our forum, bugs you reported in other team's products,
- Evidence of technical leadership e.g. sharing useful information in the forum
- [Optional] Other minor enhancements: If you have other enhancements that you implemented, which are not related to your main feature, you can include it here. If you have written a significant amount of code that can be advertised as a feature by itself, but does not belong to your main feature, you can choose to include it as a part of the optional enhancements.
- Code contributed: Give a link to your code on Project Code Dashboard, which should be
-
Contributions to the User Guide: Reproduce the parts in the User Guide that you wrote. This can include features you implemented as well as features you propose to implement.
The purpose of allowing you to include proposed features is to provide you more flexibility to show your documentation skills. e.g. you can bring in a proposed feature just to give you an opportunity to use a UML diagram type not used by the actual features. -
Contributions to the Developer Guide: Reproduce the parts in the Developer Guide that you wrote. Ensure there is enough content to evaluate your technical documentation skills and UML modelling skills. You can include descriptions of your design/implementations, possible alternatives, pros and cons of alternatives, etc.
-
If you plan to use the PPP in your Resume, you can also include your SE work outside of the module (will not be graded)
-
-
Format:
-
File name:
docs/team/githbub_username_in_lower_case.adoce.g.,docs/team/johndoe.adoc -
Follow the example in the AddressBook-Level4, but ignore the following two lines in it.
- Minor enhancement: added a history command that allows the user to navigate to previous commands using up/down keys.
- Code contributed: [Functional code] [Test code] {give links to collated code files}
-
💡 You can use the Asciidoc's
includefeature to include sections from the developer guide or the user guide in your PPP. Follow the example in the sample. -
It is assumed that all contents in the PPP were written primarily by you. If any section is written by someone else e.g. someone else wrote described the feature in the User Guide but you implemented the feature, clearly state that the section was written by someone else (e.g.
Start of Extract [from: User Guide] written by Jane Doe). Reason: Your writing skills will be evaluated based on the PPP -
Page limit: If you have more content than the limit given below, shorten (or omit some content) so that you do not exceed the page limit. Having too much content in the PPP will be viewed unfavorably during grading. Note: the page limits given below are after converting to PDF format. The actual amount of content you require is actually less than what these numbers suggest because the HTML → PDF conversion adds a lot of spacing around content.
Content Limit Overview + Summary of contributions 0.5-1 Contributions to the User Guide 1-3 Contributions to the Developer Guide 3-6 Total 5-10
-