Creating a GitHub account
Create a personal GitHub account if you don't have one yet.
-
You are advised to choose a sensible GitHub username as you are likely to use it for years to come in professional contexts.
-
Strongly recommended: Complete your GitHub profile. In particular,
- Specify your full name.
- Upload a suitable profile photo (i.e. a recent photo of your face).
The GitHub profile is useful for the tutors and classmates to identify you. If you are reluctant to share your info in your long-term GitHub account, you can remove those details after the module is over or create a separate GitHub account just for the module.
Setting Git Username to Match GitHub Username
We use various tools to analyze your code. For us to be able to identify your commits, you should use the GitHub username as your Git username as well. If there is a mismatch, or if you use multiple user names for Git, our tools might miss some of your work and as a result you might not get credit for some of your work.
In each Computer you use for coding, after installing Git, you should set the Git username as follows.
- Open a command window that can run Git commands (e.g., Git bash window)
- Run the command
git config --global user.name YOUR_GITHUB_USERNAME
e.g.,git config --global user.name JohnDoe
More info about setting Git username is here.
Submitting Pull Requests as evidence of an LO
-
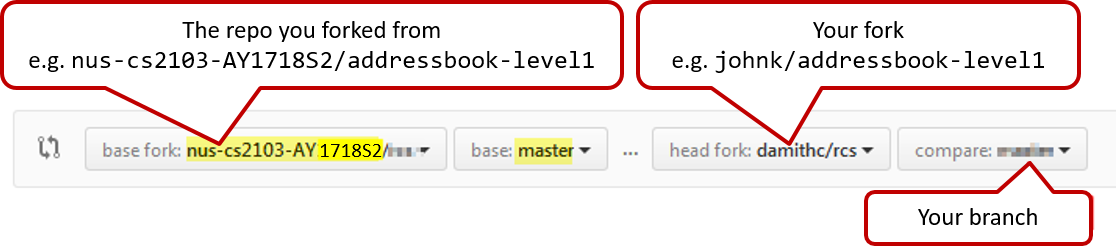
Fork the repo to your personal GitHub account, if you haven't done so already.
-
Create a branch named after the LO IDe.g.
W2.2b
Remember to switch to master branch before creating the new branch. -
Commit your changes to that branch. Push to your fork.
-
Create a Pull Request against the master branch of the repo
https://github.com/nusCS2113-AY1819S1/{repo_name}
e.g.https://github.com/nusCS2113-AY1819S1/addressbook-level1
(do not create PRs against the upstream repo atse-eduorg)
PR name should be:[LO_ID][TEAM_ID]Your Name
e.g. If you are in team 1 of tutorial W09 (i.e. Wednesday 9am),[W2.2b][W09-A1]James Yong. Your Team ID can be found in this page. Note that our tutorial IDs are different from those shown in CORS/IVLE. Our tutorial IDs are given in the panel below.
Relevant: [
Our tutorials start on week 2 (even before CORS tutorial bidding is over), not in week 3 as other modules do. CS2113 (not CS2113T) students need to choose a temporary tutorial slot for week 2 tutorial. We'll inform you the procedure to do so in due course.
Our tutorial IDs are different from CORS. Format: W12 means Wednesday 1200 and so on.
| Module | Tutorial ID (ID in CORS) | Time | Venue | Tutors (contact details) |
|---|---|---|---|---|
| CS2113T | W12 (1) | Wed 1200 | COM1-B103 | TBD |
| CS2113T | W13 (2) | Wed 1300 | COM1-B103 | TBD |
| CS2113T | T09 (3) | Thu 0900 | COM1-B103 | TBD |
| CS2113T | T12 (4) | Thu 1200 | COM1-B103 | TBD |
| CS2113T | F09 (5) | Fri 0900 | COM1-B103 | TBD |
| CS2113T | F10 (6) | Fri 1000 | COM1-B103 | TBD |
| CS2113 | T13 (1) | Thu 1300 | COM1-B103 | TBD |
| CS2113 | T16 (2) | Thu 1600 | COM1-B103 | TBD |
-
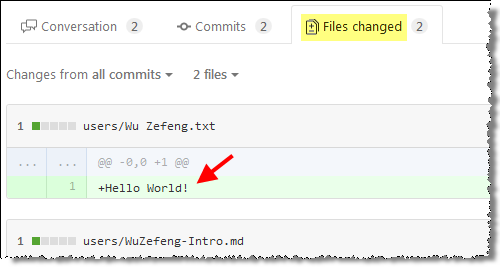
Check the 'Files Changed' tab on GitHub to confirm the PR contains intended changes only.
-
If the content of the PR is not as you expected, you can fix those problems in your local repo, commit, and push those new commits to the fork. The PR content will update automatically to match new commits. Alternatively, you can close that PR and create a new one with the correct content.
-
If your PR adapted/referred code from elsewhere (e.g. a stackoverflow post or a classmate's PR -- which is allowed, even encouraged), acknowledge the source in your PR description text. e.g.
Some code adapted from #2431 (I followed the same technique for parsing user command) -
If the PR is not ready for review yet, add a comment
Work in progress. When the PR is ready for review later, add a commentReady for reviewIf there is no comment, we assume the PR is ready for review.
Organization setup
The instructions below are for setting up a GitHub organization for your team.
You can create your GitHub account after receiving your team ID. Here are the instructions (please follow the organization/repo name format closely because we use scripts to download your code. If the names are not as expected, our scripts will not work):
- One team member (e.g. team leader) should create an organization with the following details:
- Organization name :
CS2113-AY1819S1-TEAM_ID. e.g.CS2113-AY1819S1-W12-1 - Plan: Open Source ($0/month)
- After that, the same person can add members to the organization:
- Create a team called
developersto your organization. - Add your team members to the developers team.
Repo setup
Only one team member:
- Fork either Address Book Level 3 or Address Book Level 4 to your team org.
- Rename the forked repo as
main. This repo is to be used as the repo for your project. - Ensure your team members have the desired level of access to your team repo
All team members:
- Fork the
mainrepo (created above) to your personal GitHub account. - Clone the fork to your Computer.
- Set it up as an Intellij project (follow the instructions in the Developer Guide carefully).
Note that some of our download scripts depend on the following folder paths. Please do not alter those paths in your project.
/src/main/src/test/docs
- Note: If you fork from Address Book Level 3, ensure that the folder structure is similar to the one in Address Book Level 4
Issue tracker setup
When you create a repo, you get an issue tracker for that repo automatically. Configure it as follows:
- Delete existing labels and add the following labels.
Issue type labels:
type.epic: A big feature which can be broken down into smaller stories e.g. searchtype.story: A user storytype.enhancement: An enhancement to an existing storytype.task: Something that needs to be done, but not a story, bug, or an epic. e.g. Move testing code into a new folder)type.bug: A bug
Status labels:
status.ongoing: The issue is currently being worked on. note: remove this label before closing an issue.
Priority labels:
priority.high: Must dopriority.medium: Nice to havepriority.low: Unlikely to do
Bug Severity labels:
severity.Low: A flaw that is unlikely to affect normal operations of the product. Appears only in very rare situations and causes a minor inconvenience only.severity.Medium: A flaw that causes occasional inconvenience to some users but they can continue to use the product.severity.High: A flaw that affects most users and causes major problems for users. i.e., makes the product almost unusable for most users.
-
Create following milestones :
v1.0,v1.1,v1.2,v1.3,v1.4, -
You may configure other project settings as you wish. e.g. more labels, more milestones
Project Schedule Tracking
In general, use the issue tracker (Milestones, Issues, PRs, Tags, Releases, and Labels) for assigning, scheduling, and tracking all noteworthy project tasks, including user stories. Update the issue tracker regularly to reflect the current status of the project. You can also use GitHub's new Projects feature to manage the project, but keep it linked to the issue tracker as much as you can.
Using Issues:
-
Record each of the user stories you plan to deliver as an issue in the issue tracker. e.g.
Title: As a user I can add a deadline
Description: ... so that I can keep track of my deadlines -
Assign the
type.*andpriority.*labels to those issues. -
When you start implementing a story, break it down to tasks. Define reasonable sized, standalone tasks. A task should be able to done by one person, in a few hours. e.g.
- 👍 Good: Update class diagram in the project manual for v1.4
- 👎 Bad (reasons: not a one-person task, not small enough): Write the project manual
-
Write a descriptive title for the issue. e.g. Add support for the 'undo' command to the parser.
-
There is no need to break things into VERY small tasks. Keep them as big as possible, but they should be no bigger than what you are going to assign a single person to do within a week. eg.,
Implementing parser: too big because it cannot be done by a single person in a week.Implementing parser support for adding of floating tasks: appropriate size.
-
Do not track things taken for granted. e.g.,
push code to reposhould not be a task to track. In the example given under the previous point, it is taken for granted that the owner will also (a) test the code and (b) push to the repo when it is ready. Those two need not be tracked as separate tasks. -
Omit redundant details. In some cases, the summary/title is enough to describe the task. In that case, no need to repeat it in the description. There is no need for well-crafted and detailed descriptions for tasks. A minimal description is enough. Similarly, labels such as
prioritycan be omitted if you think they don't help you. -
Assign tasks to team members using the
assigneesfield. At any point, there should be some ongoing tasks and some pending tasks against each team member. -
Optionally, you can use
status.ongoinglabel to indicate issues currently ongoing.
Using Milestones:
-
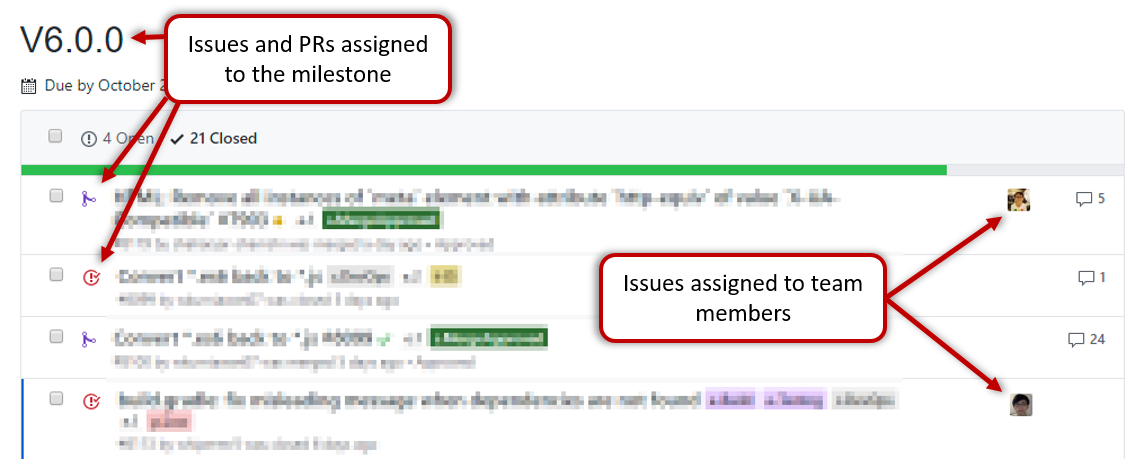
Use GitHub milestones to indicate which issues are to be handled for which milestone by assigning issues to suitable milestones.
-
Set the deadlines for milestones (in GitHub). Your internal milestones can be set earlier than the deadlines we have set, to give you a buffer.
-
Note that you can change the milestone plan along the way as necessary.
Wrapping up a Milestone:
Here are the conditions to satisfy for a milestone to be considered properly wrapped up:
-
A working product tagged with the correct tag (e.g. v1.2) is pushed to the main repo.
-
All tests passing on Travis for the version tagged above.
-
Milestone updated to match the product i.e. all issues completed and PRs merged for the milestone should be assigned to the milestone.
-
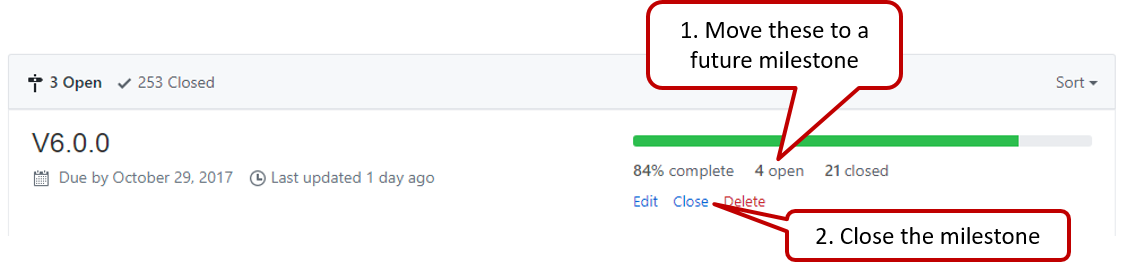
Milestone closed. If there are incomplete issues or unmerged PRs in the milestone, move them to a future milestone.
-
Optionally, issues for the next milestone are assigned to team members (this is not compulsory to do before the tutorial, but we recommend you to do it soon after the tutorial).
-
Optionally, future milestones are revised based on what you experienced in the current milestone e.g. if you could not finish all issues assigned to the current milestone, it is a sign that you overestimated how much you can do in a week, which means you might want to reduce the issues assigned to future milestones to match that observation.
-
Doing a 'release' on GitHub is optional for v1.1 and v1.2 but compulsory from v1.3.
Workflow
We recommend using the Forking Workflow.