Week 8 [Oct 8]
Todo
Admin info to read:
Overview: Adjust project schedule/rigor as needed, complete repo set up, start proper milestone management.
Project Management:
💡 You are free to adjust process rigor and project plan at any future time in the project, starting from v1.2. If you are not sure if a certain adjustment is allowed, you can check with the teaching team first.
- Switch to AB-3 or AB-2 if AB-4 is not working out for you. There is no explicit penalty for switching to a lower level AB. All projects are evaluated based on the same yardstick irrespective of on which AB it is based.
As an AB is given to you as a 'free' head-start, a lower level AB gives you a shorter head-start, which means your final product is likely to be less functional than those from teams using AB-4 unless you progress faster than them.
Nevertheless, you should switch to AB2/3 if you feel you can learn more from the project that way, as our goal is to maximize learning, not features.
If your team wants to stay with AB-4 but you want to switch to a lower level AB, let the us know so that we can work something out for you.
Relevant: [
There is no explicit penalty for switching to a lower level AB. All projects are evaluated based on the same yardstick irrespective of on which AB it is based. As an AB is given to you as a 'free' head-start, a lower level AB gives
you a shorter head-start, which means your final product is likely to be less functional than those from teams using AB-4 unless you progress faster than them. Nevertheless, you should switch to AB2/3 if you feel you can learn
more from the project that way, as our goal is to maximize learning, not features.
If your team wants to stay with AB-4 but you want to switch to a lower level AB, let the us know so that we can work something out for you.
If you have opted to use AB-2 or AB-3 instead of AB-4 as the basis of your product, please note the following points:
- Set up auto-publishing of documentation similar to AB-4
- Add Project Portfolio Pages (PPP) for members, similar to the example provided in AB-4
- You can convert UG, DG, and PPP into pdf files using instructions provided in AB-4 DG
- Create an About Us page similar to AB-4 and update it as described in
mid-v1.1 progress guide
Overview: Set up project repo, start moving UG and DG to the repo, attempt to do local-impact changes to the code base.
Project Management:
- One team member:
Set up the team org andteam repo for your team if you haven't done that already.- Set up auto-publishing of docs
Organization setup
The instructions below are for setting up a GitHub organization for your team.
You can create your GitHub account after receiving your team ID. Here are the instructions (please follow the organization/repo name format closely because we use scripts to download your code. If the names are not as expected, our scripts will not work):
- One team member (e.g. team leader) should create an organization with the following details:
- Organization name :
CS2113-AY1819S1-TEAM_ID. e.g.CS2113-AY1819S1-W12-1 - Plan: Open Source ($0/month)
- After that, the same person can add members to the organization:
- Create a team called
developersto your organization. - Add your team members to the developers team.
Repo setup
Only one team member:
- Fork either Address Book Level 3 or Address Book Level 4 to your team org.
- Rename the forked repo as
main. This repo is to be used as the repo for your project. - Ensure your team members have the desired level of access to your team repo
All team members:
- Fork the
mainrepo (created above) to your personal GitHub account. - Clone the fork to your Computer.
- Set it up as an Intellij project (follow the instructions in the Developer Guide carefully).
Note that some of our download scripts depend on the following folder paths. Please do not alter those paths in your project.
/src/main/src/test/docs
- Note: If you fork from Address Book Level 3, ensure that the folder structure is similar to the one in Address Book Level 4
- All members: Set up your own forks of the team repo, so that you can submit PRs to your team repo using the forking workflow.
Setting Git Username to Match GitHub Username
We use various tools to analyze your code. For us to be able to identify your commits, you should use the GitHub username as your Git username as well. If there is a mismatch, or if you use multiple user names for Git, our tools might miss some of your work and as a result you might not get credit for some of your work.
In each Computer you use for coding, after installing Git, you should set the Git username as follows.
- Open a command window that can run Git commands (e.g., Git bash window)
- Run the command
git config --global user.name YOUR_GITHUB_USERNAME
e.g.,git config --global user.name JohnDoe
More info about setting Git username is here.
Documentation:
Recommended procedure for updating docs:
- Divide among yourselves who will update which parts of the document(s).
- Update the team repo by following the
forking workflow . - One member: create a PR from your team repo
masterbranch to [addressbook-level4] (or [addressbook-level3])masterbranch. PR name:[Team ID] Product Namee.g.,[W12-2] Contact List Pro. In the PR descriptionmention the other team members so that they get notified when the tutor adds comments to the PR.
Project Management → Revision Control →
Forking Flow
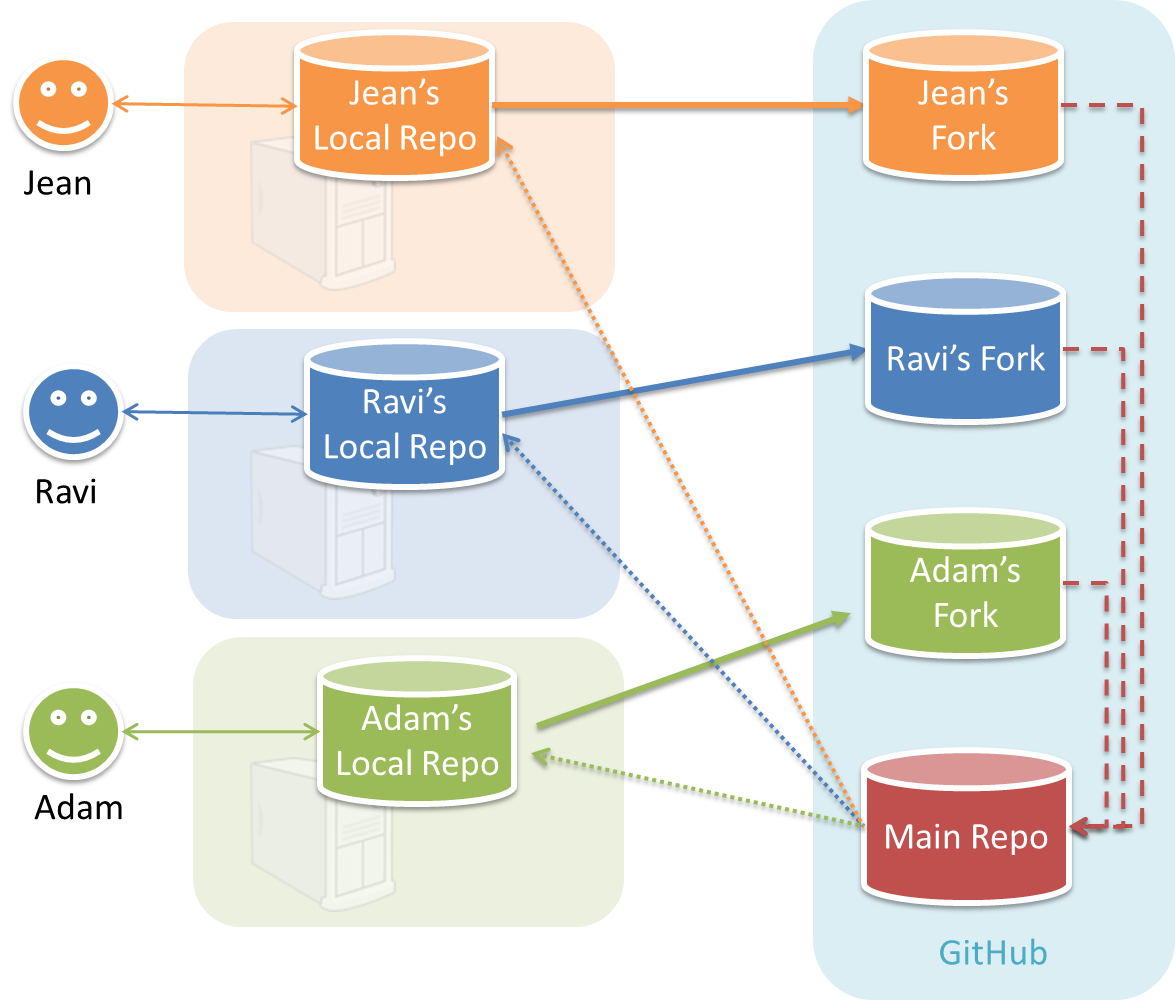
In the forking workflow, the 'official' version of the software is kept in a remote repo designated as the 'main repo'. All team members fork the main repo create pull requests from their fork to the main repo.
To illustrate how the workflow goes, let’s assume Jean wants to fix a bug in the code. Here are the steps:
- Jean creates a separate branch in her local repo and fixes the bug in that branch.
- Jean pushes the branch to her fork.
- Jean creates a pull request from that branch in her fork to the main repo.
- Other members review Jean’s pull request.
- If reviewers suggested any changes, Jean updates the PR accordingly.
- When reviewers are satisfied with the PR, one of the members (usually the team lead or a designated 'maintainer' of the main repo) merges the PR, which brings Jean’s code to the main repo.
- Other members, realizing there is new code in the upstream repo, sync their forks with the new upstream repo (i.e. the main repo). This is done by pulling the new code to their own local repo and pushing the updated code to their own fork.
- A detailed explanation of the Forking Workflow - From Atlassian
Update the following pages in your project repo:
- About Us page:
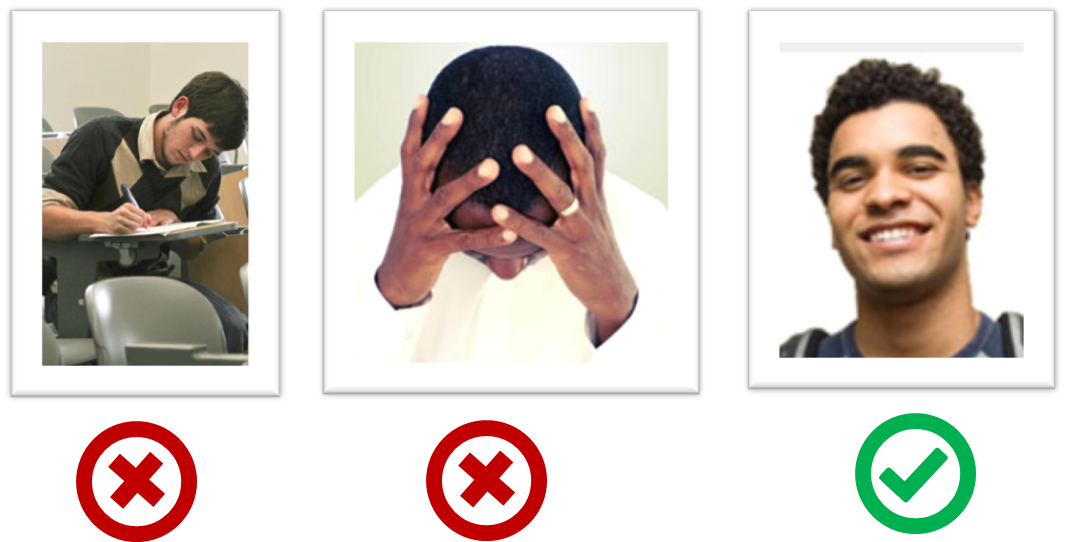
This page is used for module admin purposes. Please follow the format closely to avoid penalties.- Replace info of SE-EDU developers with info of your team, including a suitable photo as described
here . - Including the name/photo of the supervisor/lecturer is optional.
- The photo of a team member should be
doc/images/githbub_username_in_lower_case.pnge.g.docs/images/akshay.png.
- Replace info of SE-EDU developers with info of your team, including a suitable photo as described
-
The purpose of the profile photo is for the teaching team to identify you. Therefore, you should choose a recent individual photo showing your face clearly -- somewhat similar to a passport photo. Some examples can be seen in the 'Teaching team' page. Given below are some examples of good and bad profile photos.
-
If you are uncomfortable posting your photo due to security reasons, you can post a lower resolution image so that it is hard for someone to misuse that image for fraudulent purposes. If you are concerned about privacy, you can request permission to omit your photo from the page by writing to prof.
- Indicate the different roles played and responsibilities held by each team member. You can reassign these
roles and responsibilities (as explained in Admin Project Scope) later in the project, if necessary.
Roles indicate aspects you are in charge of and responsible for. E.g., if you are in charge of documentation, you are the person who should allocate which parts of the documentation is to be done by who, ensure the document is in right format, ensure consistency etc.
This is a non-exhaustive list; you may define additional roles.
- Team lead: Responsible for overall project coordination.
- Documentation (short for ‘in charge of documentation’): Responsible for the quality of various project documents.
- Testing: Ensures the testing of the project is done properly and on time.
- Code quality: Looks after code quality, ensures adherence to coding standards, etc.
- Deliverables and deadlines: Ensure project deliverables are done on time and in the right format.
- Integration: In charge of versioning of the code, maintaining the code repository, integrating various parts of the software to create a whole.
- Scheduling and tracking: In charge of defining, assigning, and tracking project tasks.
- [Tool ABC] expert: e.g. Intellij expert, Git expert, etc. Helps other team member with matters related to the specific tool.
- In charge of[Component XYZ]: e.g. In charge of
Model,UI,Storage, etc. If you are in charge of a component, you are expected to know that component well, and review changes done to that component in v1.3-v1.4.
Please make sure each of the important roles are assigned to one person in the team. It is OK to have a 'backup' for each role, but for each aspect there should be one person who is unequivocally the person responsible for it.
-
README.adoc page: Update it to match your project.
- Add a UI mockup of your intended final product.
Note that the image of the UI should bedocs/images/Ui.pngso that it can be downloaded by our scripts. - The original
README.adocfile (which doubles as the landing page of your project website) is written to read like the introduction to an SE learning/teaching resource. You should restructure this page to look like the home page of a real product (not a school project) targeting real users e.g. remove references to addressbook-level3, Learning Outcomes etc. mention target users, add a marketing blurb etc. On a related note, also removeLearning Outcomeslink and related pages. - Acknowledge the original source of the code i.e. AddressBook-Level4 project created by SE-EDU initiative at
https://github.com/se-edu/
- Add a UI mockup of your intended final product.
-
User Guide: Start moving the content from your User Guide (draft created in previous weeks) into the User Guide page in your repository.
-
Developer Guide: Similar to the User Guide, start moving the content from your Developer Guide (draft created in previous weeks) into the Developer Guide page in your team repository.
Product:
-
Each member can attempt to do a
local-impact change to the code base.Objective: To familiarize yourself with at least one component the code.
Description: Divide the
components among yourselves. Each member can do some small enhancements to their component(s) to learn the code of that component. Some suggested enhancements are given in the AddressBook-Level4 developer guide.Submission: Create PRs from your own fork to your team repo. Get it merged by following your team's workflow.
Before you start coding, please read
our reuse policy (in Admin: Appendix B) , in particular, how to give credit when you reuse code from Internet or classmates.
Policy on reuse
Reuse is encouraged. However, note that reuse has its own costs (such as the learning curve, additional complexity, usage restrictions, and unknown bugs). Furthermore, you will not be given credit for work done by others. Rather, you will be given credit for using work done by others.
- You are allowed to reuse work from your classmates, subject to following conditions:
- The work has been published by us or the authors.
- You clearly give credit to the original author(s).
- You are allowed to reuse work from external sources, subject to following conditions:
- The work comes from a source of 'good standing' (such as an established open source project). This means you cannot reuse code written by an outside 'friend'.
- You clearly give credit to the original author. Acknowledge use of third party resources clearly e.g. in the welcome message, splash screen (if any) or under the 'about' menu. If you are open about reuse, you are less likely to get into trouble if you unintentionally reused something copyrighted.
- You do not violate the license under which the work has been released. Please do not use 3rd-party images/audio in your software unless they have been specifically released to be used freely. Just because you found it in the Internet does not mean it is free for reuse.
- Always get permission from us before you reuse third-party libraries. Please post your 'request to use 3rd party library' in our GitHub forum. That way, the whole class get to see what libraries are being used by others.
Giving credit for reused work
Given below are how to give credit for things you reuse from elsewhere. These requirements are specific to this module i.e., not applicable outside the module (outside the module you should follow the rules specified by your employer and the license of the reused work)
If you used a third party library:
- Mention in the
README.adoc(under the Acknowledgements section) - mention in the
Project Portfolio Page if the library has a significant relevance to the features you implemented
If you reused code snippets found on the Internet e.g. from StackOverflow answers or
referred code in another software or
referred project code by current/past student:
- If you read the code to understand the approach and implemented it yourself, mention it as a comment
Example://Solution below adapted from https://stackoverflow.com/a/16252290 {Your implmentation of the reused solution here ...} - If you copy-pasted a non-trivial code block (possibly with minor modifications renaming, layout changes, changes to comments, etc.), also mark the code block as reused code (using
@@authortags
Format://@@author {yourGithubUsername}-reused //{Info about the source...} {Reused code (possibly with minor modifications) here ...} //@@authorpersons = getList() //@@author johndoe-reused //Reused from https://stackoverflow.com/a/34646172 with minor modifications Collections.sort(persons, new Comparator<CustomData>() { @Override public int compare(CustomData lhs, CustomData rhs) { return lhs.customInt > rhs.customInt ? -1 : (lhs.customInt < rhs.customInt) ? 1 : 0; } }); //@@author return persons;
Adding @@author tags indicate authorship
-
Mark your code with a
//@@author {yourGithubUsername}. Note the double@.
The//@@authortag should indicates the beginning of the code you wrote. The code up to the next//@@authortag or the end of the file (whichever comes first) will be considered as was written by that author. Here is a sample code file://@@author johndoe method 1 ... method 2 ... //@@author sarahkhoo method 3 ... //@@author johndoe method 4 ... -
If you don't know who wrote the code segment below yours, you may put an empty
//@@author(i.e. no GitHub username) to indicate the end of the code segment you wrote. The author of code below yours can add the GitHub username to the empty tag later. Here is a sample code with an emptyauthortag:method 0 ... //@@author johndoe method 1 ... method 2 ... //@@author method 3 ... method 4 ... -
The author tag syntax varies based on file type e.g. for java, css, fxml. Use the corresponding comment syntax for non-Java files.
Here is an example code from an xml/fxml file.<!-- @@author sereneWong --> <textbox> <label>...</label> <input>...</input> </textbox> ... -
Do not put the
//@@authorinside java header comments.
👎/** * Returns true if ... * @@author johndoe */👍
//@@author johndoe
/**
  * Returns true if ...
  */
What to and what not to annotate
-
Annotate both functional and test code There is no need to annotate documentation files.
-
Annotate only significant size code blocks that can be reviewed on its own e.g., a class, a sequence of methods, a method.
Claiming credit for code blocks smaller than a method is discouraged but allowed. If you do, do it sparingly and only claim meaningful blocks of code such as a block of statements, a loop, or an if-else statement.- If an enhancement required you to do tiny changes in many places, there is no need to annotate all those tiny changes; you can describe those changes in the Project Portfolio page instead.
- If a code block was touched by more than one person, either let the person who wrote most of it (e.g. more than 80%) take credit for the entire block, or leave it as 'unclaimed' (i.e., no author tags).
- Related to the above point, if you claim a code block as your own, more than 80% of the code in that block should have been written by yourself. For example, no more than 20% of it can be code you reused from somewhere.
- 💡 GitHub has a blame feature and a history feature that can help you determine who wrote a piece of code.
-
Do not try to boost the quantity of your contribution using unethical means such as duplicating the same code in multiple places. In particular, do not copy-paste test cases to create redundant tests. Even repetitive code blocks within test methods should be extracted out as utility methods to reduce code duplication. Individual members are responsible for making sure code attributed to them are correct. If you notice a team member claiming credit for code that he/she did not write or use other questionable tactics, you can email us (after the final submission) to let us know.
-
If you wrote a significant amount of code that was not used in the final product,
- Create a folder called
{project root}/unused - Move unused files (or copies of files containing unused code) to that folder
- use
//@@author {yourGithubUsername}-unusedto mark unused code in those files (note the suffixunused) e.g.
//@@author johndoe-unused
method 1 ...
method 2 ...
Please put a comment in the code to explain why it was not used.
- Create a folder called
-
If you reused code from elsewhere, mark such code as
//@@author {yourGithubUsername}-reused(note the suffixreused) e.g.//@@author johndoe-reused method 1 ... method 2 ... -
You can use empty
@@authortags to mark code as not yours when RepoSense attribute the to you incorrectly.-
Code generated by the IDE/framework, should not be annotated as your own.
-
Code you modified in minor ways e.g. adding a parameter. These should not be claimed as yours but you can mention these additional contributions in the Project Portfolio page if you want to claim credit for them.
-
At the end of the project each student is required to submit a Project Portfolio Page.
-
Objective:
- For you to use (e.g. in your resume) as a well-documented data point of your SE experience
- For us to use as a data point to evaluate your,
- contributions to the project
- your documentation skills
-
Sections to include:
-
Overview: A short overview of your product to provide some context to the reader.
-
Summary of Contributions:
- Code contributed: Give a link to your code on Project Code Dashboard, which should be
https://nuscs2113-ay1819s1.github.io/dashboard/#=undefined&search=githbub_username_in_lower_case(replacegithbub_username_in_lower_casewith your actual username in lower case e.g.,johndoe). This link is also available in the Project List Page -- linked to the icon under your photo. - Main feature implemented: A summary of the main feature you implemented
- Other contributions:
- Contributions to project management e.g., setting up project tools, managing releases, managing issue tracker etc.
- Evidence of helping others e.g. responses you posted in our forum, bugs you reported in other team's products,
- Evidence of technical leadership e.g. sharing useful information in the forum
- [Optional] Other minor enhancements: If you have other enhancements that you implemented, which are not related to your main feature, you can include it here. If you have written a significant amount of code that can be advertised as a feature by itself, but does not belong to your main feature, you can choose to include it as a part of the optional enhancements.
- Code contributed: Give a link to your code on Project Code Dashboard, which should be
-
Contributions to the User Guide: Reproduce the parts in the User Guide that you wrote. This can include features you implemented as well as features you propose to implement.
The purpose of allowing you to include proposed features is to provide you more flexibility to show your documentation skills. e.g. you can bring in a proposed feature just to give you an opportunity to use a UML diagram type not used by the actual features. -
Contributions to the Developer Guide: Reproduce the parts in the Developer Guide that you wrote. Ensure there is enough content to evaluate your technical documentation skills and UML modelling skills. You can include descriptions of your design/implementations, possible alternatives, pros and cons of alternatives, etc.
-
If you plan to use the PPP in your Resume, you can also include your SE work outside of the module (will not be graded)
-
-
Format:
-
File name:
docs/team/githbub_username_in_lower_case.adoce.g.,docs/team/johndoe.adoc -
Follow the example in the AddressBook-Level4, but ignore the following two lines in it.
- Minor enhancement: added a history command that allows the user to navigate to previous commands using up/down keys.
- Code contributed: [Functional code] [Test code] {give links to collated code files}
-
💡 You can use the Asciidoc's
includefeature to include sections from the developer guide or the user guide in your PPP. Follow the example in the sample. -
It is assumed that all contents in the PPP were written primarily by you. If any section is written by someone else e.g. someone else wrote described the feature in the User Guide but you implemented the feature, clearly state that the section was written by someone else (e.g.
Start of Extract [from: User Guide] written by Jane Doe). Reason: Your writing skills will be evaluated based on the PPP -
Page limit: If you have more content than the limit given below, shorten (or omit some content) so that you do not exceed the page limit. Having too much content in the PPP will be viewed unfavorably during grading. Note: the page limits given below are after converting to PDF format. The actual amount of content you require is actually less than what these numbers suggest because the HTML → PDF conversion adds a lot of spacing around content.
Content Limit Overview + Summary of contributions 0.5-1 Contributions to the User Guide 1-3 Contributions to the Developer Guide 3-6 Total 5-10
-
-
Complete the repo set up.
- Fix any errors in org/repo set up (e.g. wrong repo name).
- Set up auto-publishing of docs if you haven't done so already
-
Adjust project rigor to suit your team's pace, as explained below. Note that you are free to do similar adjustments at any future time in the project.
-
Automated tests have benefits, but they can be a pain to write/maintain; GUI tests are especially hard to maintain because their behavior can sometimes depend on things such as the OS, resolution etc.
It is OK to get rid of some of the troublesome tests and rely more on manual testing instead. The less automated test coverage you have, the higher the risk of regressions; but it may be an acceptable trade-off under the circumstances if tests are slowing you down too much.
There is no direct penalty for removing GUI tests.
Also noteour expectation on test code . -
Automated checks: You can also reduce the rigor of checkstyle checks to expedite PR processing.
-
Workflow: Though you are recommended to follow the forking workflow when evolving the product, you can switch to a simpler workflow if the forking workflow is slowing you down.
-
- There is no requirement for a minimum coverage level. Note that in a production environment you are often required to have at least 90% of the code covered by tests. In this project, it can be less. The less coverage you have, the higher the risk of regression bugs, which will cost marks if not fixed before the final submission.
- You must write some tests so that we can evaluate your ability to write tests.
- How much of each type of testing should you do? We expect you to decide. You learned different types of testing and what they try to achieve. Based on that, you should decide how much of each type is required. Similarly, you can decide to what extent you want to automate tests, depending on the benefits and the effort required.
- Applying TDD is optional. If you plan to test something, it is better to apply TDD because TDD ensures that you write functional code in a testable way. If you do it the normal way, you often find that it is hard to test the functional code because the code has low testability.
-
Adjust project plan if necessary, as explained below. Note that you are free to do similar adjustments at any future time in the project.
- Now that you have a some idea about the code base, revisit the feature release plan and adjust it if necessary. The adjustment can be done using GitHub issue tracker.
-
Set up the issue tracker as described in
[Admin Appendix E: GitHub: Issue Tracker Setup] , if you haven't done so already. Update it to reflect the current project plan. -
Start proper milestone management
-
Starting from the upcoming milestone, there are additional requirements to follow regarding how you use GitHub to manage your milestones,
as described in
[Admin Appendix E: GitHub: Project Schedule Tracking] .
-
Starting from the upcoming milestone, there are additional requirements to follow regarding how you use GitHub to manage your milestones,
as described in
Issue tracker setup
When you create a repo, you get an issue tracker for that repo automatically. Configure it as follows:
- Delete existing labels and add the following labels.
Issue type labels:
type.epic: A big feature which can be broken down into smaller stories e.g. searchtype.story: A user storytype.enhancement: An enhancement to an existing storytype.task: Something that needs to be done, but not a story, bug, or an epic. e.g. Move testing code into a new folder)type.bug: A bug
Status labels:
status.ongoing: The issue is currently being worked on. note: remove this label before closing an issue.
Priority labels:
priority.high: Must dopriority.medium: Nice to havepriority.low: Unlikely to do
Bug Severity labels:
severity.Low: A flaw that is unlikely to affect normal operations of the product. Appears only in very rare situations and causes a minor inconvenience only.severity.Medium: A flaw that causes occasional inconvenience to some users but they can continue to use the product.severity.High: A flaw that affects most users and causes major problems for users. i.e., makes the product almost unusable for most users.
-
Create following milestones :
v1.0,v1.1,v1.2,v1.3,v1.4, -
You may configure other project settings as you wish. e.g. more labels, more milestones
Project Schedule Tracking
In general, use the issue tracker (Milestones, Issues, PRs, Tags, Releases, and Labels) for assigning, scheduling, and tracking all noteworthy project tasks, including user stories. Update the issue tracker regularly to reflect the current status of the project. You can also use GitHub's new Projects feature to manage the project, but keep it linked to the issue tracker as much as you can.
Using Issues:
-
Record each of the user stories you plan to deliver as an issue in the issue tracker. e.g.
Title: As a user I can add a deadline
Description: ... so that I can keep track of my deadlines -
Assign the
type.*andpriority.*labels to those issues. -
When you start implementing a story, break it down to tasks. Define reasonable sized, standalone tasks. A task should be able to done by one person, in a few hours. e.g.
- 👍 Good: Update class diagram in the project manual for v1.4
- 👎 Bad (reasons: not a one-person task, not small enough): Write the project manual
-
Write a descriptive title for the issue. e.g. Add support for the 'undo' command to the parser.
-
There is no need to break things into VERY small tasks. Keep them as big as possible, but they should be no bigger than what you are going to assign a single person to do within a week. eg.,
Implementing parser: too big because it cannot be done by a single person in a week.Implementing parser support for adding of floating tasks: appropriate size.
-
Do not track things taken for granted. e.g.,
push code to reposhould not be a task to track. In the example given under the previous point, it is taken for granted that the owner will also (a) test the code and (b) push to the repo when it is ready. Those two need not be tracked as separate tasks. -
Omit redundant details. In some cases, the summary/title is enough to describe the task. In that case, no need to repeat it in the description. There is no need for well-crafted and detailed descriptions for tasks. A minimal description is enough. Similarly, labels such as
prioritycan be omitted if you think they don't help you. -
Assign tasks to team members using the
assigneesfield. At any point, there should be some ongoing tasks and some pending tasks against each team member. -
Optionally, you can use
status.ongoinglabel to indicate issues currently ongoing.
Using Milestones:
-
Use GitHub milestones to indicate which issues are to be handled for which milestone by assigning issues to suitable milestones.
-
Set the deadlines for milestones (in GitHub). Your internal milestones can be set earlier than the deadlines we have set, to give you a buffer.
-
Note that you can change the milestone plan along the way as necessary.
Wrapping up a Milestone:
Here are the conditions to satisfy for a milestone to be considered properly wrapped up:
-
A working product tagged with the correct tag (e.g. v1.2) is pushed to the main repo.
-
All tests passing on Travis for the version tagged above.
-
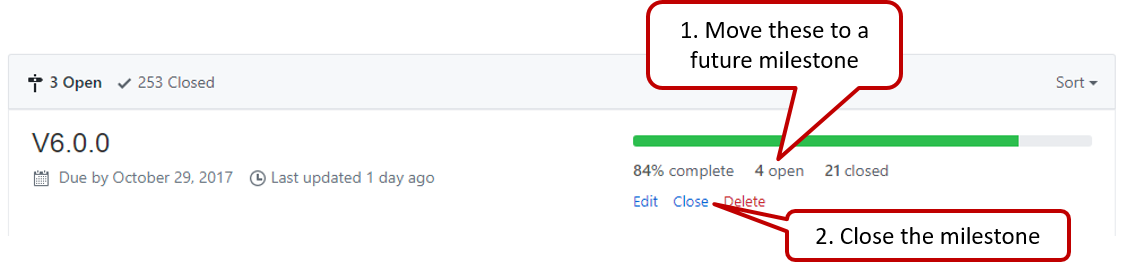
Milestone updated to match the product i.e. all issues completed and PRs merged for the milestone should be assigned to the milestone.
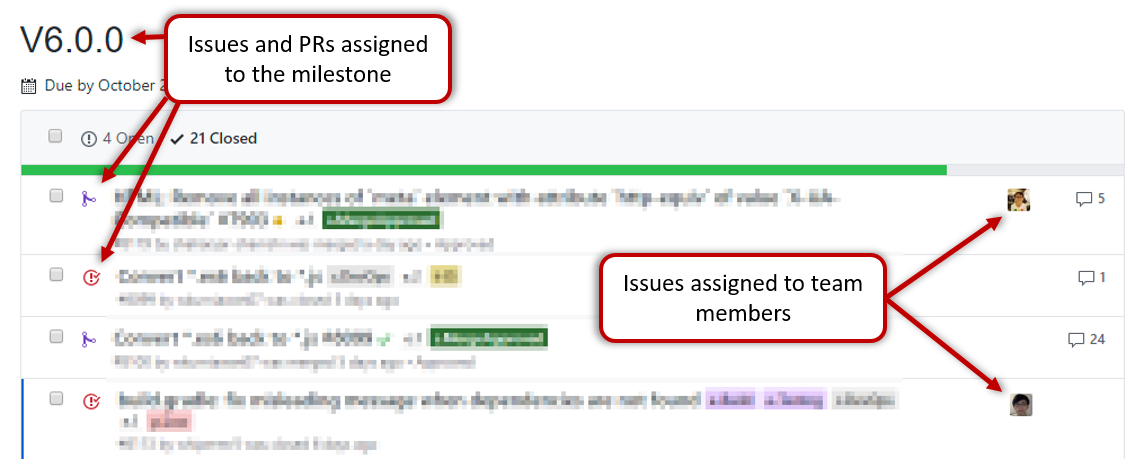
-
Milestone closed. If there are incomplete issues or unmerged PRs in the milestone, move them to a future milestone.
-
Optionally, issues for the next milestone are assigned to team members (this is not compulsory to do before the tutorial, but we recommend you to do it soon after the tutorial).
-
Optionally, future milestones are revised based on what you experienced in the current milestone e.g. if you could not finish all issues assigned to the current milestone, it is a sign that you overestimated how much you can do in a week, which means you might want to reduce the issues assigned to future milestones to match that observation.
-
Doing a 'release' on GitHub is optional for v1.1 and v1.2 but compulsory from v1.3.
Product:
- From v1.2 onwards each member is expected to contribute
some code to eachmilestone , preferably each week; only merged code is considered as contributions(Reason) .
If an enhancement is too big to complete in one milestone, try to deliver it in smaller incremental steps e.g. deliver a basic version of the enhancement first.
Why aren't we allowed to build a new product from scratch?
There are many reasons. One of them is that most of you will be working with existing software in your first few years of the career while hardly any school projects train you to work with existing code bases. We decided to bite the bullet and use CS2113/T to train you to work in existing code bases.
Why so many submissions?
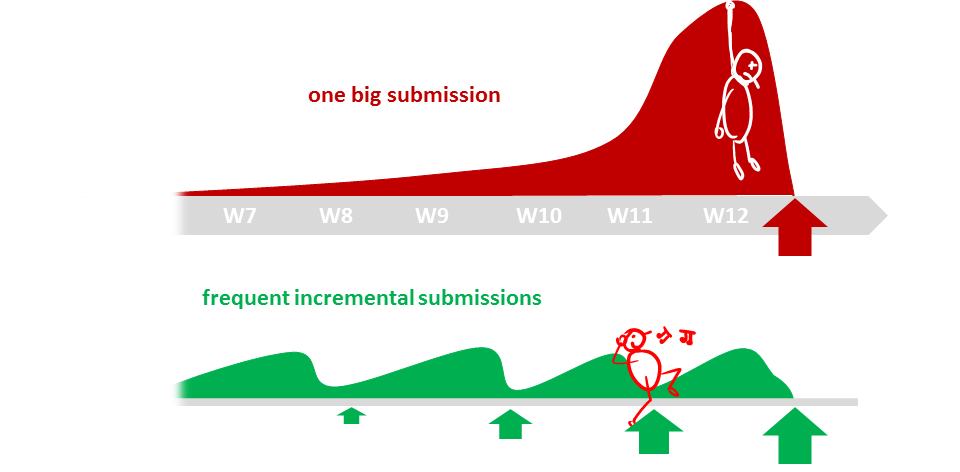
The high number of submissions is not meant to increase workload but to spread it across the semester. Learning theory and applying them should be done in parallel to maximize the learning effect. That can happen only if we spread theory and 'application of theory' (i.e., project work) evenly across the semester.
Why submission requirements differ between CS2113/T and CS2101?
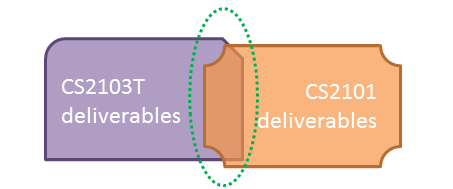
They do, and they should.
CS2113T communication requirements are limited to a very narrow scope (i.e., communicate about the product to users and developers). CS2101 aims to teach you technical communication in a much wider context. While you may be able to reuse some of the stuff across the two modules, submissions are not intended to be exactly the same.
Outcomes
Design
W8.1 Can use basic software design principles
Abstraction
W8.1a Can explain abstraction
Design → Design Fundamentals → Abstraction →
What
Abstraction is a technique for dealing with complexity. It works by establishing a level of complexity (or an aspect) we are interested in, and suppressing the more complex details below that level (or irrelevant to that aspect).
Most programs are written to solve complex problems involving large amounts of intricate details. It is impossible to deal with all these details at the same time. The guiding principle of abstraction stipulates that we capture only details that are relevant to the current perspective or the task at hand.
Ignoring lower level data items and thinking in terms of bigger entities is called data abstraction.
Within a certain software component, we might deal with a user data type, while ignoring the details contained in the user data item such as name, and date of birth. These details have been ‘abstracted away’ as they do not affect the task of that software component.
Control abstraction abstracts away details of the actual control flow to focus on tasks at a simplified level.
print(“Hello”) is an abstraction of the actual output mechanism within the computer.
Abstraction can be applied repeatedly to obtain progressively higher levels of abstractions.
An example of different levels of data abstraction: a File is a data item that is at a higher level than an array and an array is at a higher level than a bit.
An example of different levels of control abstraction: execute(Game) is at a higher level than print(Char) which is at a higher than an Assembly language instruction
MOV.
Coupling
W8.1b Can explain coupling
Design → Design Fundamentals → Coupling →
What
Coupling is a measure of the degree of dependence between components, classes, methods, etc. Low coupling indicates that a component is less dependent on other components. High coupling (aka tight coupling or strong coupling) is discouraged due to the following disadvantages:
- Maintenance is harder because a change in one module could cause changes in other modules coupled to it (i.e. a ripple effect).
- Integration is harder because multiple components coupled with each other have to be integrated at the same time.
- Testing and reuse of the module is harder due to its dependence on other modules.
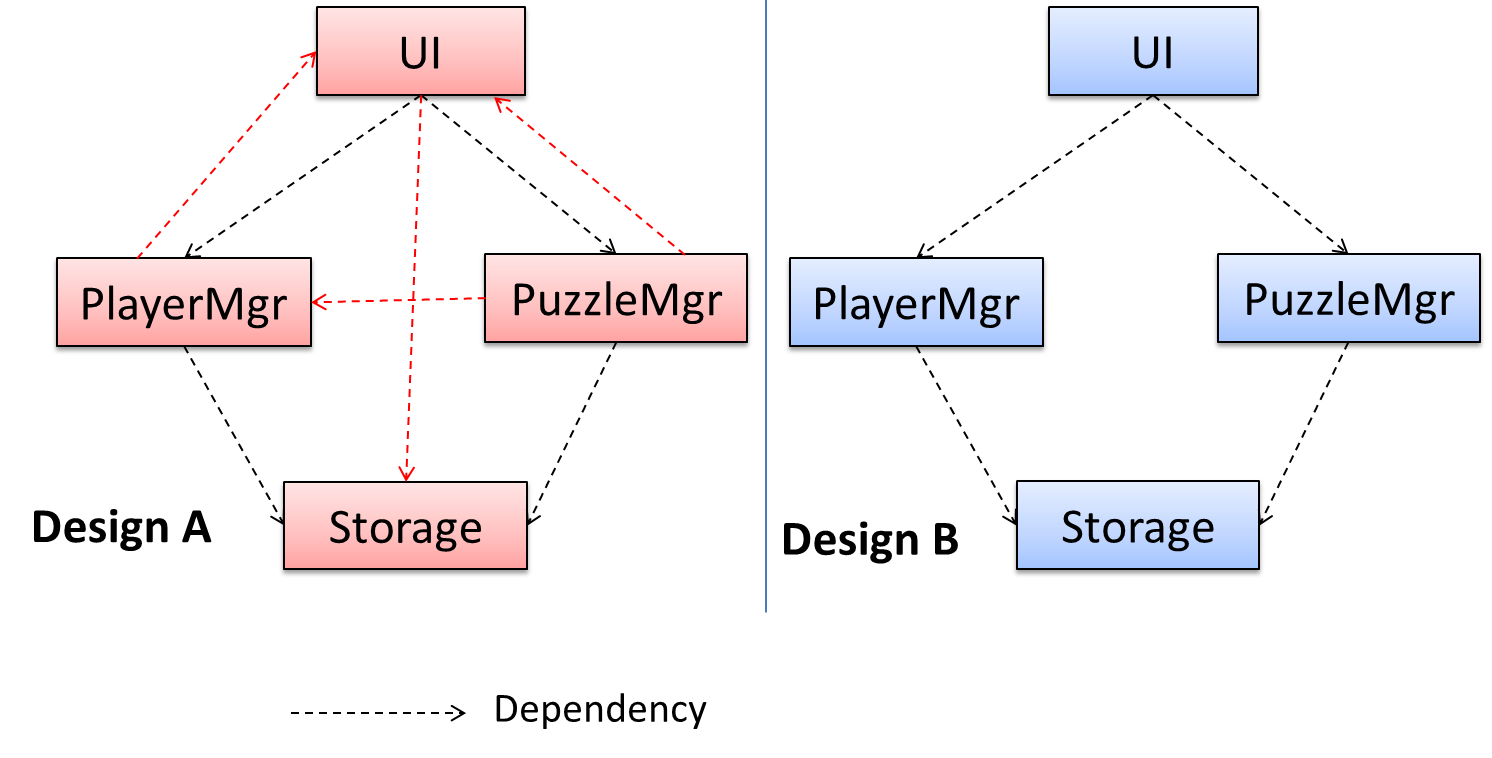
In the example below, design A appears to have a more coupling between the components than design B.
Discuss the coupling levels of alternative designs x and y.
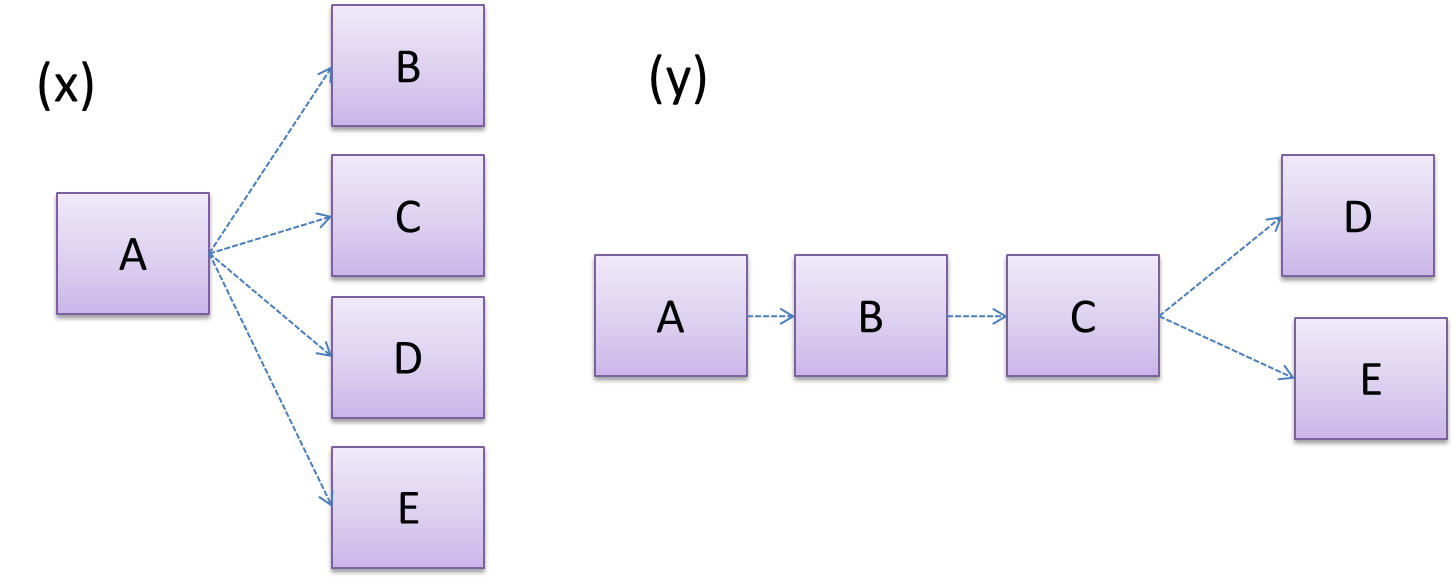
Overall coupling levels in x and y seem to be similar (neither has more dependencies than the other). (Note that the number of dependency links is not a definitive measure of the level of coupling.
Some links may be stronger than the others.). However, in x, A is highly-coupled to the rest of the system while B, C, D, and E are standalone
(do not depend on anything else). In y, no component is as highly-coupled as A of x. However, only D and E are standalone.
Explain the link (if any) between regressions and coupling.
When the system is highly-coupled, the risk of regressions is higher too e.g. when component A is modified, all components ‘coupled’ to component A risk ‘unintended behavioral changes’.
Discuss the relationship between coupling and
Coupling decreases testability because if the
Choose the correct statements.
- a. As coupling increases, testability decreases.
- b. As coupling increases, the risk of regression increases.
- c. As coupling increases, the value of automated regression testing increases.
- d. As coupling increases, integration becomes easier as everything is connected together.
- e. As coupling increases, maintainability decreases.
(a)(b)(c)(d)(e)
Explanation: High coupling means either more components require to be integrated at once in a big-bang fashion (increasing the risk of things going wrong) or more drivers and stubs are required when integrating incrementally.
Evidence:
Explain coupling with examples from AddressBook-Level4 (or your own project).
W8.1c Can reduce coupling
Design → Design Fundamentals → Coupling →
How
X is coupled to Y if a change to Y can potentially require a change in X.
If Foo class calls the method Bar#read(), Foo is coupled to Bar because a change to Bar can potentially (but not always) require
a change in the Foo class e.g. if the signature of the Bar#read() is changed, Foo needs to change as well, but a change to the Bar#write() method may not require a change in the Foo class because Foo does not call Bar#write().
class Foo{
    ...
    new Bar().read();
    ...
}

class Bar{
    void read(){
        ...
    }

    void write(){
        ...
    }
}
Some examples of coupling: A is coupled to B if,
Ahas access to the internal structure ofB(this results in a very high level of coupling)AandBdepend on the same global variableAcallsBAreceives an object ofBas a parameter or a return valueAinherits fromBAandBare required to follow the same data format or communication protocol
Which of these indicate a coupling between components A and B?
- a. component A has access to internal structure of component B.
- b. component A and B are written by the same developer.
- c. component A calls component B.
- d. component A receives an object of component B as a parameter.
- e. component A inherits from component B.
- f. components A and B have to follow the same data format or communication protocol.
(a)(b)(c)(d)(e)(f)
Explanation: Being written by the same developer does not imply a coupling.
Evidence:
Explain with examples from AddressBook-Level4 (or your own project) how coupling can be increased/decreased.
W8.1d Can identify types of coupling
Design → Design Fundamentals → Coupling →
Types of Coupling
Some examples of different coupling types:
- Content coupling: one module modifies or relies on the internal workings of another module e.g., accessing local data of another module
- Common/Global coupling: two modules share the same global data
- Control coupling: one module controlling the flow of another, by passing it information on what to do e.g., passing a flag
- Data coupling: one module sharing data with another module e.g. via passing parameters
- External coupling: two modules share an externally imposed convention e.g., data formats, communication protocols, device interfaces.
- Subclass coupling: a class inherits from another class. Note that a child class is coupled to the parent class but not the other way around.
- Temporal coupling: two actions are bundled together just because they happen to occur at the same time e.g. extracting a contiguous block of code as a method although the code block contains statements unrelated to each other
Evidence:
Explain types of coupling with examples from AddressBook-Level4 (or your own project).
Cohesion
W8.1e Can explain cohesion
Design → Design Fundamentals → Cohesion →
What
Cohesion is a measure of how strongly-related and focused the various responsibilities of a component are. A highly-cohesive component keeps related functionalities together while keeping out all other unrelated things.
Higher cohesion is better. Disadvantages of low cohesion (aka weak cohesion):
- Impedes the understandability of modules as it is difficult to express module functionalities at a higher level.
- Lowers maintainability because a module can be modified due to unrelated causes (reason: the module contains code unrelated to each other) or many many modules may need to be modified to achieve a small change in behavior (reason: because the code realated to that change is not localized to a single module).
- Lowers reusability of modules because they do not represent logical units of functionality.
Evidence:
Explain cohesion with examples from AddressBook-Level4 (or your own project).
W8.1f Can increase cohesion
Design → Design Fundamentals → Cohesion →
How
Cohesion can be present in many forms. Some examples:
- Code related to a single concept is kept together, e.g. the Student component handles everything related to students.
- Code that is invoked close together in time is kept together, e.g. all code related to initializing the system is kept together.
- Code that manipulates the same data structure is kept together, e.g. the
GameArchivecomponent handles everything related to the storage and retrieval of game sessions.
Suppose a Payroll application contains a class that deals with writing data to the database. If the class include some code to show an error dialog to the user if the database is unreachable, that class is not cohesive because it seems to be interacting with the user as well as the database.
Compare the cohesion of the following two versions of the EmailMessage class. Which one is more cohesive and why?
// version-1
class EmailMessage {
    private String sendTo;
 	  private String subject;
    private String message;

    public EmailMessage(String sendTo, String subject, String message) {
        this.sendTo = sendTo;
        this.subject = subject;
        this.message = message;
    }

    public void sendMessage() {
        // sends message using sendTo, subject and message
    }
}

// version-2
class EmailMessage {
    private String sendTo;
    private String subject;
    private String message;
    private String username;

    public EmailMessage(String sendTo, String subject, String message) {
        this.sendTo = sendTo;
        this.subject = subject;
        this.message = message;
    }

    public void sendMessage() {
        // sends message using sendTo, subject and message
    }

    public void login(String username, String password) {
        this.username = username;
        // code to login
    }
}
Version 2 is less cohesive.
Explanation: Version 2 is handling functionality related to login, which is not directly related to the concept of ‘email message’ that the class is supposed to represent. On a related note, we can improve the cohesion of both versions by removing the sendMessage functionality. Although sending message is related to emails, this class is supposed to represent an email message, not an email server.
Evidence:
Explain with examples from AddressBook-Level4 (or your own project) how cohesion can be increased/decreased.
SoC and OCP
W8.1g Can explain separation of concerns principle
Supplmentary → Principles →
Separation of Concerns Principle
Separation of Concerns Principle (SoC): To achieve better modularity, separate the code into distinct sections, such that each section addresses a separate concern. -- Proposed by Edsger W. Dijkstra
A concern in this context is a set of information that affects the code of a computer program.
Examples for concerns:
- A specific feature, such as the code related to
add employeefeature - A specific aspect, such as the code related to
persistenceorsecurity - A specific entity, such as the code related to the
Employeeentity
Applying
If the code related to persistence is separated from the code related to security, a change to how the data are persisted will not need changes to how the security is implemented.
This principle can be applied at the class level, as well as on higher levels.
The
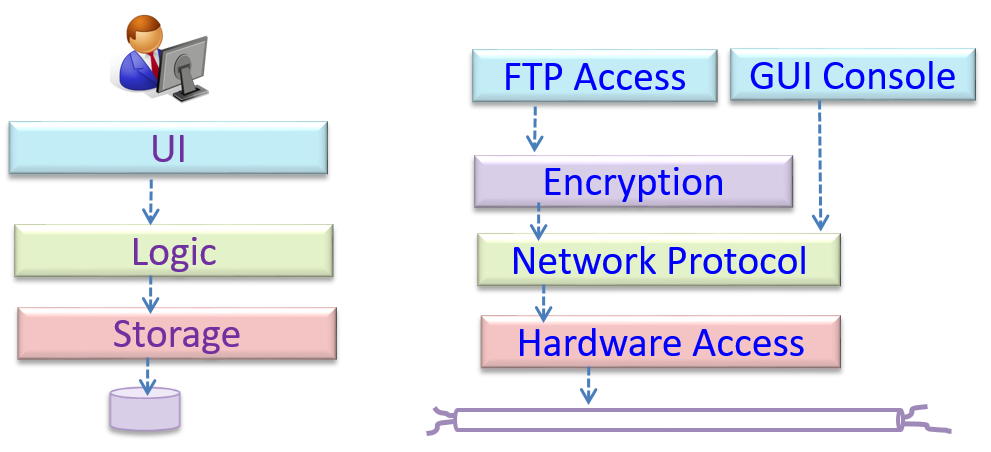
Design → Architecture → Styles → n-Tier Style
What
In the n-tier style, higher layers make use of services provided by lower layers. Lower layers are independent of higher layers. Other names: multi-layered, layered.
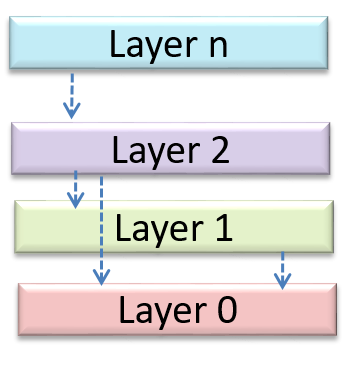
Operating systems and network communication software often use n-tier style.
This principle should lead to higher
Design → Design Fundamentals → Coupling →
What
Coupling is a measure of the degree of dependence between components, classes, methods, etc. Low coupling indicates that a component is less dependent on other components. High coupling (aka tight coupling or strong coupling) is discouraged due to the following disadvantages:
- Maintenance is harder because a change in one module could cause changes in other modules coupled to it (i.e. a ripple effect).
- Integration is harder because multiple components coupled with each other have to be integrated at the same time.
- Testing and reuse of the module is harder due to its dependence on other modules.
In the example below, design A appears to have a more coupling between the components than design B.
Discuss the coupling levels of alternative designs x and y.
Overall coupling levels in x and y seem to be similar (neither has more dependencies than the other). (Note that the number of dependency links is not a definitive measure of the level of
coupling. Some links may be stronger than the others.). However, in x, A is highly-coupled to the rest of the system while B, C, D, and E are standalone (do not depend on anything else). In y, no component is as highly-coupled as A of x. However, only D and E are standalone.
Explain the link (if any) between regressions and coupling.
When the system is highly-coupled, the risk of regressions is higher too e.g. when component A is modified, all components ‘coupled’ to component A risk ‘unintended behavioral changes’.
Discuss the relationship between coupling and
Coupling decreases testability because if the
Choose the correct statements.
- a. As coupling increases, testability decreases.
- b. As coupling increases, the risk of regression increases.
- c. As coupling increases, the value of automated regression testing increases.
- d. As coupling increases, integration becomes easier as everything is connected together.
- e. As coupling increases, maintainability decreases.
(a)(b)(c)(d)(e)
Explanation: High coupling means either more components require to be integrated at once in a big-bang fashion (increasing the risk of things going wrong) or more drivers and stubs are required when integrating incrementally.
Design → Design Fundamentals → Cohesion →
What
Cohesion is a measure of how strongly-related and focused the various responsibilities of a component are. A highly-cohesive component keeps related functionalities together while keeping out all other unrelated things.
Higher cohesion is better. Disadvantages of low cohesion (aka weak cohesion):
- Impedes the understandability of modules as it is difficult to express module functionalities at a higher level.
- Lowers maintainability because a module can be modified due to unrelated causes (reason: the module contains code unrelated to each other) or many many modules may need to be modified to achieve a small change in behavior (reason: because the code realated to that change is not localized to a single module).
- Lowers reusability of modules because they do not represent logical units of functionality.
“Only the GUI class should interact with the user. The GUI class should only concern itself with user interactions”. This statement follows from,
- a. A software design should promote separation of concerns in a design.
- b. A software design should increase cohesion of its components.
- c. A software design should follow single responsibility principle.
(a)(b)(c)
Explanation: By making ‘user interaction’ GUI class’ sole responsibility, we increase its cohesion. This is also in line with separation of concerns (i.e., we separated the concern of user interaction) and single responsibility principle (GUI class has only one responsibility).
Evidence:
Explain SoC with examples from AddressBook-Level4 (or your own project).
W8.1h Can explain open-closed principle (OCP)
Supplmentary → Principles →
Open-Closed Principle
While it is possible to isolate the functionalities of a software system into modules, there is no way to remove interaction between modules. When modules interact with each other, coupling naturally increases. Consequently, it is harder to localize any changes to the software system. The Open-Close Principle aims to alleviate this problem.
Open-Closed Principle (OCP): A module should be open for extension but closed for modification. That is, modules should be written so that they can be extended, without requiring them to be modified. -- proposed by Bertrand Meyer
In object-oriented programming, OCP can be achieved in various ways. This often requires separating the specification (i.e. interface) of a module from its implementation.
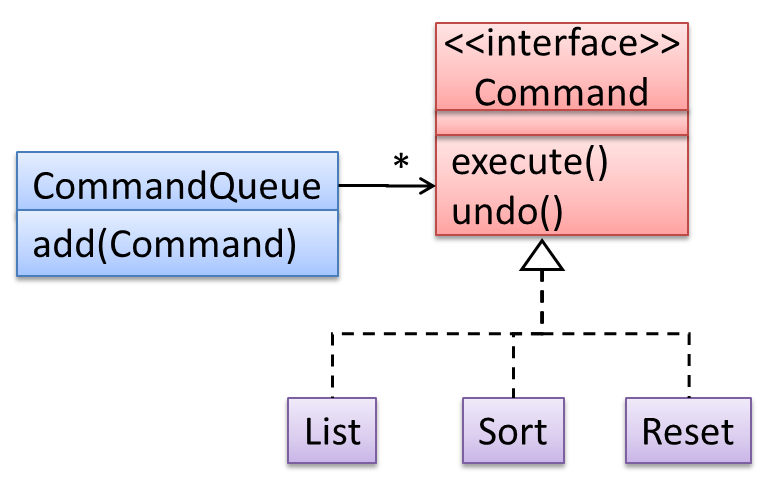
In the design given below, the behavior of the CommandQueue class can be altered by adding more concrete Command subclasses. For example, by including a Delete class alongside List, Sort, and Reset, the CommandQueue can now perform delete commands without modifying its code at all. That is, its behavior was extended without having
to modify its code. Hence, it was open to extensions, but closed to modification.
The behavior of a Java generic class can be altered by passing it a different class as a parameter. In the code below, the ArrayList class behaves as a container of Students in one instance and as a container of Admin objects in the other instance, without having to change its code. That is, the behavior of the ArrayList class is extended without modifying its code.
ArrayList students = new ArrayList< Student >();
ArrayList admins = new ArrayList< Admin >();
Which of these is closest to the meaning of the open-closed principle?
(a)
Explanation: Please refer the handout for the definition of OCP.
Evidence:
Identify where OCP is applied (or applicable) in AddressBook-Level4 (or your own project).
Implementation
W8.2 Can explain integration approaches
W8.2a Can explain how integration approaches vary based on timing and frequency
Implementation → Integration → Approaches →
'Late and One Time' vs 'Early and Frequent'
In terms of timing and frequency, there are two general approaches to integration: late and one-time, early and frequent.
Late and one-time: wait till all components are completed and integrate all finished components near the end of the project.
This approach is not recommended because integration often causes many component incompatibilities (due to previous miscommunications and misunderstandings) to surface which can lead to delivery delays i.e. Late integration → incompatibilities found → major rework required → cannot meet the delivery date.
Early and frequent: integrate early and evolve each part in parallel, in small steps, re-integrating frequently.
A
Here is an animation that compares the two approaches:
W8.2b Can explain how integration approaches vary based on amount merged at
a time
Implementation → Integration → Approaches →
Big-Bang vs Incremental Integration
Big-bang integration: integrate all components at the same time.
Big-bang is not recommended because it will uncover too many problems at the same time which could make debugging and bug-fixing more complex than when problems are uncovered incrementally.
Incremental integration: integrate few components at a time. This approach is better than the big-bang integration because it surfaces integration problems in a more manageable way.
Here is an animation that compares the two approaches:
Give two arguments in support and two arguments against the following statement.
Because there is no external client, it is OK to use big bang integration for a school project.
Arguments for:
- It is relatively simple; even big-bang can succeed.
- Project duration is short; there is not enough time to integrate in steps.
- The system is non-critical, non-production (demo only); the cost of integration issues is relatively small.
Arguments against:
- Inexperienced developers; big-bang more likely to fail
- Too many problems may be discovered too late. Submission deadline (fixed) can be missed.
- Team members have not worked together before; increases the probability of integration problems.
W8.2c Can explain how integration approaches vary based on the order of integration
Implementation → Integration → Approaches →
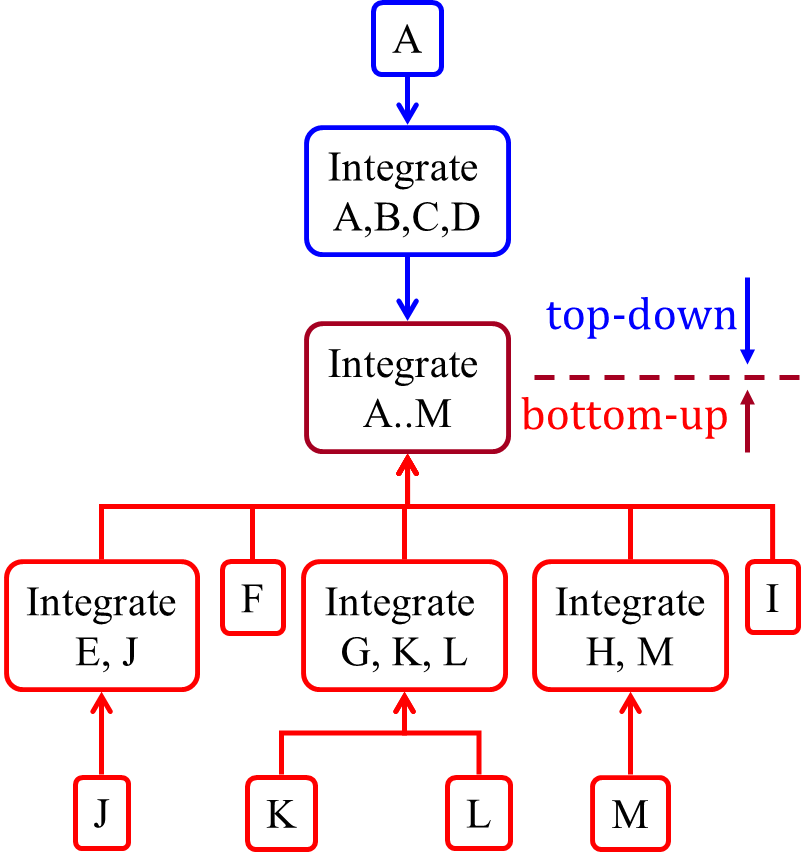
Top-Down vs Bottom-Up Integration
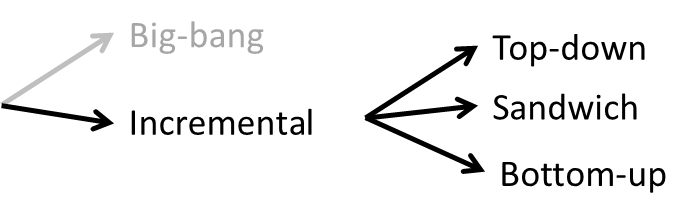
Based on the order in which components are integrated, incremental integration can be done in three ways.
Top-down integration: higher-level components are integrated before bringing in the lower-level components. One advantage of this approach is that higher-level problems can be discovered early. One disadvantage
is that this requires the use of
Stub: A stub has the same interface as the component it replaces, but its implementation is so simple that it is unlikely to have any bugs. It mimics the responses of the component, but only for the a limited set of predetermined inputs. That is, it does not know how to respond to any other inputs. Typically, these mimicked responses are hard-coded in the stub rather than computed or retrieved from elsewhere, e.g. from a database.
Bottom-up integration: the reverse of top-down integration. Note that when integrating lower level components,
Sandwich integration: a mix of the top-down and the bottom-up approaches. The idea is to do both top-down and bottom-up so as to 'meet' in the middle.
Here is an animation that compares the three approaches:
Suggest an integration strategy for the system represented by following diagram. You need not follow a strict top-down, bottom-up, sandwich, or big bang approach. Dashed arrows represent dependencies between classes.
Also take into account the following facts in your test strategy.
HospitalUIwill be developed early, so as to get customer feedback early.HospitalFacadeshields the UI from complexities of the application layer. It simply redirects the method calls received to the appropriate classes belowIO_Helperis to be reused from an earlier project, with minor modifications- Development of
OutPatientcomponent has been outsourced, and the delivery is not expected until the 2nd half of the project.
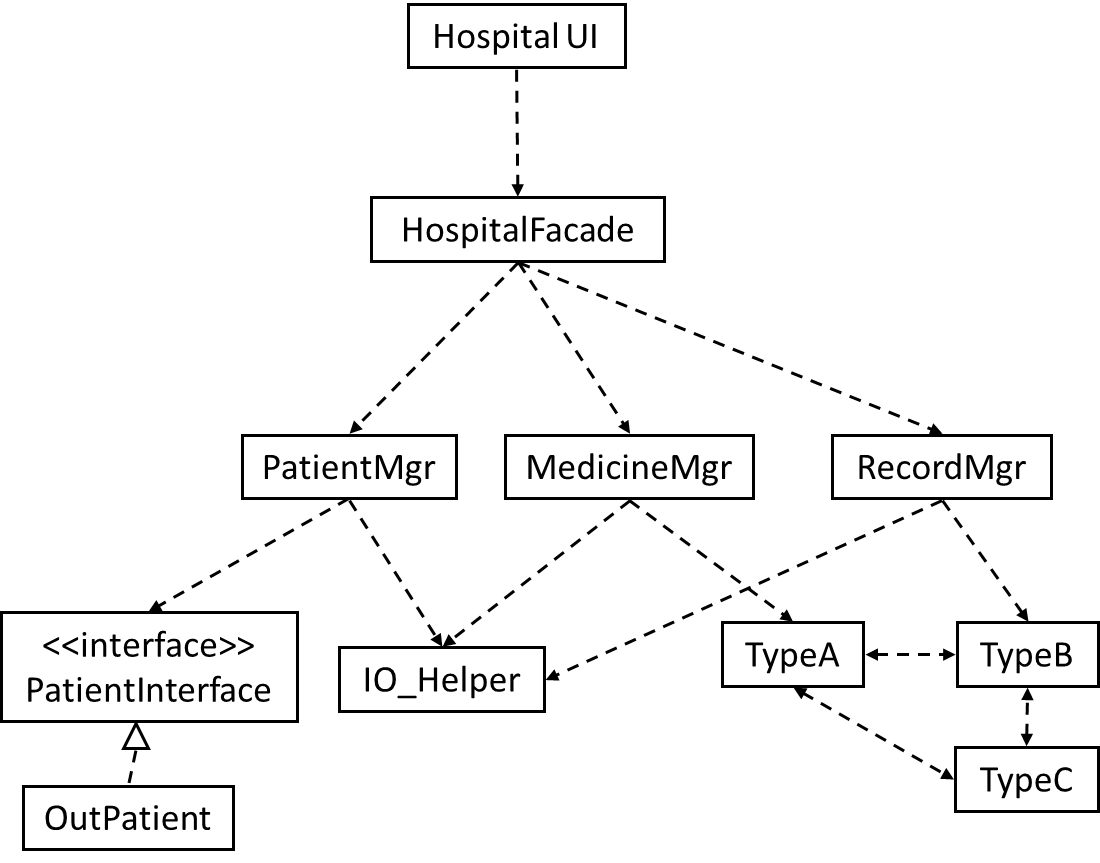
There can be many acceptable answers to this question. But any good strategy should consider at least some of the below.
- Because
HospitalUIwill be developed early, it’s OK to integrate it early, using stubs, rather than wait for the rest of the system to finish. (i.e. a top-down integration is suitable forHospitalUI) - Because
HospitalFacadeis unlikely to have a lot of business logic, it may not be worth to write stubs to test it (i.e. a bottom-up integration is better forHospitalFacade). - Because
IO_Helperis to be reused from an earlier project, we can finish it early. This is especially suitable since there are many classes that use it. ThereforeIO_Helpercan be integrated with the dependent classes in bottom-up fashion. - Because
OutPatientclass may be delayed, we may have to integratePatientMgrusing a stub. TypeA,TypeB, andTypeCseem to be tightly coupled. It may be a good idea to test them together.
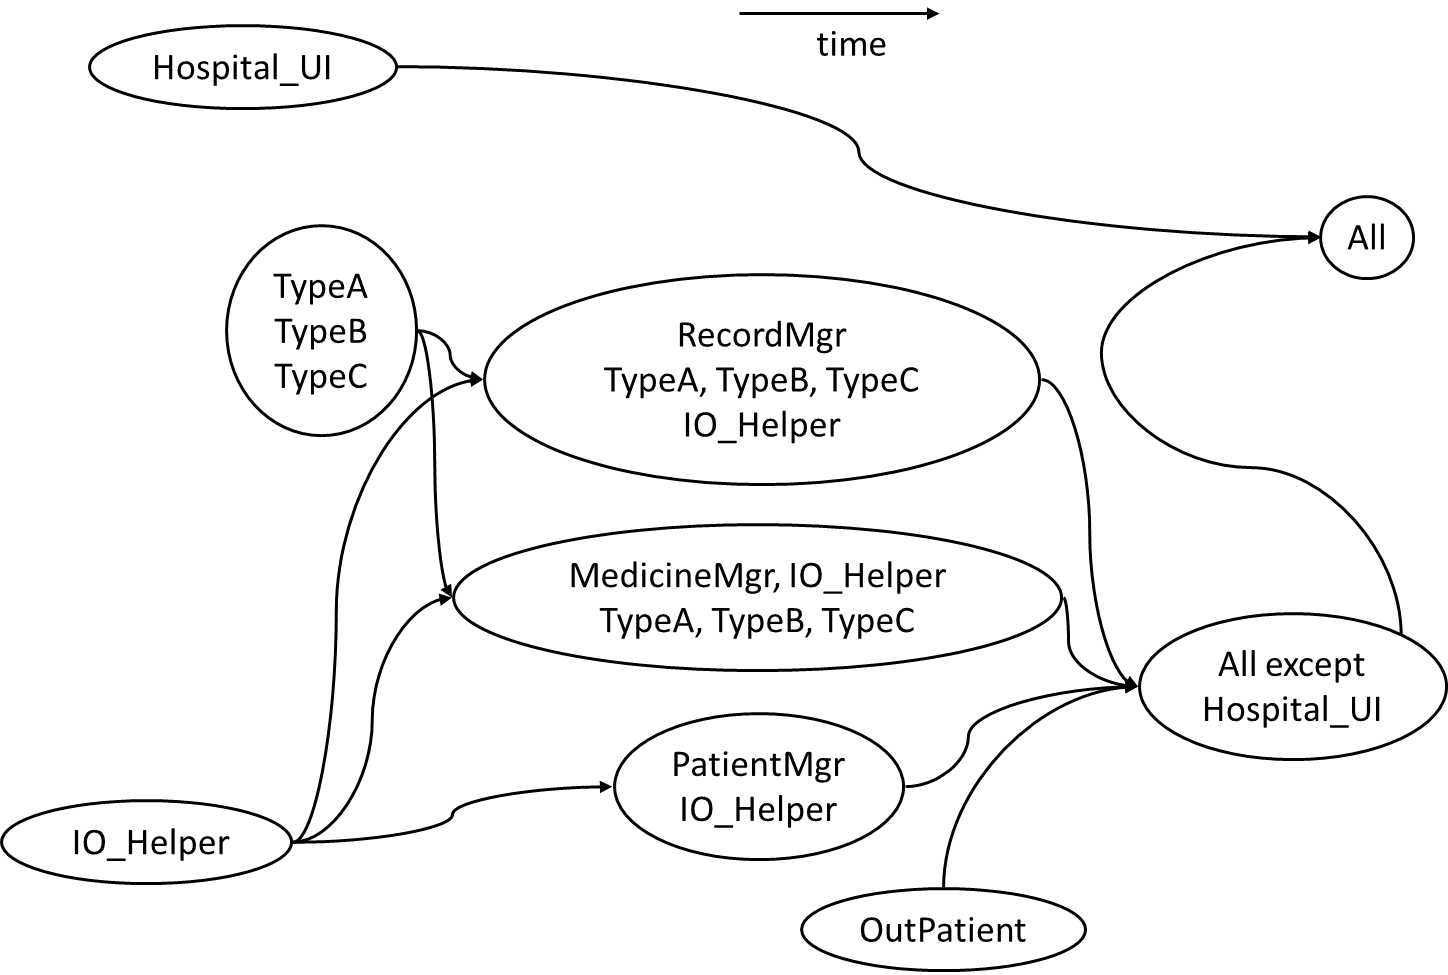
Given below is one possible integration test strategy. Relative positioning also indicates a rough timeline.
Consider the architecture given below. Describe the order in which components will be integrated with one another if the following integration strategies were adopted.
a) top-down b) bottom-up c) sandwich
Note that dashed arrows show dependencies (e.g. A depend on B, C, D and therefore, higher-level than B, C and D).
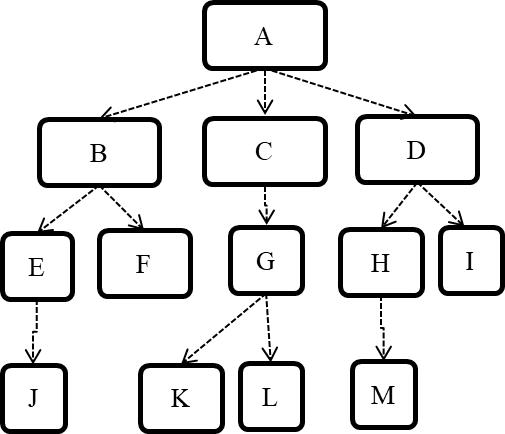
a) Diagram:
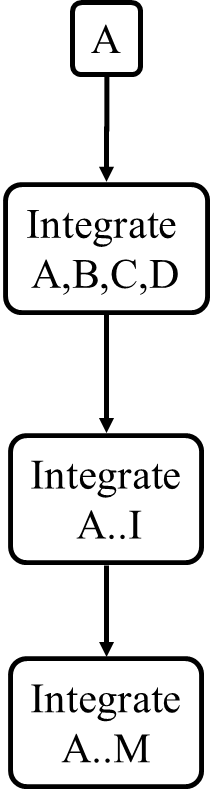
b) Diagram:
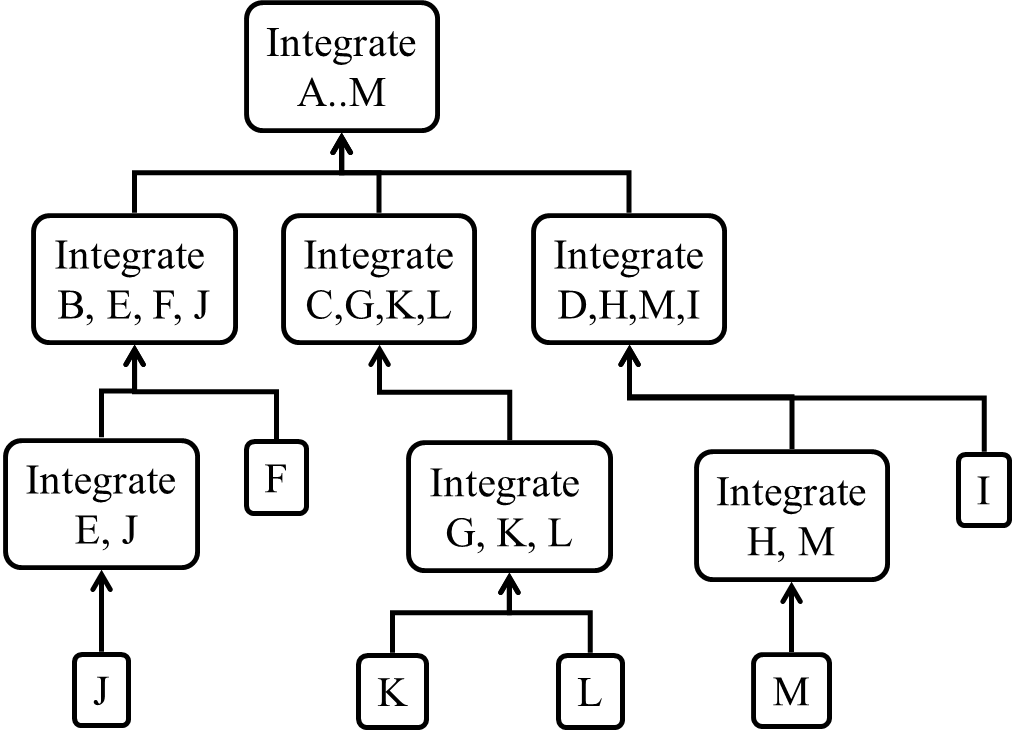
c) Diagram:
Quality Assurance
W8.3 Can explain different types of testing
Unit Testing
W8.3a Can explain unit testing
Quality Assurance → Testing → Unit Testing →
What
Unit testing : testing individual units (methods, classes, subsystems, ...) to ensure each piece works correctly.
In OOP code, it is common to write one or more unit tests for each public method of a class.
Here are the code skeletons for a Foo class containing two methods and a FooTest class that contains unit tests for those two methods.
class Foo{
    String read(){
        //...
    }

    void write(String input){
        //...
    }

}

class FooTest{

    @Test
    void read(){
        //a unit test for Foo#read() method
    }

    @Test
    void write_emptyInput_exceptionThrown(){
        //a unit tests for Foo#write(String) method
    }

    @Test
    void write_normalInput_writtenCorrectly(){
        //another unit tests for Foo#write(String) method
    }
}
import unittest

class Foo:
  def read(self):
      # ...

  def write(self, input):
      # ...


class FooTest(unittest.TestCase):

  def test_read(sefl):
      # a unit test for read() method

  def test_write_emptyIntput_ignored(self):
      # a unit tests for write(string) method

  def test_write_normalInput_writtenCorrectly(self):
      # another unit tests for write(string) method
Side readings:
- [Web article] The three pillars of unit testing - A short article about what makes a good unit test.
- Learning from Apple’s #gotofail Security Bug - How unit testing (and other good coding practices) could have prevented a major security bug.
Evidence:
Identify some unit tests in AddressBook-Level4 (or your own project).
W8.3b Can use stubs to isolate an SUT from its dependencies
Quality Assurance → Testing → Unit Testing →
Stubs
A proper unit test requires the unit to be tested in isolation so that bugs in the
If a Logic class depends on a Storage class, unit testing the Logic class requires isolating the Logic class from the Storage class.
Stubs can isolate the
Stub: A stub has the same interface as the component it replaces, but its implementation is so simple that it is unlikely to have any bugs. It mimics the responses of the component, but only for the a limited set of predetermined inputs. That is, it does not know how to respond to any other inputs. Typically, these mimicked responses are hard-coded in the stub rather than computed or retrieved from elsewhere, e.g. from a database.
Consider the code below:
class Logic {
    Storage s;

    Logic(Storage s) {
        this.s = s;
    }

    String getName(int index) {
        return "Name: " + s.getName(index);
    }
}

interface Storage {
    String getName(int index);
}

class DatabaseStorage implements Storage {

    @Override
    public String getName(int index) {
        return readValueFromDatabase(index);
    }

    private String readValueFromDatabase(int index) {
        // retrieve name from the database
    }
}
Normally, you would use the Logic class as follows (not how the Logic object depends on a DatabaseStorage object to perform the getName() operation):
Logic logic = new Logic(new DatabaseStorage());
String name = logic.getName(23);
You can test it like this:
@Test
void getName() {
    Logic logic = new Logic(new DatabaseStorage());
    assertEquals("Name: John", logic.getName(5));
}
However, this logic object being tested is making use of a DataBaseStorage object which means a bug in the DatabaseStorage class can affect the test. Therefore, this test is not testing Logic in isolation from its dependencies and hence it is not a pure unit test.
Here is a stub class you can use in place of DatabaseStorage:
class StorageStub implements Storage {

    @Override
    public String getName(int index) {
        if(index == 5) {
            return "Adam";
        } else {
            throw new UnsupportedOperationException();
        }
    }
}
Note how the stub has the same interface as the real dependency, is so simple that it is unlikely to contain bugs, and is pre-configured to respond with a hard-coded response, presumably, the correct response DatabaseStorage is expected to return for the given test input.
Here is how you can use the stub to write a unit test. This test is not affected by any bugs in the DatabaseStorage class and hence is a pure unit test.
@Test
void getName() {
    Logic logic = new Logic(new StorageStub());
    assertEquals("Name: Adam", logic.getName(5));
}
In addition to Stubs, there are other type of replacements you can use during testing. E.g. Mocks, Fakes, Dummies, Spies.
- Mocks Aren't Stubs by Martin Fowler -- An in-depth article about how Stubs differ from other types of test helpers.
Stubs help us to test a component in isolation from its dependencies.
True
Evidence:
Identify some tests in AddressBook-Level4,
- that can be made pure unit tests by introducing stubs
- that are using stubs to isolate the SUT from its dependencies
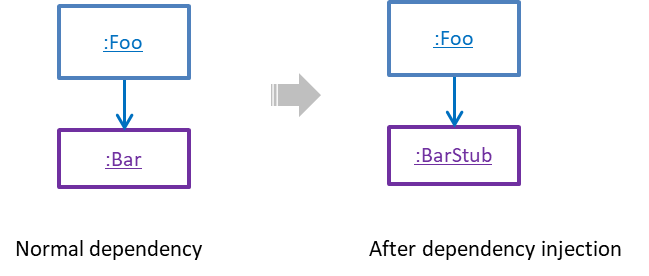
W8.3c Can explain dependency injection
Quality Assurance → Testing → Dependency Injection →
What
Dependency injection is the process of 'injecting' objects to replace current dependencies with a different object. This is often used to inject
Quality Assurance → Testing → Unit Testing →
Stubs
A proper unit test requires the unit to be tested in isolation so that bugs in the
If a Logic class depends on a Storage class, unit testing the Logic class requires isolating the Logic class from the Storage class.
Stubs can isolate the
Stub: A stub has the same interface as the component it replaces, but its implementation is so simple that it is unlikely to have any bugs. It mimics the responses of the component, but only for the a limited set of predetermined inputs. That is, it does not know how to respond to any other inputs. Typically, these mimicked responses are hard-coded in the stub rather than computed or retrieved from elsewhere, e.g. from a database.
Consider the code below:
class Logic {
    Storage s;

    Logic(Storage s) {
        this.s = s;
    }

    String getName(int index) {
        return "Name: " + s.getName(index);
    }
}

interface Storage {
    String getName(int index);
}

class DatabaseStorage implements Storage {

    @Override
    public String getName(int index) {
        return readValueFromDatabase(index);
    }

    private String readValueFromDatabase(int index) {
        // retrieve name from the database
    }
}
Normally, you would use the Logic class as follows (not how the Logic object depends on a DatabaseStorage object to perform the getName() operation):
Logic logic = new Logic(new DatabaseStorage());
String name = logic.getName(23);
You can test it like this:
@Test
void getName() {
    Logic logic = new Logic(new DatabaseStorage());
    assertEquals("Name: John", logic.getName(5));
}
However, this logic object being tested is making use of a DataBaseStorage object which means a bug in the DatabaseStorage class can affect the test. Therefore, this test is not
testing Logic in isolation from its dependencies and hence it is not a pure unit test.
Here is a stub class you can use in place of DatabaseStorage:
class StorageStub implements Storage {

    @Override
    public String getName(int index) {
        if(index == 5) {
            return "Adam";
        } else {
            throw new UnsupportedOperationException();
        }
    }
}
Note how the stub has the same interface as the real dependency, is so simple that it is unlikely to contain bugs, and is pre-configured to respond with a hard-coded response, presumably, the correct response DatabaseStorage is expected to return for the given test input.
Here is how you can use the stub to write a unit test. This test is not affected by any bugs in the DatabaseStorage class and hence is a pure unit test.
@Test
void getName() {
    Logic logic = new Logic(new StorageStub());
    assertEquals("Name: Adam", logic.getName(5));
}
In addition to Stubs, there are other type of replacements you can use during testing. E.g. Mocks, Fakes, Dummies, Spies.
- Mocks Aren't Stubs by Martin Fowler -- An in-depth article about how Stubs differ from other types of test helpers.
Stubs help us to test a component in isolation from its dependencies.
True
A Foo object normally depends on a Bar object, but we can inject a BarStub object so that the Foo object no longer depends on a Bar object. Now we can test the Foo object in isolation from the Bar object.
W8.3d Can use dependency injection
Quality Assurance → Testing → Dependency Injection →
How
Polymorphism can be used to implement dependency injection, as can be seen in the example given in
Quality Assurance → Testing → Unit Testing →
Stubs
A proper unit test requires the unit to be tested in isolation so that bugs in the
If a Logic class depends on a Storage class, unit testing the Logic class requires isolating the Logic class from the Storage class.
Stubs can isolate the
Stub: A stub has the same interface as the component it replaces, but its implementation is so simple that it is unlikely to have any bugs. It mimics the responses of the component, but only for the a limited set of predetermined inputs. That is, it does not know how to respond to any other inputs. Typically, these mimicked responses are hard-coded in the stub rather than computed or retrieved from elsewhere, e.g. from a database.
Consider the code below:
class Logic {
    Storage s;

    Logic(Storage s) {
        this.s = s;
    }

    String getName(int index) {
        return "Name: " + s.getName(index);
    }
}

interface Storage {
    String getName(int index);
}

class DatabaseStorage implements Storage {

    @Override
    public String getName(int index) {
        return readValueFromDatabase(index);
    }

    private String readValueFromDatabase(int index) {
        // retrieve name from the database
    }
}
Normally, you would use the Logic class as follows (not how the Logic object depends on a DatabaseStorage object to perform the getName() operation):
Logic logic = new Logic(new DatabaseStorage());
String name = logic.getName(23);
You can test it like this:
@Test
void getName() {
    Logic logic = new Logic(new DatabaseStorage());
    assertEquals("Name: John", logic.getName(5));
}
However, this logic object being tested is making use of a DataBaseStorage object which means a bug in the DatabaseStorage class can affect the test. Therefore, this test is not
testing Logic in isolation from its dependencies and hence it is not a pure unit test.
Here is a stub class you can use in place of DatabaseStorage:
class StorageStub implements Storage {

    @Override
    public String getName(int index) {
        if(index == 5) {
            return "Adam";
        } else {
            throw new UnsupportedOperationException();
        }
    }
}
Note how the stub has the same interface as the real dependency, is so simple that it is unlikely to contain bugs, and is pre-configured to respond with a hard-coded response, presumably, the correct response DatabaseStorage is expected to return for the given test input.
Here is how you can use the stub to write a unit test. This test is not affected by any bugs in the DatabaseStorage class and hence is a pure unit test.
@Test
void getName() {
    Logic logic = new Logic(new StorageStub());
    assertEquals("Name: Adam", logic.getName(5));
}
In addition to Stubs, there are other type of replacements you can use during testing. E.g. Mocks, Fakes, Dummies, Spies.
- Mocks Aren't Stubs by Martin Fowler -- An in-depth article about how Stubs differ from other types of test helpers.
Stubs help us to test a component in isolation from its dependencies.
True
Here is another example of using polymorphism to implement dependency injection:
Suppose we want to unit test the Payroll#totalSalary() given below. The method depends on the SalaryManager object to calculate the return value. Note how the setSalaryManager(SalaryManager) can be used to inject a SalaryManager object to replace the current SalaryManager object.
class Payroll {
    private SalaryManager manager = new SalaryManager();
    private String[] employees;

    void setEmployees(String[] employees) {
        this.employees = employees;
    }

    void setSalaryManager(SalaryManager sm) {
       this. manager = sm;
    }

    double totalSalary() {
        double total = 0;
        for(int i = 0;i < employees.length; i++){
            total += manager.getSalaryForEmployee(employees[i]);
        }
        return total;
    }
}


class SalaryManager {
    double getSalaryForEmployee(String empID){
        //code to access employee’s salary history
        //code to calculate total salary paid and return it
    }
}
During testing, you can inject a SalaryManagerStub object to replace the SalaryManager object.
class PayrollTest {
    public static void main(String[] args) {
        //test setup
        Payroll p = new Payroll();
        p.setSalaryManager(new SalaryManagerStub()); //dependency injection
        //test case 1
        p.setEmployees(new String[]{"E001", "E002"});
        assertEquals(2500.0, p.totalSalary());
        //test case 2
        p.setEmployees(new String[]{"E001"});
        assertEquals(1000.0, p.totalSalary());
        //more tests ...
    }
}


class SalaryManagerStub extends SalaryManager {
    /** Returns hard coded values used for testing */
    double getSalaryForEmployee(String empID) {
        if(empID.equals("E001")) {
            return 1000.0;
        } else if(empID.equals("E002")) {
            return 1500.0;
        } else {
            throw new Error("unknown id");
        }
    }
}
Choose correct statement about dependency injection
- a. It is a technique for increasing dependencies
- b. It is useful for unit testing
- c. It can be done using polymorphism
- d. It can be used to substitute a component with a stub
(a)(b)(c)(d)
Explanation: It is a technique we can use to substitute an existing dependency with another, not increase dependencies. It is useful when you want to test a component in isolation but the SUT depends on other components. Using dependency injection, we can substitute those other components with test-friendly stubs. This is often done using polymorphism.
Integration Testing
W8.3e Can explain integration testing
Quality Assurance → Testing → Integration Testing →
What
Integration testing : testing whether different parts of the software work together (i.e. integrates) as expected. Integration tests aim to discover bugs in the 'glue code' related to how components interact with each other. These bugs are often the result of misunderstanding of what the parts are supposed to do vs what the parts are actually doing.
Suppose a class Car users classes Engine and Wheel. If the Car class assumed a Wheel can support 200 mph speed but the actual Wheel can only support 150 mph, it is the integration test that is supposed to uncover this discrepancy.
Evidence:
Explain the difference between unit tests and integration tests.
W8.3f Can explain integration testing
Quality Assurance → Testing → Integration Testing →
How
Integration testing is not simply a repetition of the unit test cases but run using the actual dependencies (instead of the stubs used in unit testing). Instead, integration tests are additional test cases that focus on the interactions between the parts.
Suppose a class Car uses classes Engine and Wheel. Here is how you would go about doing pure integration tests:
a) First, unit test Engine and Wheel.
b) Next, unit test Car in isolation of Engine and Wheel, using stubs for Engine and Wheel.
c) After that, do an integration test for Car using it together with the Engine and Wheel classes to ensure the Car integrates properly with the Engine and the
Wheel.
In practice, developers often use a hybrid of unit+integration tests to minimize the need for stubs.
Here's how a hybrid unit+integration approach could be applied to the same example used above:
(a) First, unit test Engine and Wheel.
(b) Next, unit test Car in isolation of Engine and Wheel, using stubs for Engine and Wheel.
(c) After that, do an integration test for Car using it together with the Engine and Wheel classes to ensure the Car integrates properly with the Engine and the Wheel. This step should include test cases that are meant to test the unit Car (i.e. test cases used in the step (b) of the example above) as well as test cases that are meant to test the integration of Car with Wheel and Engine (i.e. pure integration test cases used
of the step (c) in the example above).
💡 Note that you no longer need stubs for Engine and Wheel. The downside is that Car is never tested in isolation of its dependencies. Given that its dependencies are already unit tested,
the risk of bugs in Engine and Wheel affecting the testing of Car can be considered minimal.
Evidence:
Use tests from AddressBook-Level4 to illustrate the difference between unit testings and integration testing. Hint: good examples seedu.address.storage.StorageManagerTest,
seedu.address.logic.commands.AddCommandTest,seedu.address.logic.commands.AddCommandIntegrationTest
System Testing
W8.3g Can explain system testing
Quality Assurance → Testing → System Testing →
What
System testing: take the whole system and test it against the system specification.
System testing is typically done by a testing team (also called a QA team).
System test cases are based on the specified external behavior of the system. Sometimes, system tests go beyond the bounds defined in the specification. This is useful when testing that the system fails 'gracefully' having pushed beyond its limits.
Suppose the SUT is a browser supposedly capable of handling web pages containing up to 5000 characters. Given below is a test case to test if the SUT fails gracefully if pushed beyond its limits.
Test case: load a web page that is too big
* Input: load a web page containing more than 5000 characters.
* Expected behavior: abort the loading of the page and show a meaningful error message.
This test case would fail if the browser attempted to load the large file anyway and crashed.
System testing includes testing against non-functional requirements too. Here are some examples.
- Performance testing – to ensure the system responds quickly.
- Load testing (also called stress testing or scalability testing) – to ensure the system can work under heavy load.
- Security testing – to test how secure the system is.
- Compatibility testing, interoperability testing – to check whether the system can work with other systems.
- Usability testing – to test how easy it is to use the system.
- Portability testing – to test whether the system works on different platforms.
Evidence:
Explain what system tests are. Give examples from your own project.
W8.3h Can explain automated GUI testing
Quality Assurance → Testing → Test Automation →
Automated Testing of GUIs
If a software product has a GUI component, all product-level testing (i.e. the types of testing mentioned above) need to be done using the GUI. However, testing the GUI is much harder than testing the CLI (command line interface) or API, for the following reasons:
- Most GUIs can support a large number of different operations, many of which can be performed in any arbitrary order.
- GUI operations are more difficult to automate than API testing. Reliably automating GUI operations and automatically verifying whether the GUI behaves as expected is harder than calling an operation and comparing its return value with an expected value. Therefore, automated regression testing of GUIs is rather difficult.
- The appearance of a GUI (and sometimes even behavior) can be different across platforms and even environments. For example, a GUI can behave differently based on whether it is minimized or maximized, in focus or out of focus, and in a high resolution display or a low resolution display.
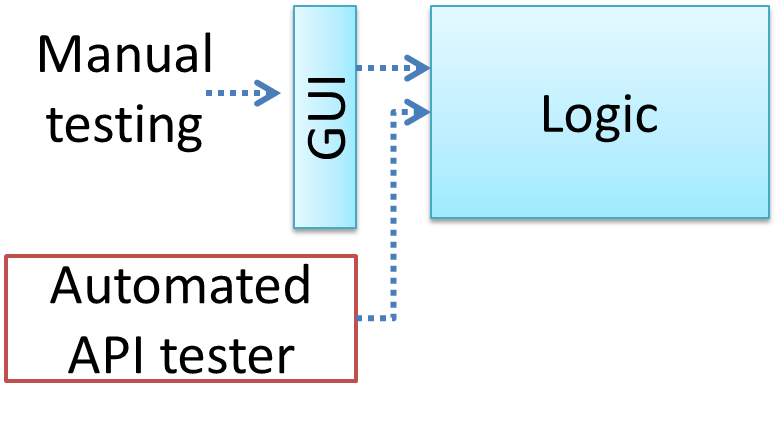
One approach to overcome the challenges of testing GUIs is to minimize logic aspects in the GUI. Then, bypass the GUI to test the rest of the system using automated API testing. While this still requires the GUI to be tested manually, the number of such manual test cases can be reduced as most of the system has been tested using automated API testing.
There are testing tools that can automate GUI testing.
Some tools used for automated GUI testing:
GUI testing is usually easier than API testing because it doesn’t require any extra coding.
False
Evidence:
Why is automated testing of GUIs is hard? What can we do about it?
Acceptance Testing
W8.3i Can explain acceptance testing
Quality Assurance → Testing → Acceptance Testing →
What
Acceptance testing (aka User Acceptance Testing (UAT)): test the delivered system to ensure it meets the user requirements.
Acceptance tests give an assurance to the customer that the system does what it is intended to do. Acceptance test cases are often defined at the beginning of the project, usually based on the use case specification. Successful completion of UAT is often a prerequisite to the project sign-off.
Evidence:
Explain what acceptance tests are. Explain how acceptance testing of your project will be done.
W8.3j Can explain the differences between system testing and acceptance testing
Quality Assurance → Testing → Acceptance Testing →
Acceptance vs System Testing
Acceptance testing comes after system testing. Similar to system testing, acceptance testing involves testing the whole system.
Some differences between system testing and acceptance testing:
| System Testing | Acceptance Testing |
|---|---|
| Done against the system specification | Done against the requirements specification |
| Done by testers of the project team | Done by a team that represents the customer |
| Done on the development environment or a test bed | Done on the deployment site or on a close simulation of the deployment site |
| Both negative and positive test cases | More focus on positive test cases |
Note: negative test cases: cases where the SUT is not expected to work normally e.g. incorrect inputs; positive test cases: cases where the SUT is expected to work normally
Requirement Specification vs System Specification
The requirement specification need not be the same as the system specification. Some example differences:
| Requirements Specification | System Specification |
|---|---|
| limited to how the system behaves in normal working conditions | can also include details on how it will fail gracefully when pushed beyond limits, how to recover, etc. specification |
| written in terms of problems that need to be solved (e.g. provide a method to locate an email quickly) | written in terms of how the system solve those problems (e.g. explain the email search feature) |
| specifies the interface available for intended end-users | could contain additional APIs not available for end-users (for the use of developers/testers) |
However, in many cases one document serves as both a requirement specification and a system specification.
Passing system tests does not necessarily mean passing acceptance testing. Some examples:
- The system might work on the testbed environments but might not work the same way in the deployment environment, due to subtle differences between the two environments.
- The system might conform to the system specification but could fail to solve the problem it was supposed to solve for the user, due to flaws in the system design.
Choose the correct statements about system testing and acceptance testing.
- a. Both system testing and acceptance testing typically involve the whole system.
- b. System testing is typically more extensive than acceptance testing.
- c. System testing can include testing for non-functional qualities.
- d. Acceptance testing typically has more user involvement than system testing.
- e. In smaller projects, the developers may do system testing as well, in addition to developer testing.
- f. If system testing is adequately done, we need not do acceptance testing.
(a)(b)(c)(d)(e)(f)
Explanation:
(b) is correct because system testing can aim to cover all specified behaviors and can even go beyond the system specification. Therefore, system testing is typically more extensive than acceptance testing.
(f) is incorrect because it is possible for a system to pass system tests but fail acceptance tests.
Evidence:
Explain the difference between system tests and acceptance tests. Explain why both are needed.
Alpha/Beta Testing
W8.3k Can explain alpha and beta testing
Quality Assurance → Testing → Alpha/Beta Testing →
What
Alpha testing is performed by the users, under controlled conditions set by the software development team.
Beta testing is performed by a selected subset of target users of the system in their natural work setting.
An open beta release is the release of not-yet-production-quality-but-almost-there software to the general population. For example, Google’s Gmail was in 'beta' for many years before the label was finally removed.
Evidence:
Explain alpha and beta testing. How can you do alpha and beta testing in your project?
W8.4 Can write simple JUnit tests
W8.4a Can explain developer testing
Quality Assurance → Testing → Developer Testing →
What
Developer testing is the testing done by the developers themselves as opposed to professional testers or end-users.
W8.4b Can explain the need for early developer testing
Quality Assurance → Testing → Developer Testing →
Why
Delaying testing until the full product is complete has a number of disadvantages:
- Locating the cause of such a test case failure is difficult due to a large search space; in a large system, the search space could be millions of lines of code, written by hundreds of developers! The failure may also be due to multiple inter-related bugs.
- Fixing a bug found during such testing could result in major rework, especially if the bug originated during the design or during requirements specification i.e. a faulty design or faulty requirements.
- One bug might 'hide' other bugs, which could emerge only after the first bug is fixed.
- The delivery may have to be delayed if too many bugs were found during testing.
Therefore, it is better to do early testing, as hinted by the popular rule of thumb given below, also illustrated by the graph below it.
The earlier a bug is found, the easier and cheaper to have it fixed.
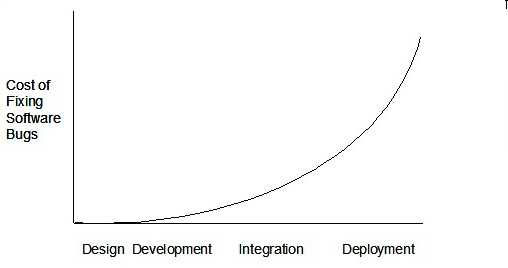
Such early testing of partially developed software is usually, and by necessity, done by the developers themselves i.e. developer testing.
Discuss pros and cons of developers testing their own code.
Pros:
- Can be done early (the earlier we find a bug, the cheaper it is to fix).
- Can be done at lower levels, for examples, at operation and class level (testers usually test the system at UI level).
- It is possible to do more thorough testing because developers know the expected external behavior as well as the internal structure of the component.
- It forces developers to take responsibility for their own work (they cannot claim that "testing is the job of the testers").
Cons:
- A developer may subconsciously test only situations that he knows to work (i.e. test it too 'gently').
- A developer may be blind to his own mistakes (if he did not consider a certain combination of input while writing code, it is possible for him to miss it again during testing).
- A developer may have misunderstood what the SUT is supposed to do in the first place.
- A developer may lack the testing expertise.
The cost of fixing a bug goes down as we reach the product release.
False. The cost goes up over time.
Explain why early testing by developers is important.
Evidence:
Explain why early testing by developers is important.
W8.4c Can explain test drivers
Quality Assurance → Testing → Test Automation →
Test Automation Using Test Drivers
A test driver is the code that ‘drives’ the
PayrollTest ‘drives’ the PayRoll class by sending it test inputs and verifies if the output is as expected.
public class PayrollTestDriver {
    public static void main(String[] args) throws Exception {

        //test setup
        Payroll p = new Payroll();

        //test case 1
        p.setEmployees(new String[]{"E001", "E002"});
        // automatically verify the response
        if (p.totalSalary() != 6400) {
            throw new Error("case 1 failed ");
        }

        //test case 2
        p.setEmployees(new String[]{"E001"});
        if (p.totalSalary() != 2300) {
            throw new Error("case 2 failed ");
        }

        //more tests...

        System.out.println("All tests passed");
    }
}
W8.4d Can explain test automation tools
Quality Assurance → Testing → Test Automation →
Test Automation Tools
JUnit is a tool for automated testing of Java programs. Similar tools are available for other languages and for automating different types of testing.
This an automated test for a Payroll class, written using JUnit libraries.
@Test
public void testTotalSalary(){
    Payroll p = new Payroll();

    //test case 1
    p.setEmployees(new String[]{"E001", "E002"});
    assertEquals(p.totalSalary(), 6400);

    //test case 2
    p.setEmployees(new String[]{"E001"});
    assertEquals(p.totalSalary(), 2300);

    //more tests...
}
Most modern IDEs has integrated support for testing tools. The figure below shows the JUnit output when running some JUnit tests using the Eclipse IDE.
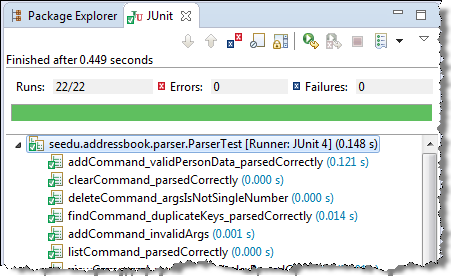
W8.4e Can use simple JUnit tests
Tools → JUnit →
JUnit: Basic
When writing JUnit tests for a class Foo, the common practice is to create a FooTest class, which will contain various test methods.
Suppose we want to write tests for the IntPair class below.
public class IntPair {
    int first;
    int second;

    public IntPair(int first, int second) {
        this.first = first;
        this.second = second;
    }

    public int intDivision() throws Exception {
        if (second == 0){
            throw new Exception("Divisor is zero");
        }
        return first/second;
    }

    @Override
    public String toString() {
        return first + "," + second;
    }
}
Here's a IntPairTest class to match.
import org.junit.Test;
import org.junit.Assert;

public class IntPairTest {

    @Test
    public void testStringConversion() {
        Assert.assertEquals("4,7", new IntPair(4, 7).toString());
    }

    @Test
    public void intDivision_nonZeroDivisor_success() throws Exception {
        Assert.assertEquals(2, new IntPair(4, 2).intDivision());
        Assert.assertEquals(0, new IntPair(1, 2).intDivision());
        Assert.assertEquals(0, new IntPair(0, 5).intDivision());
    }

    @Test
    public void intDivision_zeroDivisor_exceptionThrown() {
        try {
            Assert.assertEquals(0, new IntPair(1, 0).intDivision());
            Assert.fail(); // the test should not reach this line
        } catch (Exception e) {
            Assert.assertEquals("Divisor is zero", e.getMessage());
        }
    }
}
Notes:
- Each test method is marked with a
@Testannotation. - Tests use
Assert.assertEquals(expected, actual)methods to compare the expected output with the actual output. If they do not match, the test will fail. JUnit comes with other similar methods such asAssert.assertNullandAssert.assertTrue. - Java code normally use camelCase for method names e.g.,
testStringConversionbut when writing test methods, sometimes another convention is used:whatIsBeingTested_descriptionOfTestInputs_expectedOutcomee.g.,intDivision_zeroDivisor_exceptionThrown - There are several ways to verify the code throws the correct exception. The third test method in the example above shows one of the simpler methods. If
the exception is thrown, it will be caught and further verified inside the
catchblock. But if it is not thrown as expected, the test will reachAssert.fail()line and will fail as a result. - The easiest way to run JUnit tests is to do it via the IDE. For example, in Intellij you can right-click the folder containing test classes and choose 'Run all tests...'
- Optionally, you can use static imports to avoid having to specify
Assert.everywhere.import static org.junit.Assert.assertEquals; //... @Test public void testStringConversion() { assertEquals("4,7", new IntPair(4, 7).toString()); }
JUnit 4 with IntelliJ: A quick introduction -- by DrBFraser
- JUnit cookbook - a short tutorial from JUnit creators
- JUnit tutorial - a more detailed tutorial from a developer Lars Vogel
- How to test private methods in Java? [ short answer ] [ long answer ]
Evidence:
Suggested: Evidence of having written JUnit tests your projects.
Refresher: Do the exercise in [Addressbook-Level2: LO-JUnit]
Submission: Show the JUnit tests you wrote to your tutor.
Project Management
W8.5 Can use basic scheduling and tracking tools
W8.5a Can explain milestones
Project Management → Project Planning →
Milestones
A milestone is the end of a stage which indicates a significant progress. We should take into account dependencies and priorities when deciding on the features to be delivered at a certain milestone.
Each intermediate product release is a milestone.
In some projects, it is not practical to have a very detailed plan for the whole project due to the uncertainty and unavailability of required information. In such cases, we can use a high-level plan for the whole project and a detailed plan for the next few milestones.
Milestones for the Minesweeper project, iteration 1
| Day | Milestones |
|---|---|
| Day 1 | Architecture skeleton completed |
| Day 3 | ‘new game’ feature implemented |
| Day 4 | ‘new game’ feature tested |
Evidence:
Identify milestones of your class project.
W8.5b Can explain buffers
Project Management → Project Planning →
Buffers
A buffer is a time set aside to absorb any unforeseen delays. It is very important to include buffers in a software project schedule because effort/time estimations for software development is notoriously hard. However, do not inflate task estimates to create hidden buffers; have explicit buffers instead. Reason: With explicit buffers it is easier to detect incorrect effort estimates which can serve as a feedback to improve future effort estimates.
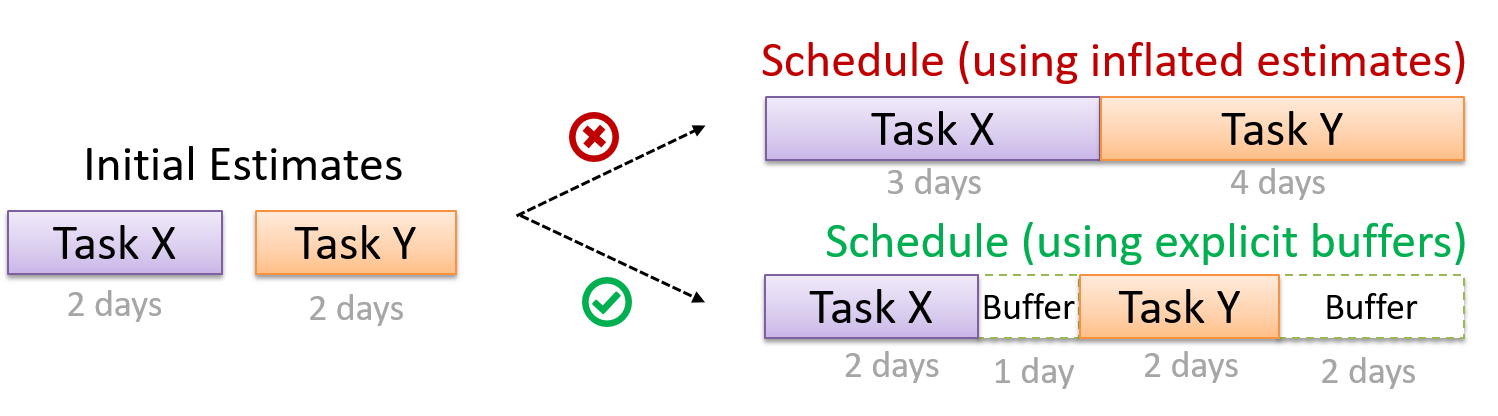
Evidence:
Explain how buffers can be used in your class project.
W8.5c Can explain issue trackers
Project Management → Project Planning →
Issue Trackers
Keeping track of project tasks (who is doing what, which tasks are ongoing, which tasks are done etc.) is an essential part of project management. In small projects it may be possible to track tasks using simple tools as online spreadsheets or general-purpose/light-weight tasks tracking tools such as Trello. Bigger projects need more sophisticated task tracking tools.
Issue trackers (sometimes called bug trackers) are commonly used to track task assignment and progress. Most online project management software such as GitHub, SourceForge, and BitBucket come with an integrated issue tracker.
A screenshot from the Jira Issue tracker software (Jira is part of the BitBucket project management tool suite):

Evidence:
Explain the role of GitHub issue tracker can play in your project.
W8.5d Can explain work breakdown structures
Project Management → Project Planning →
Work Breakdown Structure
A Work Breakdown Structure (WBS) depicts information about tasks and their details in terms of subtasks. When managing projects it is useful to divide the total work into smaller, well-defined units. Relatively complex tasks can be further split into subtasks. In complex projects a WBS can also include prerequisite tasks and effort estimates for each task.
The high level tasks for a single iteration of a small project could look like the following:
| Task ID | Task | Estimated Effort | Prerequisite Task |
|---|---|---|---|
| A | Analysis | 1 man day | - |
| B | Design | 2 man day | A |
| C | Implementation | 4.5 man day | B |
| D | Testing | 1 man day | C |
| E | Planning for next version | 1 man day | D |
The effort is traditionally measured in man hour/day/month i.e. work that can be done by one person in one hour/day/month. The Task ID is a label for easy reference to a task. Simple labeling is suitable for a small project, while a more informative labeling system can be adopted for bigger projects.
An example WBS for a project for developing a game.
| Task ID | Task | Estimated Effort | Prerequisite Task |
|---|---|---|---|
| A | High level design | 1 man day | - |
| B |
Detail design
|
2 man day
|
A |
| C |
Implementation
|
4.5 man day
|
|
| D | System Testing | 1 man day | C |
| E | Planning for next version | 1 man day | D |
All tasks should be well-defined. In particular, it should be clear as to when the task will be considered done.
Some examples of ill-defined tasks and their better-defined counterparts:
| Bad | Better |
|---|---|
| more coding | implement component X |
| do research on UI testing | find a suitable tool for testing the UI |
Which one these project tasks is not well-defined?
(c)
Explanation: ‘More testing’ is not well-defined. How much is ‘more’? ‘Test the delete functionality’ is a better-defined task.
Evidence:
Break down the project into well-defined tasks and records them in the issue tracker.
W8.5e Can explain GANTT charts
Project Management → Project Planning →
GANTT Charts
A Gantt chart is a 2-D bar-chart, drawn as time vs tasks (represented by horizontal bars).
A sample Gantt chart:
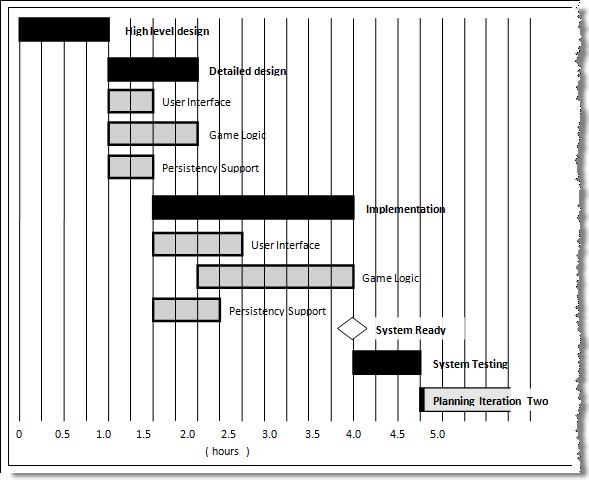
In a Gantt chart, a solid bar represents the main task, which is generally composed of a number of subtasks, shown as grey bars. The diamond shape indicates an important deadline/deliverable/milestone.
W8.5f Can explain PERT charts
Project Management → Project Planning →
PERT Charts
PERT (Program Evaluation Review Technique) chart uses a graphical technique to show the order/sequence of tasks. It is based on a simple idea of drawing a directed graph in which:
- Node or vertex captures the effort estimation of a task, and
- Arrow depicts the precedence between tasks
an example PERT chart for a simple software project
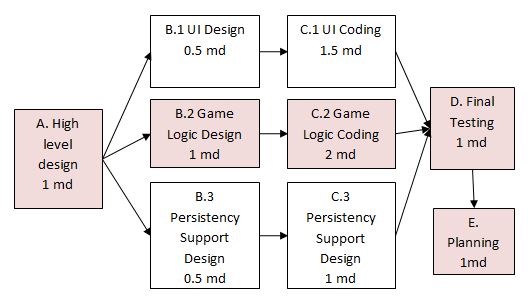
md = man days
A PERT chart can help determine the following important information:
- The order of tasks. In the example above,
Final Testingcannot begin until all coding of individual subsystems have been completed. - Which tasks can be done concurrently. In the example above, the various subsystem designs can start independently once the
High level designis completed. - The shortest possible completion time. In the example above, there is a path (indicated by the shaded boxes) from start to end that determines the shortest possible completion time.
- The Critical Path. In the example above, the shortest possible path is also the critical path.
Critical path is the path in which any delay can directly affect the project duration. It is important to ensure tasks on the critical path are completed on time.
W8.5g Can explain common team structures
Project Management → Teamwork →
Team Structures
Given below are three commonly used team structures in software development. Irrespective of the team structure, it is a good practice to assign roles and responsibilities to different team members so that someone is clearly in charge of each aspect of the project. In comparison, the ‘everybody is responsible for everything’ approach can result in more chaos and hence slower progress.
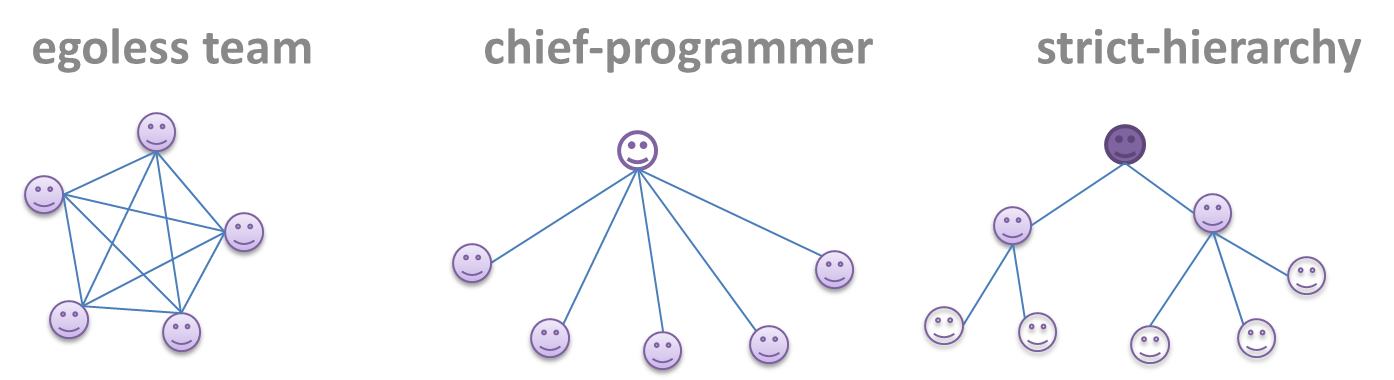
Egoless team
In this structure, every team member is equal in terms of responsibility and accountability. When any decision is required, consensus must be reached. This team structure is also known as a democratic team structure. This team structure usually finds a good solution to a relatively hard problem as all team members contribute ideas.
However, the democratic nature of the team structure bears a higher risk of falling apart due to the absence of an authority figure to manage the team and resolve conflicts.
Chief programmer team
Frederick Brooks proposed that software engineers learn from the medical surgical team in an operating room. In such a team, there is always a chief surgeon, assisted by experts in other areas. Similarly, in a chief programmer team structure, there is a single authoritative figure, the chief programmer. Major decisions, e.g. system architecture, are made solely by him/her and obeyed by all other team members. The chief programmer directs and coordinates the effort of other team members. When necessary, the chief will be assisted by domain specialists e.g. business specialists, database expert, network technology expert, etc. This allows individual group members to concentrate solely on the areas where they have sound knowledge and expertise.
The success of such a team structure relies heavily on the chief programmer. Not only must he be a superb technical hand, he also needs good managerial skills. Under a suitably qualified leader, such a team structure is known to produce successful work. .
Strict hierarchy team
In the opposite extreme of an egoless team, a strict hierarchy team has a strictly defined organization among the team members, reminiscent of the military or bureaucratic government. Each team member only works on his assigned tasks and reports to a single “boss”.
In a large, resource-intensive, complex project, this could be a good team structure to reduce communication overhead.
Which team structure is the most suitable for a school project?
(a)
Explanation: Given that students are all peers and beginners, Egoless team structure seems most suitable for a school project. However, given school projects are low-stakes, short-lived, and small, even the other two team structures can be used for them.
Evidence:
Identify the team structure used in the class project.
🅿️ Project
W8.6 Can plan/track project schedule
Covered by:
Tutorial 8
W8.1b Can explain coupling
Design → Design Fundamentals → Coupling →
What
Coupling is a measure of the degree of dependence between components, classes, methods, etc. Low coupling indicates that a component is less dependent on other components. High coupling (aka tight coupling or strong coupling) is discouraged due to the following disadvantages:
- Maintenance is harder because a change in one module could cause changes in other modules coupled to it (i.e. a ripple effect).
- Integration is harder because multiple components coupled with each other have to be integrated at the same time.
- Testing and reuse of the module is harder due to its dependence on other modules.
In the example below, design A appears to have a more coupling between the components than design B.
Discuss the coupling levels of alternative designs x and y.
Overall coupling levels in x and y seem to be similar (neither has more dependencies than the other). (Note that the number of dependency links is not a definitive measure of the level of coupling.
Some links may be stronger than the others.). However, in x, A is highly-coupled to the rest of the system while B, C, D, and E are standalone
(do not depend on anything else). In y, no component is as highly-coupled as A of x. However, only D and E are standalone.
Explain the link (if any) between regressions and coupling.
When the system is highly-coupled, the risk of regressions is higher too e.g. when component A is modified, all components ‘coupled’ to component A risk ‘unintended behavioral changes’.
Discuss the relationship between coupling and
Coupling decreases testability because if the
Choose the correct statements.
- a. As coupling increases, testability decreases.
- b. As coupling increases, the risk of regression increases.
- c. As coupling increases, the value of automated regression testing increases.
- d. As coupling increases, integration becomes easier as everything is connected together.
- e. As coupling increases, maintainability decreases.
(a)(b)(c)(d)(e)
Explanation: High coupling means either more components require to be integrated at once in a big-bang fashion (increasing the risk of things going wrong) or more drivers and stubs are required when integrating incrementally.
Evidence:
Explain coupling with examples from AddressBook-Level4 (or your own project).
W8.1c Can reduce coupling
Design → Design Fundamentals → Coupling →
How
X is coupled to Y if a change to Y can potentially require a change in X.
If Foo class calls the method Bar#read(), Foo is coupled to Bar because a change to Bar can potentially (but not always) require
a change in the Foo class e.g. if the signature of the Bar#read() is changed, Foo needs to change as well, but a change to the Bar#write() method may not require a change in the Foo class because Foo does not call Bar#write().
class Foo{
    ...
    new Bar().read();
    ...
}

class Bar{
    void read(){
        ...
    }

    void write(){
        ...
    }
}
Some examples of coupling: A is coupled to B if,
Ahas access to the internal structure ofB(this results in a very high level of coupling)AandBdepend on the same global variableAcallsBAreceives an object ofBas a parameter or a return valueAinherits fromBAandBare required to follow the same data format or communication protocol
Which of these indicate a coupling between components A and B?
- a. component A has access to internal structure of component B.
- b. component A and B are written by the same developer.
- c. component A calls component B.
- d. component A receives an object of component B as a parameter.
- e. component A inherits from component B.
- f. components A and B have to follow the same data format or communication protocol.
(a)(b)(c)(d)(e)(f)
Explanation: Being written by the same developer does not imply a coupling.
Evidence:
Explain with examples from AddressBook-Level4 (or your own project) how coupling can be increased/decreased.
W8.1d Can identify types of coupling
Design → Design Fundamentals → Coupling →
Types of Coupling
Some examples of different coupling types:
- Content coupling: one module modifies or relies on the internal workings of another module e.g., accessing local data of another module
- Common/Global coupling: two modules share the same global data
- Control coupling: one module controlling the flow of another, by passing it information on what to do e.g., passing a flag
- Data coupling: one module sharing data with another module e.g. via passing parameters
- External coupling: two modules share an externally imposed convention e.g., data formats, communication protocols, device interfaces.
- Subclass coupling: a class inherits from another class. Note that a child class is coupled to the parent class but not the other way around.
- Temporal coupling: two actions are bundled together just because they happen to occur at the same time e.g. extracting a contiguous block of code as a method although the code block contains statements unrelated to each other
Evidence:
Explain types of coupling with examples from AddressBook-Level4 (or your own project).
W8.1e Can explain cohesion
Design → Design Fundamentals → Cohesion →
What
Cohesion is a measure of how strongly-related and focused the various responsibilities of a component are. A highly-cohesive component keeps related functionalities together while keeping out all other unrelated things.
Higher cohesion is better. Disadvantages of low cohesion (aka weak cohesion):
- Impedes the understandability of modules as it is difficult to express module functionalities at a higher level.
- Lowers maintainability because a module can be modified due to unrelated causes (reason: the module contains code unrelated to each other) or many many modules may need to be modified to achieve a small change in behavior (reason: because the code realated to that change is not localized to a single module).
- Lowers reusability of modules because they do not represent logical units of functionality.
Evidence:
Explain cohesion with examples from AddressBook-Level4 (or your own project).
W8.1f Can increase cohesion
Design → Design Fundamentals → Cohesion →
How
Cohesion can be present in many forms. Some examples:
- Code related to a single concept is kept together, e.g. the Student component handles everything related to students.
- Code that is invoked close together in time is kept together, e.g. all code related to initializing the system is kept together.
- Code that manipulates the same data structure is kept together, e.g. the
GameArchivecomponent handles everything related to the storage and retrieval of game sessions.
Suppose a Payroll application contains a class that deals with writing data to the database. If the class include some code to show an error dialog to the user if the database is unreachable, that class is not cohesive because it seems to be interacting with the user as well as the database.
Compare the cohesion of the following two versions of the EmailMessage class. Which one is more cohesive and why?
// version-1
class EmailMessage {
    private String sendTo;
 	  private String subject;
    private String message;

    public EmailMessage(String sendTo, String subject, String message) {
        this.sendTo = sendTo;
        this.subject = subject;
        this.message = message;
    }

    public void sendMessage() {
        // sends message using sendTo, subject and message
    }
}

// version-2
class EmailMessage {
    private String sendTo;
    private String subject;
    private String message;
    private String username;

    public EmailMessage(String sendTo, String subject, String message) {
        this.sendTo = sendTo;
        this.subject = subject;
        this.message = message;
    }

    public void sendMessage() {
        // sends message using sendTo, subject and message
    }

    public void login(String username, String password) {
        this.username = username;
        // code to login
    }
}
Version 2 is less cohesive.
Explanation: Version 2 is handling functionality related to login, which is not directly related to the concept of ‘email message’ that the class is supposed to represent. On a related note, we can improve the cohesion of both versions by removing the sendMessage functionality. Although sending message is related to emails, this class is supposed to represent an email message, not an email server.
Evidence:
Explain with examples from AddressBook-Level4 (or your own project) how cohesion can be increased/decreased.
W8.1g Can explain separation of concerns principle
Supplmentary → Principles →
Separation of Concerns Principle
Separation of Concerns Principle (SoC): To achieve better modularity, separate the code into distinct sections, such that each section addresses a separate concern. -- Proposed by Edsger W. Dijkstra
A concern in this context is a set of information that affects the code of a computer program.
Examples for concerns:
- A specific feature, such as the code related to
add employeefeature - A specific aspect, such as the code related to
persistenceorsecurity - A specific entity, such as the code related to the
Employeeentity
Applying
If the code related to persistence is separated from the code related to security, a change to how the data are persisted will not need changes to how the security is implemented.
This principle can be applied at the class level, as well as on higher levels.
The
Design → Architecture → Styles → n-Tier Style
What
In the n-tier style, higher layers make use of services provided by lower layers. Lower layers are independent of higher layers. Other names: multi-layered, layered.
Operating systems and network communication software often use n-tier style.
This principle should lead to higher
Design → Design Fundamentals → Coupling →
What
Coupling is a measure of the degree of dependence between components, classes, methods, etc. Low coupling indicates that a component is less dependent on other components. High coupling (aka tight coupling or strong coupling) is discouraged due to the following disadvantages:
- Maintenance is harder because a change in one module could cause changes in other modules coupled to it (i.e. a ripple effect).
- Integration is harder because multiple components coupled with each other have to be integrated at the same time.
- Testing and reuse of the module is harder due to its dependence on other modules.
In the example below, design A appears to have a more coupling between the components than design B.
Discuss the coupling levels of alternative designs x and y.
Overall coupling levels in x and y seem to be similar (neither has more dependencies than the other). (Note that the number of dependency links is not a definitive measure of the level of
coupling. Some links may be stronger than the others.). However, in x, A is highly-coupled to the rest of the system while B, C, D, and E are standalone (do not depend on anything else). In y, no component is as highly-coupled as A of x. However, only D and E are standalone.
Explain the link (if any) between regressions and coupling.
When the system is highly-coupled, the risk of regressions is higher too e.g. when component A is modified, all components ‘coupled’ to component A risk ‘unintended behavioral changes’.
Discuss the relationship between coupling and
Coupling decreases testability because if the
Choose the correct statements.
- a. As coupling increases, testability decreases.
- b. As coupling increases, the risk of regression increases.
- c. As coupling increases, the value of automated regression testing increases.
- d. As coupling increases, integration becomes easier as everything is connected together.
- e. As coupling increases, maintainability decreases.
(a)(b)(c)(d)(e)
Explanation: High coupling means either more components require to be integrated at once in a big-bang fashion (increasing the risk of things going wrong) or more drivers and stubs are required when integrating incrementally.
Design → Design Fundamentals → Cohesion →
What
Cohesion is a measure of how strongly-related and focused the various responsibilities of a component are. A highly-cohesive component keeps related functionalities together while keeping out all other unrelated things.
Higher cohesion is better. Disadvantages of low cohesion (aka weak cohesion):
- Impedes the understandability of modules as it is difficult to express module functionalities at a higher level.
- Lowers maintainability because a module can be modified due to unrelated causes (reason: the module contains code unrelated to each other) or many many modules may need to be modified to achieve a small change in behavior (reason: because the code realated to that change is not localized to a single module).
- Lowers reusability of modules because they do not represent logical units of functionality.
“Only the GUI class should interact with the user. The GUI class should only concern itself with user interactions”. This statement follows from,
- a. A software design should promote separation of concerns in a design.
- b. A software design should increase cohesion of its components.
- c. A software design should follow single responsibility principle.
(a)(b)(c)
Explanation: By making ‘user interaction’ GUI class’ sole responsibility, we increase its cohesion. This is also in line with separation of concerns (i.e., we separated the concern of user interaction) and single responsibility principle (GUI class has only one responsibility).
Evidence:
Explain SoC with examples from AddressBook-Level4 (or your own project).
W8.1h Can explain open-closed principle (OCP)
Supplmentary → Principles →
Open-Closed Principle
While it is possible to isolate the functionalities of a software system into modules, there is no way to remove interaction between modules. When modules interact with each other, coupling naturally increases. Consequently, it is harder to localize any changes to the software system. The Open-Close Principle aims to alleviate this problem.
Open-Closed Principle (OCP): A module should be open for extension but closed for modification. That is, modules should be written so that they can be extended, without requiring them to be modified. -- proposed by Bertrand Meyer
In object-oriented programming, OCP can be achieved in various ways. This often requires separating the specification (i.e. interface) of a module from its implementation.
In the design given below, the behavior of the CommandQueue class can be altered by adding more concrete Command subclasses. For example, by including a Delete class alongside List, Sort, and Reset, the CommandQueue can now perform delete commands without modifying its code at all. That is, its behavior was extended without having
to modify its code. Hence, it was open to extensions, but closed to modification.
The behavior of a Java generic class can be altered by passing it a different class as a parameter. In the code below, the ArrayList class behaves as a container of Students in one instance and as a container of Admin objects in the other instance, without having to change its code. That is, the behavior of the ArrayList class is extended without modifying its code.
ArrayList students = new ArrayList< Student >();
ArrayList admins = new ArrayList< Admin >();
Which of these is closest to the meaning of the open-closed principle?
(a)
Explanation: Please refer the handout for the definition of OCP.
Evidence:
Identify where OCP is applied (or applicable) in AddressBook-Level4 (or your own project).
W8.3a Can explain unit testing
Quality Assurance → Testing → Unit Testing →
What
Unit testing : testing individual units (methods, classes, subsystems, ...) to ensure each piece works correctly.
In OOP code, it is common to write one or more unit tests for each public method of a class.
Here are the code skeletons for a Foo class containing two methods and a FooTest class that contains unit tests for those two methods.
class Foo{
    String read(){
        //...
    }

    void write(String input){
        //...
    }

}

class FooTest{

    @Test
    void read(){
        //a unit test for Foo#read() method
    }

    @Test
    void write_emptyInput_exceptionThrown(){
        //a unit tests for Foo#write(String) method
    }

    @Test
    void write_normalInput_writtenCorrectly(){
        //another unit tests for Foo#write(String) method
    }
}
import unittest

class Foo:
  def read(self):
      # ...

  def write(self, input):
      # ...


class FooTest(unittest.TestCase):

  def test_read(sefl):
      # a unit test for read() method

  def test_write_emptyIntput_ignored(self):
      # a unit tests for write(string) method

  def test_write_normalInput_writtenCorrectly(self):
      # another unit tests for write(string) method
Side readings:
- [Web article] The three pillars of unit testing - A short article about what makes a good unit test.
- Learning from Apple’s #gotofail Security Bug - How unit testing (and other good coding practices) could have prevented a major security bug.
Evidence:
Identify some unit tests in AddressBook-Level4 (or your own project).
W8.3b Can use stubs to isolate an SUT from its
dependencies
Quality Assurance → Testing → Unit Testing →
Stubs
A proper unit test requires the unit to be tested in isolation so that bugs in the
If a Logic class depends on a Storage class, unit testing the Logic class requires isolating the Logic class from the Storage class.
Stubs can isolate the
Stub: A stub has the same interface as the component it replaces, but its implementation is so simple that it is unlikely to have any bugs. It mimics the responses of the component, but only for the a limited set of predetermined inputs. That is, it does not know how to respond to any other inputs. Typically, these mimicked responses are hard-coded in the stub rather than computed or retrieved from elsewhere, e.g. from a database.
Consider the code below:
class Logic {
    Storage s;

    Logic(Storage s) {
        this.s = s;
    }

    String getName(int index) {
        return "Name: " + s.getName(index);
    }
}

interface Storage {
    String getName(int index);
}

class DatabaseStorage implements Storage {

    @Override
    public String getName(int index) {
        return readValueFromDatabase(index);
    }

    private String readValueFromDatabase(int index) {
        // retrieve name from the database
    }
}
Normally, you would use the Logic class as follows (not how the Logic object depends on a DatabaseStorage object to perform the getName() operation):
Logic logic = new Logic(new DatabaseStorage());
String name = logic.getName(23);
You can test it like this:
@Test
void getName() {
    Logic logic = new Logic(new DatabaseStorage());
    assertEquals("Name: John", logic.getName(5));
}
However, this logic object being tested is making use of a DataBaseStorage object which means a bug in the DatabaseStorage class can affect the test. Therefore, this test is not testing
Logic in isolation from its dependencies and hence it is not a pure unit test.
Here is a stub class you can use in place of DatabaseStorage:
class StorageStub implements Storage {

    @Override
    public String getName(int index) {
        if(index == 5) {
            return "Adam";
        } else {
            throw new UnsupportedOperationException();
        }
    }
}
Note how the stub has the same interface as the real dependency, is so simple that it is unlikely to contain bugs, and is pre-configured to respond with a hard-coded response, presumably, the correct response DatabaseStorage is expected to return for the given test input.
Here is how you can use the stub to write a unit test. This test is not affected by any bugs in the DatabaseStorage class and hence is a pure unit test.
@Test
void getName() {
    Logic logic = new Logic(new StorageStub());
    assertEquals("Name: Adam", logic.getName(5));
}
In addition to Stubs, there are other type of replacements you can use during testing. E.g. Mocks, Fakes, Dummies, Spies.
- Mocks Aren't Stubs by Martin Fowler -- An in-depth article about how Stubs differ from other types of test helpers.
Stubs help us to test a component in isolation from its dependencies.
True
Evidence:
Identify some tests in AddressBook-Level4,
- that can be made pure unit tests by introducing stubs
- that are using stubs to isolate the SUT from its dependencies
W8.3e Can explain integration testing
Quality Assurance → Testing → Integration Testing →
What
Integration testing : testing whether different parts of the software work together (i.e. integrates) as expected. Integration tests aim to discover bugs in the 'glue code' related to how components interact with each other. These bugs are often the result of misunderstanding of what the parts are supposed to do vs what the parts are actually doing.
Suppose a class Car users classes Engine and Wheel. If the Car class assumed a Wheel can support 200 mph speed but the actual
Wheel can only support 150 mph, it is the integration test that is supposed to uncover this discrepancy.
Evidence:
Explain the difference between unit tests and integration tests.
W8.3f Can explain integration testing
Quality Assurance → Testing → Integration Testing →
How
Integration testing is not simply a repetition of the unit test cases but run using the actual dependencies (instead of the stubs used in unit testing). Instead, integration tests are additional test cases that focus on the interactions between the parts.
Suppose a class Car uses classes Engine and Wheel. Here is how you would go about doing pure integration tests:
a) First, unit test Engine and Wheel.
b) Next, unit test Car in isolation of Engine and Wheel, using stubs for Engine and Wheel.
c) After that, do an integration test for Car using it together with the Engine and Wheel classes to ensure the Car integrates properly with the Engine and
the Wheel.
In practice, developers often use a hybrid of unit+integration tests to minimize the need for stubs.
Here's how a hybrid unit+integration approach could be applied to the same example used above:
(a) First, unit test Engine and Wheel.
(b) Next, unit test Car in isolation of Engine and Wheel, using stubs for Engine and Wheel.
(c) After that, do an integration test for Car using it together with the Engine and Wheel classes to ensure the Car integrates properly with the Engine and the Wheel. This step should include test cases that are meant to test the unit Car (i.e. test cases used in the step (b) of the example above) as well as test cases that are meant to test the integration of Car with Wheel and Engine (i.e. pure integration test cases
used of the step (c) in the example above).
💡 Note that you no longer need stubs for Engine and Wheel. The downside is that Car is never tested in isolation of its dependencies. Given that its dependencies are already unit tested,
the risk of bugs in Engine and Wheel affecting the testing of Car can be considered minimal.
Evidence:
Use tests from AddressBook-Level4 to illustrate the difference between unit testings and integration testing. Hint: good examples seedu.address.storage.StorageManagerTest,
seedu.address.logic.commands.AddCommandTest,seedu.address.logic.commands.AddCommandIntegrationTest
W8.3g Can explain system testing
Quality Assurance → Testing → System Testing →
What
System testing: take the whole system and test it against the system specification.
System testing is typically done by a testing team (also called a QA team).
System test cases are based on the specified external behavior of the system. Sometimes, system tests go beyond the bounds defined in the specification. This is useful when testing that the system fails 'gracefully' having pushed beyond its limits.
Suppose the SUT is a browser supposedly capable of handling web pages containing up to 5000 characters. Given below is a test case to test if the SUT fails gracefully if pushed beyond its limits.
Test case: load a web page that is too big
* Input: load a web page containing more than 5000 characters.
* Expected behavior: abort the loading of the page and show a meaningful error message.
This test case would fail if the browser attempted to load the large file anyway and crashed.
System testing includes testing against non-functional requirements too. Here are some examples.
- Performance testing – to ensure the system responds quickly.
- Load testing (also called stress testing or scalability testing) – to ensure the system can work under heavy load.
- Security testing – to test how secure the system is.
- Compatibility testing, interoperability testing – to check whether the system can work with other systems.
- Usability testing – to test how easy it is to use the system.
- Portability testing – to test whether the system works on different platforms.
Evidence:
Explain what system tests are. Give examples from your own project.
W8.3h Can explain automated GUI testing
Quality Assurance → Testing → Test Automation →
Automated Testing of GUIs
If a software product has a GUI component, all product-level testing (i.e. the types of testing mentioned above) need to be done using the GUI. However, testing the GUI is much harder than testing the CLI (command line interface) or API, for the following reasons:
- Most GUIs can support a large number of different operations, many of which can be performed in any arbitrary order.
- GUI operations are more difficult to automate than API testing. Reliably automating GUI operations and automatically verifying whether the GUI behaves as expected is harder than calling an operation and comparing its return value with an expected value. Therefore, automated regression testing of GUIs is rather difficult.
- The appearance of a GUI (and sometimes even behavior) can be different across platforms and even environments. For example, a GUI can behave differently based on whether it is minimized or maximized, in focus or out of focus, and in a high resolution display or a low resolution display.
One approach to overcome the challenges of testing GUIs is to minimize logic aspects in the GUI. Then, bypass the GUI to test the rest of the system using automated API testing. While this still requires the GUI to be tested manually, the number of such manual test cases can be reduced as most of the system has been tested using automated API testing.
There are testing tools that can automate GUI testing.
Some tools used for automated GUI testing:
GUI testing is usually easier than API testing because it doesn’t require any extra coding.
False
Evidence:
Why is automated testing of GUIs is hard? What can we do about it?
W8.3i Can explain acceptance testing
Quality Assurance → Testing → Acceptance Testing →
What
Acceptance testing (aka User Acceptance Testing (UAT)): test the delivered system to ensure it meets the user requirements.
Acceptance tests give an assurance to the customer that the system does what it is intended to do. Acceptance test cases are often defined at the beginning of the project, usually based on the use case specification. Successful completion of UAT is often a prerequisite to the project sign-off.
Evidence:
Explain what acceptance tests are. Explain how acceptance testing of your project will be done.
W8.3j Can explain the differences between system
testing and acceptance testing
Quality Assurance → Testing → Acceptance Testing →
Acceptance vs System Testing
Acceptance testing comes after system testing. Similar to system testing, acceptance testing involves testing the whole system.
Some differences between system testing and acceptance testing:
| System Testing | Acceptance Testing |
|---|---|
| Done against the system specification | Done against the requirements specification |
| Done by testers of the project team | Done by a team that represents the customer |
| Done on the development environment or a test bed | Done on the deployment site or on a close simulation of the deployment site |
| Both negative and positive test cases | More focus on positive test cases |
Note: negative test cases: cases where the SUT is not expected to work normally e.g. incorrect inputs; positive test cases: cases where the SUT is expected to work normally
Requirement Specification vs System Specification
The requirement specification need not be the same as the system specification. Some example differences:
| Requirements Specification | System Specification |
|---|---|
| limited to how the system behaves in normal working conditions | can also include details on how it will fail gracefully when pushed beyond limits, how to recover, etc. specification |
| written in terms of problems that need to be solved (e.g. provide a method to locate an email quickly) | written in terms of how the system solve those problems (e.g. explain the email search feature) |
| specifies the interface available for intended end-users | could contain additional APIs not available for end-users (for the use of developers/testers) |
However, in many cases one document serves as both a requirement specification and a system specification.
Passing system tests does not necessarily mean passing acceptance testing. Some examples:
- The system might work on the testbed environments but might not work the same way in the deployment environment, due to subtle differences between the two environments.
- The system might conform to the system specification but could fail to solve the problem it was supposed to solve for the user, due to flaws in the system design.
Choose the correct statements about system testing and acceptance testing.
- a. Both system testing and acceptance testing typically involve the whole system.
- b. System testing is typically more extensive than acceptance testing.
- c. System testing can include testing for non-functional qualities.
- d. Acceptance testing typically has more user involvement than system testing.
- e. In smaller projects, the developers may do system testing as well, in addition to developer testing.
- f. If system testing is adequately done, we need not do acceptance testing.
(a)(b)(c)(d)(e)(f)
Explanation:
(b) is correct because system testing can aim to cover all specified behaviors and can even go beyond the system specification. Therefore, system testing is typically more extensive than acceptance testing.
(f) is incorrect because it is possible for a system to pass system tests but fail acceptance tests.
Evidence:
Explain the difference between system tests and acceptance tests. Explain why both are needed.
W8.3k Can explain alpha and beta testing
Quality Assurance → Testing → Alpha/Beta Testing →
What
Alpha testing is performed by the users, under controlled conditions set by the software development team.
Beta testing is performed by a selected subset of target users of the system in their natural work setting.
An open beta release is the release of not-yet-production-quality-but-almost-there software to the general population. For example, Google’s Gmail was in 'beta' for many years before the label was finally removed.
Evidence:
Explain alpha and beta testing. How can you do alpha and beta testing in your project?
W8.4b Can explain the need for early developer
testing
Quality Assurance → Testing → Developer Testing →
Why
Delaying testing until the full product is complete has a number of disadvantages:
- Locating the cause of such a test case failure is difficult due to a large search space; in a large system, the search space could be millions of lines of code, written by hundreds of developers! The failure may also be due to multiple inter-related bugs.
- Fixing a bug found during such testing could result in major rework, especially if the bug originated during the design or during requirements specification i.e. a faulty design or faulty requirements.
- One bug might 'hide' other bugs, which could emerge only after the first bug is fixed.
- The delivery may have to be delayed if too many bugs were found during testing.
Therefore, it is better to do early testing, as hinted by the popular rule of thumb given below, also illustrated by the graph below it.
The earlier a bug is found, the easier and cheaper to have it fixed.
Such early testing of partially developed software is usually, and by necessity, done by the developers themselves i.e. developer testing.
Discuss pros and cons of developers testing their own code.
Pros:
- Can be done early (the earlier we find a bug, the cheaper it is to fix).
- Can be done at lower levels, for examples, at operation and class level (testers usually test the system at UI level).
- It is possible to do more thorough testing because developers know the expected external behavior as well as the internal structure of the component.
- It forces developers to take responsibility for their own work (they cannot claim that "testing is the job of the testers").
Cons:
- A developer may subconsciously test only situations that he knows to work (i.e. test it too 'gently').
- A developer may be blind to his own mistakes (if he did not consider a certain combination of input while writing code, it is possible for him to miss it again during testing).
- A developer may have misunderstood what the SUT is supposed to do in the first place.
- A developer may lack the testing expertise.
The cost of fixing a bug goes down as we reach the product release.
False. The cost goes up over time.
Explain why early testing by developers is important.
Evidence:
Explain why early testing by developers is important.
W8.4e Can use simple JUnit tests
Tools → JUnit →
JUnit: Basic
When writing JUnit tests for a class Foo, the common practice is to create a FooTest class, which will contain various test methods.
Suppose we want to write tests for the IntPair class below.
public class IntPair {
    int first;
    int second;

    public IntPair(int first, int second) {
        this.first = first;
        this.second = second;
    }

    public int intDivision() throws Exception {
        if (second == 0){
            throw new Exception("Divisor is zero");
        }
        return first/second;
    }

    @Override
    public String toString() {
        return first + "," + second;
    }
}
Here's a IntPairTest class to match.
import org.junit.Test;
import org.junit.Assert;

public class IntPairTest {

    @Test
    public void testStringConversion() {
        Assert.assertEquals("4,7", new IntPair(4, 7).toString());
    }

    @Test
    public void intDivision_nonZeroDivisor_success() throws Exception {
        Assert.assertEquals(2, new IntPair(4, 2).intDivision());
        Assert.assertEquals(0, new IntPair(1, 2).intDivision());
        Assert.assertEquals(0, new IntPair(0, 5).intDivision());
    }

    @Test
    public void intDivision_zeroDivisor_exceptionThrown() {
        try {
            Assert.assertEquals(0, new IntPair(1, 0).intDivision());
            Assert.fail(); // the test should not reach this line
        } catch (Exception e) {
            Assert.assertEquals("Divisor is zero", e.getMessage());
        }
    }
}
Notes:
- Each test method is marked with a
@Testannotation. - Tests use
Assert.assertEquals(expected, actual)methods to compare the expected output with the actual output. If they do not match, the test will fail. JUnit comes with other similar methods such asAssert.assertNullandAssert.assertTrue. - Java code normally use camelCase for method names e.g.,
testStringConversionbut when writing test methods, sometimes another convention is used:whatIsBeingTested_descriptionOfTestInputs_expectedOutcomee.g.,intDivision_zeroDivisor_exceptionThrown - There are several ways to verify the code throws the correct exception. The third test method in the example above shows one of the simpler methods.
If the exception is thrown, it will be caught and further verified inside the
catchblock. But if it is not thrown as expected, the test will reachAssert.fail()line and will fail as a result. - The easiest way to run JUnit tests is to do it via the IDE. For example, in Intellij you can right-click the folder containing test classes and choose 'Run all tests...'
- Optionally, you can use static imports to avoid having to specify
Assert.everywhere.import static org.junit.Assert.assertEquals; //... @Test public void testStringConversion() { assertEquals("4,7", new IntPair(4, 7).toString()); }
JUnit 4 with IntelliJ: A quick introduction -- by DrBFraser
- JUnit cookbook - a short tutorial from JUnit creators
- JUnit tutorial - a more detailed tutorial from a developer Lars Vogel
- How to test private methods in Java? [ short answer ] [ long answer ]
Evidence:
Suggested: Evidence of having written JUnit tests your projects.
Refresher: Do the exercise in [Addressbook-Level2: LO-JUnit]
Submission: Show the JUnit tests you wrote to your tutor.
W8.5a Can explain milestones
Project Management → Project Planning →
Milestones
A milestone is the end of a stage which indicates a significant progress. We should take into account dependencies and priorities when deciding on the features to be delivered at a certain milestone.
Each intermediate product release is a milestone.
In some projects, it is not practical to have a very detailed plan for the whole project due to the uncertainty and unavailability of required information. In such cases, we can use a high-level plan for the whole project and a detailed plan for the next few milestones.
Milestones for the Minesweeper project, iteration 1
| Day | Milestones |
|---|---|
| Day 1 | Architecture skeleton completed |
| Day 3 | ‘new game’ feature implemented |
| Day 4 | ‘new game’ feature tested |
Evidence:
Identify milestones of your class project.
W8.5b Can explain buffers
Project Management → Project Planning →
Buffers
A buffer is a time set aside to absorb any unforeseen delays. It is very important to include buffers in a software project schedule because effort/time estimations for software development is notoriously hard. However, do not inflate task estimates to create hidden buffers; have explicit buffers instead. Reason: With explicit buffers it is easier to detect incorrect effort estimates which can serve as a feedback to improve future effort estimates.
Evidence:
Explain how buffers can be used in your class project.
W8.5c Can explain issue trackers
Project Management → Project Planning →
Issue Trackers
Keeping track of project tasks (who is doing what, which tasks are ongoing, which tasks are done etc.) is an essential part of project management. In small projects it may be possible to track tasks using simple tools as online spreadsheets or general-purpose/light-weight tasks tracking tools such as Trello. Bigger projects need more sophisticated task tracking tools.
Issue trackers (sometimes called bug trackers) are commonly used to track task assignment and progress. Most online project management software such as GitHub, SourceForge, and BitBucket come with an integrated issue tracker.
A screenshot from the Jira Issue tracker software (Jira is part of the BitBucket project management tool suite):
Evidence:
Explain the role of GitHub issue tracker can play in your project.
W8.5d Can explain work breakdown structures
Project Management → Project Planning →
Work Breakdown Structure
A Work Breakdown Structure (WBS) depicts information about tasks and their details in terms of subtasks. When managing projects it is useful to divide the total work into smaller, well-defined units. Relatively complex tasks can be further split into subtasks. In complex projects a WBS can also include prerequisite tasks and effort estimates for each task.
The high level tasks for a single iteration of a small project could look like the following:
| Task ID | Task | Estimated Effort | Prerequisite Task |
|---|---|---|---|
| A | Analysis | 1 man day | - |
| B | Design | 2 man day | A |
| C | Implementation | 4.5 man day | B |
| D | Testing | 1 man day | C |
| E | Planning for next version | 1 man day | D |
The effort is traditionally measured in man hour/day/month i.e. work that can be done by one person in one hour/day/month. The Task ID is a label for easy reference to a task. Simple labeling is suitable for a small project, while a more informative labeling system can be adopted for bigger projects.
An example WBS for a project for developing a game.
| Task ID | Task | Estimated Effort | Prerequisite Task |
|---|---|---|---|
| A | High level design | 1 man day | - |
| B |
Detail design
|
2 man day
|
A |
| C |
Implementation
|
4.5 man day
|
|
| D | System Testing | 1 man day | C |
| E | Planning for next version | 1 man day | D |
All tasks should be well-defined. In particular, it should be clear as to when the task will be considered done.
Some examples of ill-defined tasks and their better-defined counterparts:
| Bad | Better |
|---|---|
| more coding | implement component X |
| do research on UI testing | find a suitable tool for testing the UI |
Which one these project tasks is not well-defined?
(c)
Explanation: ‘More testing’ is not well-defined. How much is ‘more’? ‘Test the delete functionality’ is a better-defined task.
Evidence:
Break down the project into well-defined tasks and records them in the issue tracker.
W8.5g Can explain common team structures
Project Management → Teamwork →
Team Structures
Given below are three commonly used team structures in software development. Irrespective of the team structure, it is a good practice to assign roles and responsibilities to different team members so that someone is clearly in charge of each aspect of the project. In comparison, the ‘everybody is responsible for everything’ approach can result in more chaos and hence slower progress.
Egoless team
In this structure, every team member is equal in terms of responsibility and accountability. When any decision is required, consensus must be reached. This team structure is also known as a democratic team structure. This team structure usually finds a good solution to a relatively hard problem as all team members contribute ideas.
However, the democratic nature of the team structure bears a higher risk of falling apart due to the absence of an authority figure to manage the team and resolve conflicts.
Chief programmer team
Frederick Brooks proposed that software engineers learn from the medical surgical team in an operating room. In such a team, there is always a chief surgeon, assisted by experts in other areas. Similarly, in a chief programmer team structure, there is a single authoritative figure, the chief programmer. Major decisions, e.g. system architecture, are made solely by him/her and obeyed by all other team members. The chief programmer directs and coordinates the effort of other team members. When necessary, the chief will be assisted by domain specialists e.g. business specialists, database expert, network technology expert, etc. This allows individual group members to concentrate solely on the areas where they have sound knowledge and expertise.
The success of such a team structure relies heavily on the chief programmer. Not only must he be a superb technical hand, he also needs good managerial skills. Under a suitably qualified leader, such a team structure is known to produce successful work. .
Strict hierarchy team
In the opposite extreme of an egoless team, a strict hierarchy team has a strictly defined organization among the team members, reminiscent of the military or bureaucratic government. Each team member only works on his assigned tasks and reports to a single “boss”.
In a large, resource-intensive, complex project, this could be a good team structure to reduce communication overhead.
Which team structure is the most suitable for a school project?
(a)
Explanation: Given that students are all peers and beginners, Egoless team structure seems most suitable for a school project. However, given school projects are low-stakes, short-lived, and small, even the other two team structures can be used for them.
Evidence:
Identify the team structure used in the class project.
W8.6 Can plan/track project schedule
Covered by:
Lecture 8
Slides: Uploaded on IVLE.