There is no midterm.
The final exam has two parts:
- Part 1: MCQ questions (30 minutes, 25 marks)
- Part 2: Essay questions (1 hour 30 min, 30 marks)
Both papers will be given to you at the start but you need to answer Part 1 first (i.e. MCQ paper). It will be collected 30 min after the exam start time (even if arrived late for the exam). You are free
to start part 2 early if you finish Part 1 early.
Final Exam: Part 1 (MCQ)
Each MCQ question gives you a statement to evaluate.
An example statement
Testing is a Q&A activity
Unless stated otherwise, the meaning of answer options are
A. True
B. False
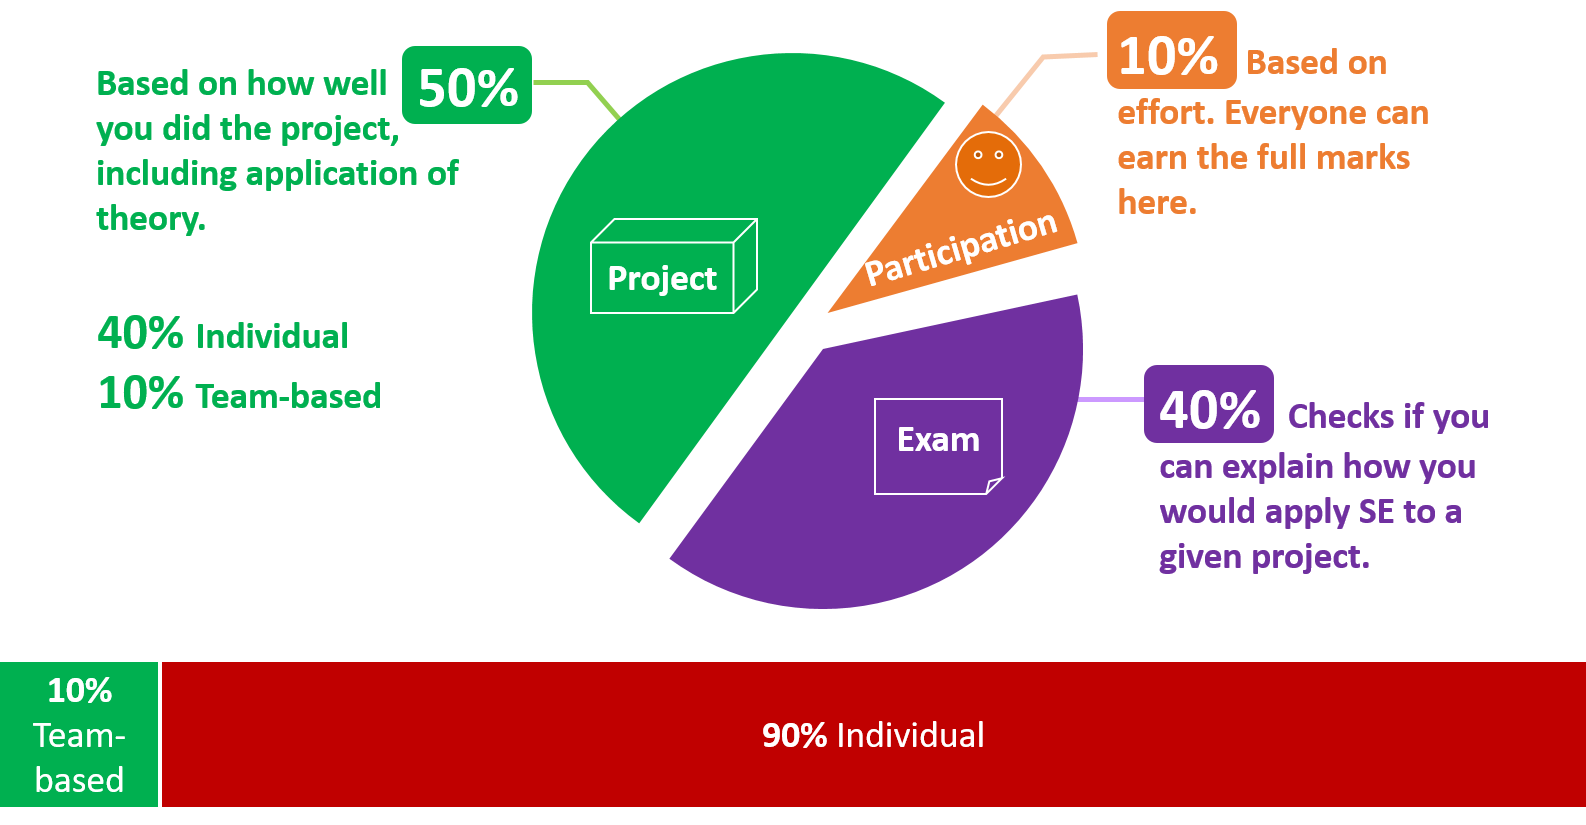
The exam paper has 50 questions. All questions carry equal marks.
The weightage of the Part 1 of the final exam is 25 marks out of the total score of 100.
Note that you have slightly more than ½ minute for each question, which means you need to go through the questions fairly quickly.
Given the fast pace required by the paper, to be fair to all students, you will not be allowed to clarify doubts about questions (in Part 1) by talking to invigilators.
Questions in Part 1 are confidential. You are not allowed to reveal Part 1 content to anyone after the exam. All pages of the assessment paper are to be returned at the end of the exam.
You will be given OCR forms to indicate your answers for Part 1.
The paper is open-book: you may bring any printed or written materials to the exam in hard copy format. However, given the fast pace required by Part 1, you will not have time left to refer notes during that part of the
exam.
💡 Mark the OCR form as you go, rather than planning to transfer your answers to the OCR form near the end. Reason: Given there are 50 questions and only 30 mins, it will be hard to estimate how much time you need to mass-transfer all answers to OCR forms.
💡 Write the answer in the exam paper as well as marking it in the OCR form. Reason: It will reduce the chance of missing a question. Furthermore, in case you missed a question, it will help you correct the OCR form quickly.
💡 We have tried to avoid deliberately misleading/tricky questions. If a question seems to take a very long time to figure out, you are probably over-thinking it.
Final Exam: Part 2 (Essay)
Unlike in part 1, you can ask invigilators for clarifications if you found a question to be unclear in part 2.
Yes, you may use pencils when answering part 2.
The weightage of the Part 2 of the final exam is 15 marks out of the total score of 100.
Resources
Past exam papers uploaded on IVLE


