Week 5 [Sep 10]
Todo
Admin info to read:
Policy on project work distribution
As most of the work is graded individually, it is OK to do less or more than equal share in your project team.
Related: [Admin: Project: Scope]
Policy on email response time
Normally, the prof will respond within 24 hours if it was an email sent to the prof or a forum post directed at the prof. If you don't get a response within that time, please feel free to remind the prof. It is likely that the prof did not notice your post or the email got stuck somewhere.
Similarly we expect you to check email regularly and respond to emails written to you personally (not mass email) promptly.
Not responding to a personal email is a major breach of professional etiquette (and general civility). Imagine how pissed off you would be if you met the prof along the corridor, said 'Hi prof, good morning' and the prof walked away without saying anything back. Not responding to a personal email is just as bad. Always take a few seconds to at least acknowledge such emails. It doesn't take long to type "Noted. Thanks" and hit 'send'.
The promptness of a reply is even more important when the email is requesting you for something that you cannot provide. Imagine you wrote to the prof requesting a reference letter and the prof did not respond at all because he/she did not want to give you one; You'll be quite frustrated because you wouldn't know whether to look for another prof or wait longer for a response. Saying 'No' is fine and in fact a necessary part of professional life; but saying nothing is not acceptable. If you didn't reply, the sender will not even know whether you received the email.
Policy on grading smaller/larger teams
As most of the work is graded individually, team sizes of 3, 4, or 5 is not expected to affect your grade. While managing larger teams is harder, larger teams have more collective know-how, which can cancel each other.
Why so much bean counting?

Sometimes, small things matter in big ways. e.g., all other things being equal, a job may be offered to the candidate who has the neater looking CV although both have the same qualifications. This may be unfair, but that's how the world works. Students forget this harsh reality when they are in the protected environment of the school and tend to get sloppy with their work habits. That is why we reward all positive behavior, even small ones (e.g., following precise submission instructions, arriving on time etc.).
But unlike the real world, we are forgiving. That is why you can still earn full 10 marks of the participation marks even if you miss a few things here and there.
Related article: This Is The Personality Trait That Most Often Predicts Success (this is why we reward things like punctuality).
Outcomes
Design
W5.1 Can explain single responsibility principle
W5.1a Can explain single responsibility principle
Supplmentary → Principles →
Single Responsibility Principle
Single Responsibility Principle (SRP): A class should have one, and only one, reason to change. -- Robert C. Martin
If a class has only one responsibility, it needs to change only when there is a change to that responsibility.
Consider a TextUi class that does parsing of the user commands as well as interacting with the user. That class needs to change when the formatting of the UI changes as well as when
the syntax of the user command changes. Hence, such a class does not follow the SRP.
- An explanation of the SRP from www.oodesign.com
- Another explanation (more detailed) by Patkos Csaba
- A book chapter on SRP - A book chapter on SRP, written by the father of the principle itself Robert C Martin.
Evidence:
Acceptable: Evidence of having used SRP in some project.
Suggested: Do the exercise in [Addressbook-Level2: LO-SRP]
Submission: Create a PR against Addressbook-Level2. Only clean PRs (i.e. free of unrelated code modifications) will be accepted.
OOP
W5.2 Can explain associations
W5.2a Can explain associations
Paradigms → Object Oriented Programming → Associations →
Basic
Objects in an OO solution need to be connected to each other to form a network so that they can interact with each other. Such connections between objects are called associations.
Suppose an OOP program for managing a learning management system creates an object structure to represent the related objects. In that object structure we can expect to have associations between
aCourse object that represents a specific course and Student objects that represents students taking that course.
Associations in an object structure can change over time.
To continue the previous example, the associations between a Course object and Student objects can change as students enroll in the module or drop the module over time.
Associations among objects can be generalized as associations between the corresponding classles too.
In our example, as some Course objects can have associations with some Student objects, we can view it as an association between the Course class and the Student class.
Implementing associations
We use instance level variables to implement associations.
Evidence:
Covered in:
Suppose we wrote a program to follow the class structure given in this class diagram:
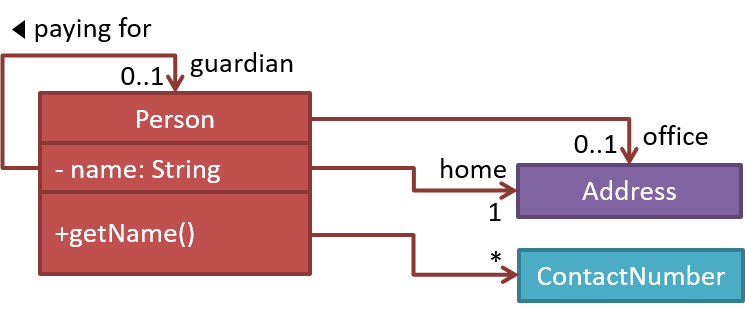
Draw object diagrams to represent the object structures after each of these steps below. Assume that we are trying to minimize the number of total objects.
i.e. apply step 1 → [diagram 1] → apply step 2 on diagram 1 → [diagram 2] and so on.
-
There are no persons.
-
Alfredis the Guardian ofBruce. -
Bruce's contact number is the same asAlfred's. -
Alfredis also the guardian of another person. That person listsAlfreds home address as his home address as well as office address. -
Alfredhas a an office address atWayne Industriesbuilding which is different from his home address (i.e.Bat Cave).
After step 2, the diagram should be like this:

W5.2b Can interpret simple associations in a class diagram
Tools → UML → Class Diagrams → Associations →
What
We use a solid line to show an association between two classes.

This example shows an association between the Admin class and the Student class:

W5.3 Can explain dependencies among classes
W5.3a Can explain dependencies among classes
Paradigms → Object Oriented Programming → Associations →
Dependencies
In the context of OOP associations, a dependency is a need for one class to depend on another without having a direction association with it. One cause of dependencies is interactions between objects that do not have a long-term link between them.
A Course object can have a dependency on a Registrar object to obtain the maximum number of students it can support.
Implementing dependencies
In the code below, Foo has a dependency on Bar but it is not an association because it is only a
Foo object and a Bar object. i.e. the Foo object does not keep the Bar object it receives as a parameter.
class Foo{

    int calculate(Bar bar){
        return bar.getValue();
    }
}

class Bar{
    int value;

    int getValue(){
        return value;
    }
}
class Foo:

    def calculate(self, bar):
        return bar.value;

class Bar:

    def __init__(self, value):
      self.value = value
W5.3b Can use dependencies in a class diagram
Tools → UML → Class Diagrams → Dependencies →
Dependencies
UML uses a dashed arrow to show dependencies.

Two examples of dependencies:

W5.4 Can implement composition
W5.4a Can explain the meaning of composition
Paradigms → Object Oriented Programming → Associations →
Composition
A composition is an association that represents a strong whole-part relationship. When the whole is destroyed, parts are destroyed too.
A Board (used for playing board games) consists of Square objects.
Composition also implies that there cannot be cyclical links.
The ‘sub-folder’ association between Folder objects is a composition type association. That means if the Folder object foo is a sub folder of Folder object bar, bar cannot be a sub-folder of foo.
Implementing composition
Composition is implemented using a normal variable. If correctly implemented, the ‘part’ object will be deleted when the ‘whole’ object is deleted. Ideally, the ‘part’ object may not even be visible to clients of the ‘whole’ object.
In the code below, the Email has a composition type relationship with the Subject class, in the sense that the subject is part of the email.
class Email {
    private Subject subject;
  ...
}
class Email:

  def __init__(self):
    self.__subject = Subject()
W5.4b Can interpret composition in class diagrams
Tools → UML → Class Diagrams → Composition →
Composition
UML uses a solid diamond symbol to denote composition.
Notation:

A Book consists of Chapter objects. When the Book object is destroyed, its Chapter objects are destroyed too.

W5.5 Can implement aggregation
W5.5a Can explain the meaning of aggregations
Paradigms → Object Oriented Programming → Associations →
Aggregation
Aggregation represents a container-contained relationship. It is a weaker relationship than composition.
SportsClub can act as a container for Person objects who are members of the club. Person objects can survive without a SportsClub object.
Implementing aggregation
Implementation is similar to that of composition except the containee object can exist even after the container object is deleted.
In the code below, there is an aggregation association between the Team class and the Person in that a Team contains Person a object who is the
leader of the team.
class Team {
    Person leader;
    ...
    void setLeader(Person p) {
        leader = p;
    }
}
class Team:

  def __init__(self):
    self.__leader = None

  def set_leader(self, person):
    self.__leader = person
W5.5b Can interpret aggregation in class diagrams
Tools → UML → Class Diagrams → Aggregation →
Aggregation
UML uses a hollow diamond is used to indicate an aggregation.
Notation:
Example:
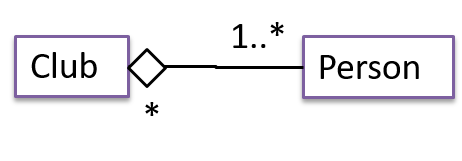
Aggregation vs Composition
💡 The distinction between composition (◆) and aggregation (◇) is rather blurred. Martin Fowler’s famous book UML Distilled advocates omitting the aggregation symbol altogether because using it adds more confusion than clarity.
Which one of these is recommended not to use in UML diagrams because it adds more confusion than clarity?
(b)
W5.6 Can implement inheritance
W5.6a Can explain the meaning of inheritance
Paradigms → Object Oriented Programming → Inheritance →
What
The OOP concept Inheritance allows you to define a new class based on an existing class.
For example, you can use inheritance to define an EvaluationReport class based on an existing Report class so that the EvaluationReport class does not have
to duplicate code that is already implemented in the Report class. The EvaluationReport can inherit the wordCount attribute and the print() method from the base class Report.
- Other names for Base class: Parent class, Super class
- Other names for Derived class: Child class, Sub class, Extended class
A superclass is said to be more general than the subclass. Conversely, a subclass is said to be more specialized than the superclass.
Applying inheritance on a group of similar classes can result in the common parts among classes being extracted into more general classes.
Man and Woman behaves the same way for certain things. However, the two classes cannot be simply replaced with a more general class Person because of the need
to distinguish between Man and Woman for certain other things. A solution is to add the Person class as a superclass (to contain the code common to men and woment) and let Man and Woman inherit from Person class.
Inheritance implies the derived class can be considered as a sub-type of the base class (and the base class is a super-type of the derived class), resulting in an is a relationship.
Inheritance does not necessarily mean a sub-type relationship exists. However, the two often go hand-in-hand. For simplicity, at this point let us assume inheritance implies a sub-type relationship.
To continue the previous example,
Womanis aPersonManis aPerson
Inheritance relationships through a chain of classes can result in inheritance hierarchies (aka inheritance trees).
Two inheritance hierarchies/trees are given below. Note that the triangle points to the parent class. Observe how the Parrot is a Bird as well as it is an Animal.

Multiple Inheritance is when a class inherits directly from multiple classes. Multiple inheritance among classes is allowed in some languages (e.g., Python, C++) but not in other languages (e.g., Java, C#).
The Honey class inherits from the Food class and the Medicine class because honey can be consumed as a food as well as a medicine (in some oriental medicine practices).
Similarly, a Car is an Vehicle, an Asset and a Liability.

Which of these are correct?
- a. Superclass is more general than the subclass.
- b. Child class is more specialized than the parent class.
- c. A class can inherit behavior from its ancestor classes (ancestor classes = classes above it in the inheritance hierarchy).
- d. Code reuse can be one benefit of inheritance.
- e. A change to the superclass will not affect its subclasses.
(a) (b) (c) (d)
Explanation: (e) is incorrect. Because subclasses inherit behavior from the superclass, any changes to the superclass could affect subclasses.
Evidence:
Acceptable: Evidence of having used Java inheritance in some project.
Suggested: Do the exercise in [Addressbook-Level2: LO-Inheritance]
Submission: Create a PR against Addressbook-Level2. Only clean PRs (i.e. free of unrelated code modifications) will be accepted.
W5.6b Can interpret class inheritance in class diagrams
Tools → UML → Class Diagrams → Inheritance →
Inheritance
You can use a triangle and a solid line (not to be confused with an arrow) to indicate class inheritance.
Notation:
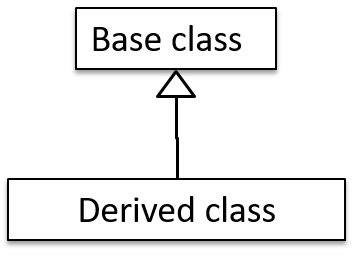
Examples: The Car class inherits from the Vehicle class. The Cat and Dog classes inherit from the Pet class.

Implementation
W5.7 Can follow a simple style guide
W5.7a Can explain the importance of code quality
Implementation → Code Quality → Introduction →
Basic
Always code as if the person who ends up maintaining your code will be a violent psychopath who knows where you live. -- Martin Golding
W5.7b Can explain the need for following a standard
Implementation → Code Quality → Style →
Introduction
One essential way to improve code quality is to follow a consistent style. That is why software engineers follow a strict coding standard (aka style guide).
The aim of a coding standard is to make the entire code base look like it was written by one person. A coding standard is usually specific to a programming language and specifies guidelines such as the location of opening and closing braces, indentation styles and naming styles (e.g. whether to use Hungarian style, Pascal casing, Camel casing, etc.). It is important that the whole team/company use the same coding standard and that standard is not generally inconsistent with typical industry practices. If a company's coding standards is very different from what is used typically in the industry, new recruits will take longer to get used to the company's coding style.
💡 IDEs can help to enforce some parts of a coding standard e.g. indentation rules.
What is the recommended approach regarding coding standards?
c
What is the aim of using a coding standard? How does it help?
Evidence:
What is the aim of using a coding standard? How does it help?
W5.7c Can follow simple mechanical style rules
Implementation → Code Quality → Style →
Basic
Learn basic guidelines of the Java coding standard (by OSS-Generic)
Sample coding standard: PEP 8 Python Style Guide -- by Python.org
Consider the code given below:
import java.util.*;

public class Task {
    public static final String descriptionPrefix = "description: ";
    private String description;
    private boolean important;
    List<String> pastDescription = new ArrayList<>(); // a list of past descriptions

    public Task(String d) {
      this.description = d;
      if (!d.isEmpty())
          this.important = true;
    }

    public String getAsXML() { return "<task>"+description+"</task>"; }

    /**
     * Print the description as a string.
     */
    public void printingDescription(){ System.out.println(this); }

    @Override
    public String toString() { return descriptionPrefix + description; }
}
In what ways the code violate the basic guidelines (i.e., those marked with one ⭐️) of the OSS-Generic Java Coding Standard given here?
Here are three:
descriptionPrefixis a constant and should be namedDESCRIPTION_PREFIX- method name
printingDescription()should be named asprintDescription() - boolean variable
importantshould be named to sound boolean e.g.,isImportant
There are many more.
W5.7d Can follow intermediate style rules
Implementation → Code Quality → Style →
Intermediate
Go through the provided Java coding standard and learn the intermediate style rules.
According to the given Java coding standard, which one of these is not a good name?
b
Explanation: checkWeight is an action. Naming variables as actions makes the code harder to follow. isWeightValid may be a better name.
Repeat the exercise in the panel below but also find violations of intermediate level guidelines.
Consider the code given below:
import java.util.*;

public class Task {
    public static final String descriptionPrefix = "description: ";
    private String description;
    private boolean important;
    List<String> pastDescription = new ArrayList<>(); // a list of past descriptions

    public Task(String d) {
      this.description = d;
      if (!d.isEmpty())
          this.important = true;
    }

    public String getAsXML() { return "<task>"+description+"</task>"; }

    /**
     * Print the description as a string.
     */
    public void printingDescription(){ System.out.println(this); }

    @Override
    public String toString() { return descriptionPrefix + description; }
}
In what ways the code violate the basic guidelines (i.e., those marked with one ⭐️) of the OSS-Generic Java Coding Standard given here?
Here are three:
descriptionPrefixis a constant and should be namedDESCRIPTION_PREFIX- method name
printingDescription()should be named asprintDescription() - boolean variable
importantshould be named to sound boolean e.g.,isImportant
There are many more.
Here's one you are more likely to miss:
* Print the description as a string.→* Prints the description as a string.
There are more.
W5.8 Can improve code readability
W5.8a Can explain the importance of readability
Implementation → Code Quality → Readability →
Introduction
Programs should be written and polished until they acquire publication quality. --Niklaus Wirth
Among various dimensions of code quality, such as run-time efficiency, security, and robustness, one of the most important is understandability. This is because in any non-trivial software project, code needs to be read, understood, and modified by other developers later on. Even if we do not intend to pass the code to someone else, code quality is still important because we all become 'strangers' to our own code someday.
The two code samples given below achieve the same functionality, but one is easier to read.
|
Bad |
|
Good |
|
Bad |
|
Good |
W5.8b Can improve code quality using technique: avoid long methods
Implementation → Code Quality → Readability → Basic →
Avoid Long Methods
Be wary when a method is longer than the computer screen, and take corrective action when it goes beyond 30 LOC (lines of code). The bigger the haystack, the harder it is to find a needle.
W5.8c Can improve code quality using technique: avoid deep nesting
Implementation → Code Quality → Readability → Basic →
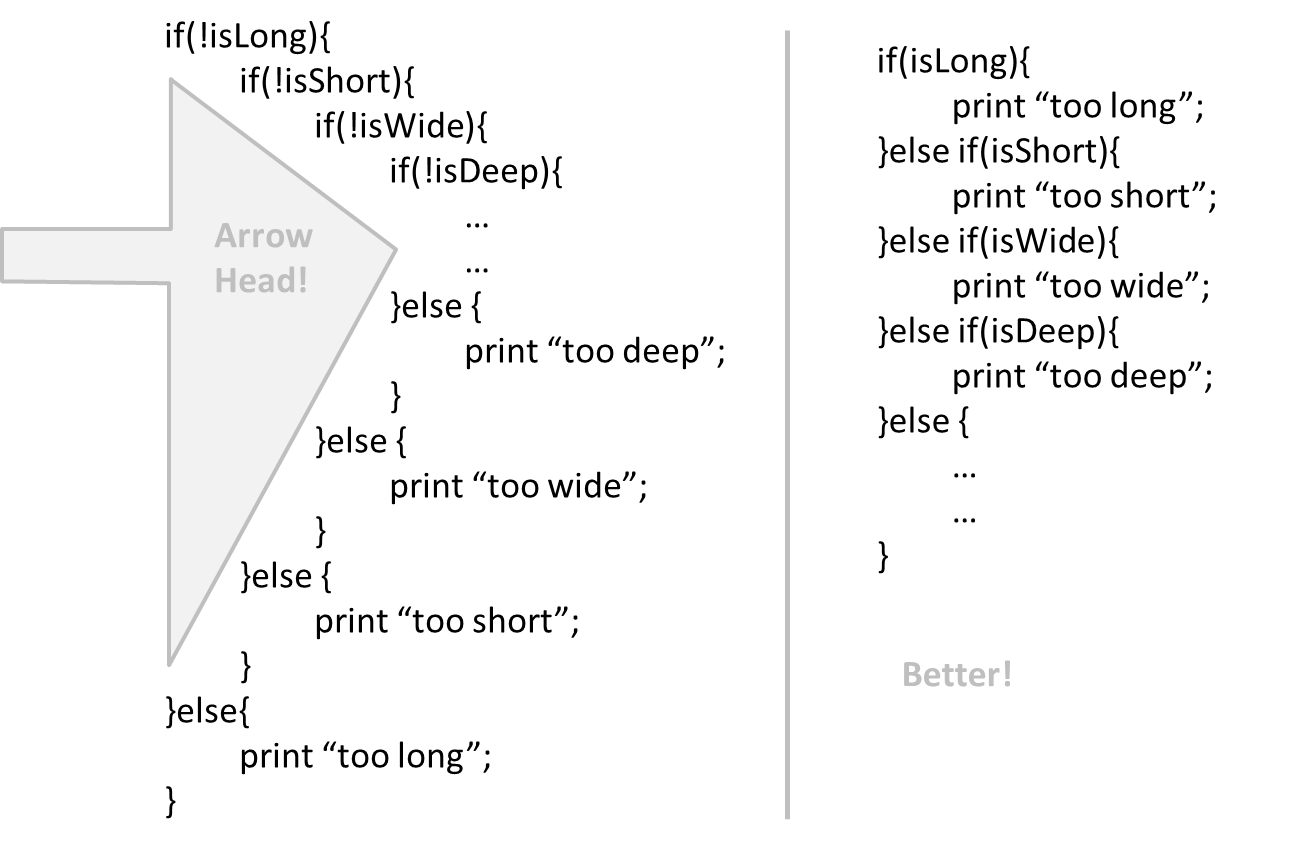
Avoid Deep Nesting
If you need more than 3 levels of indentation, you're screwed anyway, and should fix your program. --Linux 1.3.53 CodingStyle
In particular, avoid arrowhead style code.
Example:
W5.8d Can improve code quality using technique: avoid complicated expressions
Implementation → Code Quality → Readability → Basic →
Avoid Complicated Expressions
Avoid complicated expressions, especially those having many negations and nested parentheses. If you must evaluate complicated expressions, have it done in steps (i.e. calculate some intermediate values first and use them to calculate the final value).
Example:
Bad
return ((length < MAX_LENGTH) || (previousSize != length)) && (typeCode == URGENT);
Good
boolean isWithinSizeLimit = length < MAX_LENGTH;
boolean isSameSize = previousSize != length;
boolean isValidCode = isWithinSizeLimit || isSameSize;

boolean isUrgent = typeCode == URGENT;

return isValidCode && isUrgent;
Example:
Bad
return ((length < MAX_LENGTH) or (previous_size != length)) and (type_code == URGENT)
Good
is_within_size_limit = length < MAX_LENGTH
is_same_size = previous_size != length
is_valid_code = is_within_size_limit or is_same_size

is_urgent = type_code == URGENT

return is_valid_code and is_urgent
The competent programmer is fully aware of the strictly limited size of his own skull; therefore he approaches the programming task in full humility, and among other things he avoids clever tricks like the plague. -- Edsger Dijkstra
W5.8e Can improve code quality using technique: avoid magic numbers
Implementation → Code Quality → Readability → Basic →
Avoid Magic Numbers
When the code has a number that does not explain the meaning of the number, we call that a magic number (as in “the number appears as if by magic”). Using a
Example:
|
Bad |
|
Good |
Note: Python does not have a way to make a variable a constant. However, you can use a normal variable with an ALL_CAPS name to simulate a constant.
|
Bad |
|
Good |
Similarly, we can have ‘magic’ values of other data types.
Bad
"Error 1432" // A magic string!
W5.8f Can improve code quality using technique: make the code obvious
Implementation → Code Quality → Readability → Basic →
Make the Code Obvious
Make the code as explicit as possible, even if the language syntax allows them to be implicit. Here are some examples:
- [
Java] Use explicit type conversion instead of implicit type conversion. - [
Java,Python] Use parentheses/braces to show grouping even when they can be skipped. - [
Java,Python] Useenumerations when a certain variable can take only a small number of finite values. For example, instead of declaring the variable 'state' as an integer and using values 0,1,2 to denote the states 'starting', 'enabled', and 'disabled' respectively, declare 'state' as typeSystemStateand define an enumerationSystemStatethat has values'STARTING','ENABLED', and'DISABLED'.
W5.8g Can improve code quality using technique: structure code logically
Implementation → Code Quality → Readability → Intermediate →
Structure Code Logically
Lay out the code so that it adheres to the logical structure. The code should read like a story. Just like we use section breaks, chapters and paragraphs to organize a story, use classes, methods, indentation and line spacing in your code to group related segments of the code. For example, you can use blank lines to group related statements together. Sometimes, the correctness of your code does not depend on the order in which you perform certain intermediary steps. Nevertheless, this order may affect the clarity of the story you are trying to tell. Choose the order that makes the story most readable.
W5.8h Can improve code quality using technique: do not 'trip up' reader
Implementation → Code Quality → Readability → Intermediate →
Do Not 'Trip Up' Reader
Avoid things that would make the reader go ‘huh?’, such as,
- unused parameters in the method signature
- similar things look different
- different things that look similar
- multiple statements in the same line
- data flow anomalies such as, pre-assigning values to variables and modifying it without any use of the pre-assigned value
W5.8i Can improve code quality using technique: practice kissing
Implementation → Code Quality → Readability → Intermediate →
Practice KISSing
As the old adage goes, "keep it simple, stupid” (KISS). Do not try to write ‘clever’ code. For example, do not dismiss the brute-force yet simple solution in favor of a complicated one because of some ‘supposed benefits’ such as 'better reusability' unless you have a strong justification.
Debugging is twice as hard as writing the code in the first place. Therefore, if you write the code as cleverly as possible, you are, by definition, not smart enough to debug it. --Brian W. Kernighan
Programs must be written for people to read, and only incidentally for machines to execute. --Abelson and Sussman
W5.8j Can improve code quality using technique: avoid premature optimizations
Implementation → Code Quality → Readability → Intermediate →
Avoid Premature Optimizations
Optimizing code prematurely has several drawbacks:
- We may not know which parts are the real performance bottlenecks. This is especially the case when the code undergoes transformations (e.g. compiling, minifying, transpiling, etc.) before it becomes an executable. Ideally, you should use a profiler tool to identify the actual bottlenecks of the code first, and optimize only those parts.
- Optimizing can complicate the code, affecting correctness and understandability
- Hand-optimized code can be harder for the compiler to optimize (the simpler the code, the easier for the compiler to optimize it). In many cases a compiler can do a better job of optimizing the runtime code if you don't get in the way by trying to hand-optimize the source code.
A popular saying in the industry is make it work, make it right, make it fast which means in most cases getting the code to perform correctly should take priority over optimizing it. If the code doesn't work correctly, it has no value on matter how fast/efficient it it.
Premature optimization is the root of all evil in programming. --Donald Knuth
Note that there are cases where optimizing takes priority over other things e.g. when writing code for resource-constrained environments. This guideline simply a caution that you should optimize only when it is really needed.
W5.8k Can improve code quality using technique: SLAP hard
Implementation → Code Quality → Readability → Intermediate →
SLAP Hard
Avoid varying the level of
Example:
Bad
readData();
salary = basic*rise+1000;
tax = (taxable?salary*0.07:0);
displayResult();
Good
readData();
processData();
displayResult();
Design → Design Fundamentals → Abstraction →
What
Abstraction is a technique for dealing with complexity. It works by establishing a level of complexity (or an aspect) we are interested in, and suppressing the more complex details below that level (or irrelevant to that aspect).
Most programs are written to solve complex problems involving large amounts of intricate details. It is impossible to deal with all these details at the same time. The guiding principle of abstraction stipulates that we capture only details that are relevant to the current perspective or the task at hand.
Ignoring lower level data items and thinking in terms of bigger entities is called data abstraction.
Within a certain software component, we might deal with a user data type, while ignoring the details contained in the user data item such as name, and date of birth. These details have been ‘abstracted away’ as they do not affect the task of that software component.
Control abstraction abstracts away details of the actual control flow to focus on tasks at a simplified level.
print(“Hello”) is an abstraction of the actual output mechanism within the computer.
Abstraction can be applied repeatedly to obtain progressively higher levels of abstractions.
An example of different levels of data abstraction: a File is a data item that is at a higher level than an array and an array is at a higher level than a bit.
An example of different levels of control abstraction: execute(Game) is at a higher level than print(Char) which is at a higher than an Assembly language instruction
MOV.
W5.8l Can improve code quality using technique: make the happy path prominent
Implementation → Code Quality → Readability → Advanced →
Make the Happy Path Prominent
The happy path (i.e. the execution path taken when everything goes well) should be clear and prominent in your code. Restructure the code to make the happy path unindented as much as possible. It is the ‘unusual’ cases that should be indented. Someone reading the code should not get distracted by alternative paths taken when error conditions happen. One technique that could help in this regard is the use of guard clauses.
Example:
Bad
if (!isUnusualCase) {  //detecting an unusual condition
    if (!isErrorCase) {
        start();    //main path
        process();
        cleanup();
        exit();
    } else {
        handleError();
    }
} else {
    handleUnusualCase(); //handling that unusual condition
}
In the code above,
- Unusual condition detection is separated from their handling.
- Main path is nested deeply.
Good
if (isUnusualCase) { //Guard Clause
    handleUnusualCase();
    return;
}

if (isErrorCase) { //Guard Clause
    handleError();
    return;
}

start();
process();
cleanup();
exit();
In contrast, the above code
- deals with unusual conditions as soon as they are detected so that the reader doesn't have to remember them for long.
- keeps the main path un-indented.
Project Management
W5.9 Can follow Forking Workflow
W5.9a Can explain forking workflow
Project Management → Revision Control →
Forking Flow

In the forking workflow, the 'official' version of the software is kept in a remote repo designated as the 'main repo'. All team members fork the main repo create pull requests from their fork to the main repo.
To illustrate how the workflow goes, let’s assume Jean wants to fix a bug in the code. Here are the steps:
- Jean creates a separate branch in her local repo and fixes the bug in that branch.
- Jean pushes the branch to her fork.
- Jean creates a pull request from that branch in her fork to the main repo.
- Other members review Jean’s pull request.
- If reviewers suggested any changes, Jean updates the PR accordingly.
- When reviewers are satisfied with the PR, one of the members (usually the team lead or a designated 'maintainer' of the main repo) merges the PR, which brings Jean’s code to the main repo.
- Other members, realizing there is new code in the upstream repo, sync their forks with the new upstream repo (i.e. the main repo). This is done by pulling the new code to their own local repo and pushing the updated code to their own fork.
- A detailed explanation of the Forking Workflow - From Atlassian
W5.9b Can follow Forking Workflow
Tools → Git and GitHub →
Forking Workflow
This activity is best done as a team. If you are learning this alone, you can simulate a team by using two different browsers to log into GitHub using two different accounts.
-
One member: set up the team org and the team repo.
- Create a GitHub organization for your team. The org name is up to you. We'll refer to this organization as team org from now on.
- Add a team called
developersto your team org. - Add your team members to the
developersteam. - Fork se-edu/samplerepo-workflow-practice to your team org. We'll refer to this as the team repo.
- Add the forked repo to the
developersteam. Give write access.
-
Each team member: create PRs via own fork
- Fork that repo from your team org to your own GitHub account.
- Create a PR to add a file
yourName.md(e.g.jonhDoe.md) containing a brief resume of yourself (branch → commit → push → create PR)
-
For each PR: review, update, and merge.
- A team member (not the PR author): Review the PR by adding comments (can be just dummy comments).
- PR author: Update the PR by pushing more commits to it, to simulate updating the PR based on review comments.
- Another team member: Merge the PR using the GitHub interface.
- All members: Sync your local repo (and your fork) with upstream repo. In this case, your upstream repo is the repo in your team org.
-
Create conflicting PRs.
- Each team member: Create a PR to add yourself under the
Team Memberssection in theREADME.md. - One member: in the
masterbranch, remove John Doe and Jane Doe from theREADME.md, commit, and push to the main repo.
- Each team member: Create a PR to add yourself under the
-
Merge conflicting PRs one at a time. Before merging a PR, you’ll have to resolve conflicts. Steps:
- [Optional] A member can inform the PR author (by posting a comment) that there is a conflict in the PR.
- PR author: Pull the
masterbranch from the repo in your team org. Merge the pulledmasterbranch to your PR branch. Resolve the merge conflict that crops up during the merge. Push the updated PR branch to your fork. - Another member or the PR author: When GitHub does not indicate a conflict anymore, you can go ahead and merge the PR.
Evidence:
Acceptable: Evidence of following the forking workflow with the current team members using any repo.
Suggested: Evidence of following the steps in the LO with current team members.
Submission: Show during the tutorial.
W5.9c Can explain DRCS vs CRCS
Project Management → Revision Control →
DRCS vs CRCS
RCS can be done in two ways: the centralized way and the distributed way.
Centralized RCS (CRCS for short)uses a central remote repo that is shared by the team. Team members download (‘pull’) and upload (‘push’) changes between their own local repositories and the central repository. Older RCS tools such as CVS and SVN support only this model. Note that these older RCS do not support the notion of a local repo either. Instead, they force users to do all the versioning with the remote repo.
The centralized RCS approach without any local repos (e.g., CVS, SVN)
Distributed RCS (DRCS for short, also known as Decentralized RCS) allows multiple remote repos and pulling and pushing can be done among them in arbitrary ways. The workflow can vary differently from team to team. For example, every team member can have his/her own remote repository in addition to their own local repository, as shown in the diagram below. Git and Mercurial are some prominent RCS tools that support the distributed approach.
The decentralized RCS approach
W5.9d Can explain feature branch flow
Project Management → Revision Control →
Feature Branch Flow
Feature branch workflow is similar to forking workflow except there are no forks. Everyone is pushing/pulling from the same remote repo. The phrase feature branch is used because each new feature
(or bug fix, or any other modification) is done in a separate branch and merged to master branch when ready.

- A detailed explanation of the Feature Branch Workflow - From Atlassian
W5.9e Can explain centralized flow
Project Management → Revision Control →
Centralized Flow
The centralized workflow is similar to the feature branch workflow except all changes are done in the master branch.
- A detailed explanation of the Centralized Workflow - From Atlassian
W5.10 Can use GitHub PRs in a workflow
W5.10a Can use Git to resolve merge conflicts
Tools → Git and GitHub →
Merge Conflicts
1. Start a branch named fix1 in a local repo. Create a commit that adds a line with some text to one of the files.
2. Switch back to master branch. Create a commit with a conflicting change i.e. it adds a line with some different text in the exact location the previous line was added.
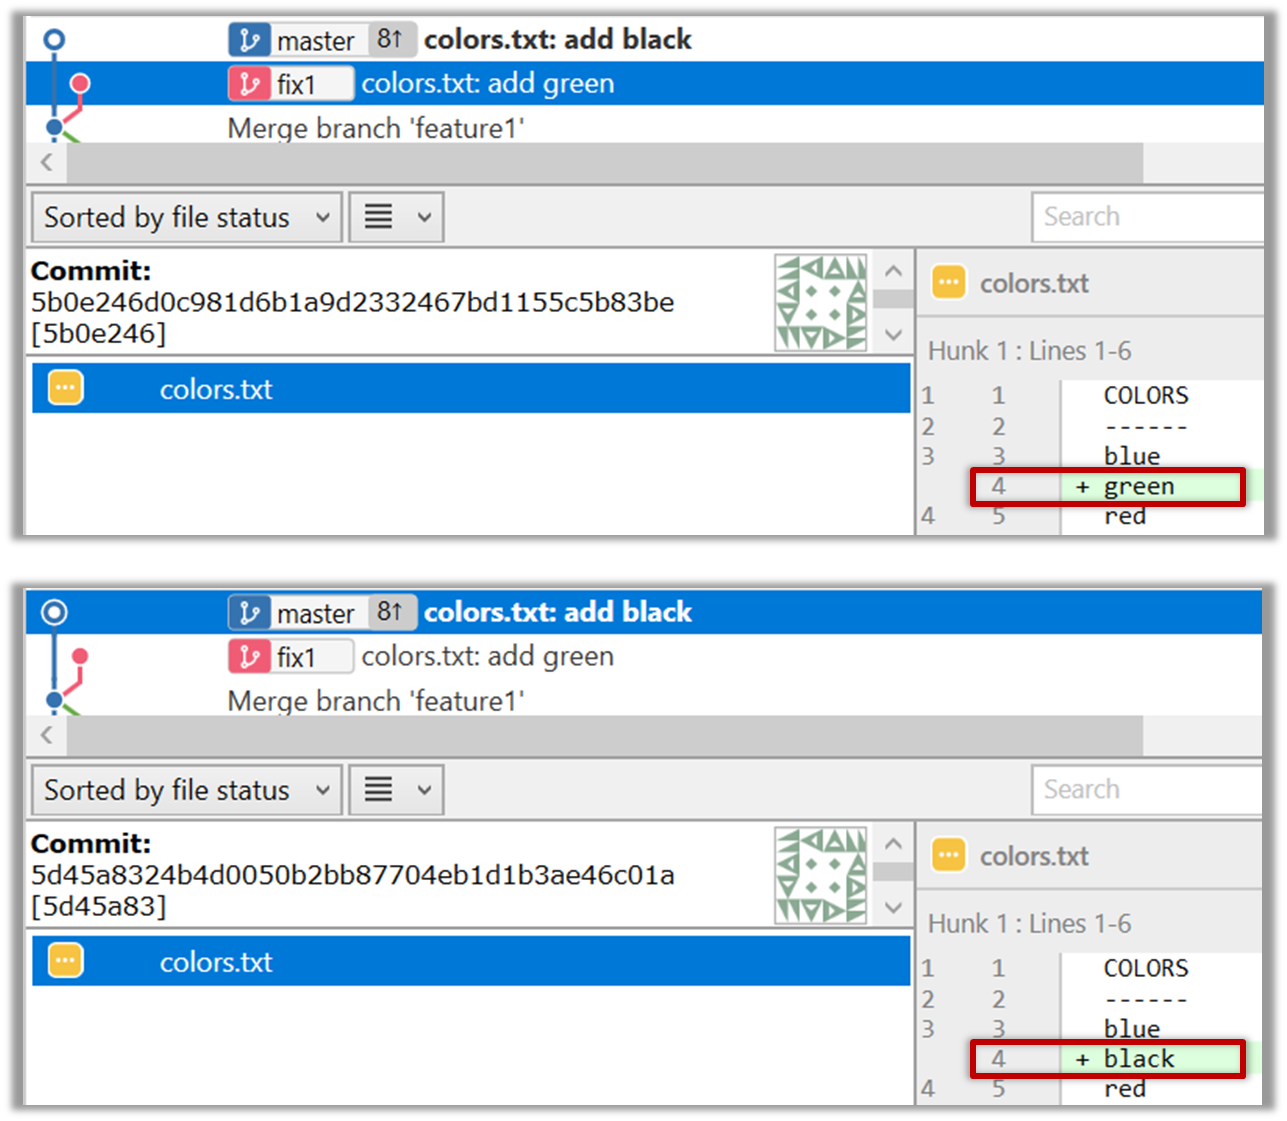
3. Try to merge the fix1 branch onto the master branch. Git will pause mid-way during the merge and report a merge conflict. If you open the conflicted file, you will see something like
this:
COLORS
------
blue
<<<<<<< HEAD
black
=======
green
>>>>>>> fix1
red
white
4. Observe how the conflicted part is marked between a line starting with <<<<<<< and a line starting with >>>>>>>, separated by another line
starting with =======.
This is the conflicting part that is coming from the master branch:
<<<<<<< HEAD
black
=======
This is the conflicting part that is coming from the fix1 branch:
=======
green
>>>>>>> fix1
5. Resolve the conflict by editing the file. Let us assume you want to keep both lines in the merged version. You can modify the file to be like this:
COLORS
------
blue
black
green
red
white
6. Stage the changes, and commit.
Evidence:
Acceptable: Merge conflicts resolved in any repo.
Suggested: Evidence of following the steps in the LO.
Submission: Show your merge commit during the tutorial.
W5.10b Can review and merge PRs on GitHub
Tools → Git and GitHub →
Manage PRs
1. Go to GitHub page of your fork and review the add-intro PR you created previously in [
1. Fork the samplerepo-pr-practice onto your GitHub account. Clone it onto your computer.
2. Create a branch named add-intro in your clone. Add a couple of commits which adds/modifies an Introduction section to the README.md. Example:
# Introduction
Creating Pull Requsts (PRs) is needed when using RCS in a multi-person projects.
This repo can be used to practice creating PRs.
3. Push the add-intro branch to your fork.
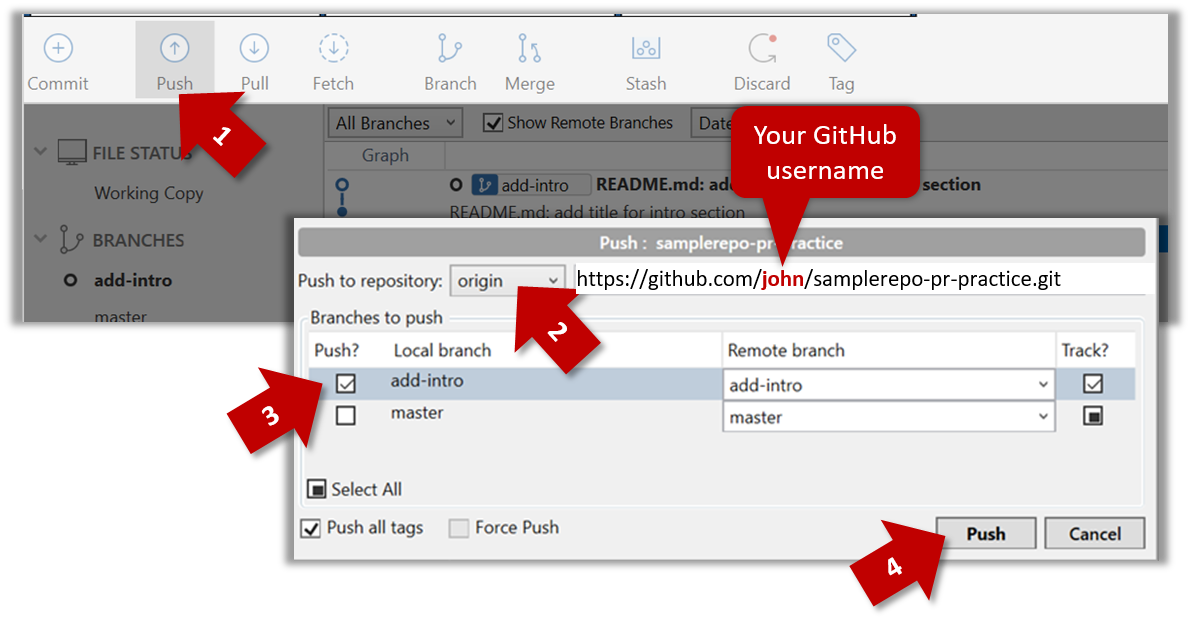
git push origin add-intro
4. Create a Pull Request from the add-intro branch in your fork to the master branch of the same fork (i.e. your-user-name/samplerepo-pr-practice, not se-edu/samplerepo-pr-practice),
as described below.
4a. Go to the GitHub page of your fork (i.e. https://github.com/{your_username}/samplerepo-pr-practice), click on the Pull Requests tab, and then click on New Pull Request button.

4b. Select base fork and head fork as follows:
base fork: your own fork (i.e.{your user name}/samplerepo-pr-practice, NOTse-edu/samplerepo-pr-practice)head fork: your own fork.

The base fork is where changes should be applied. The head fork contains the changes you would like to be applied.
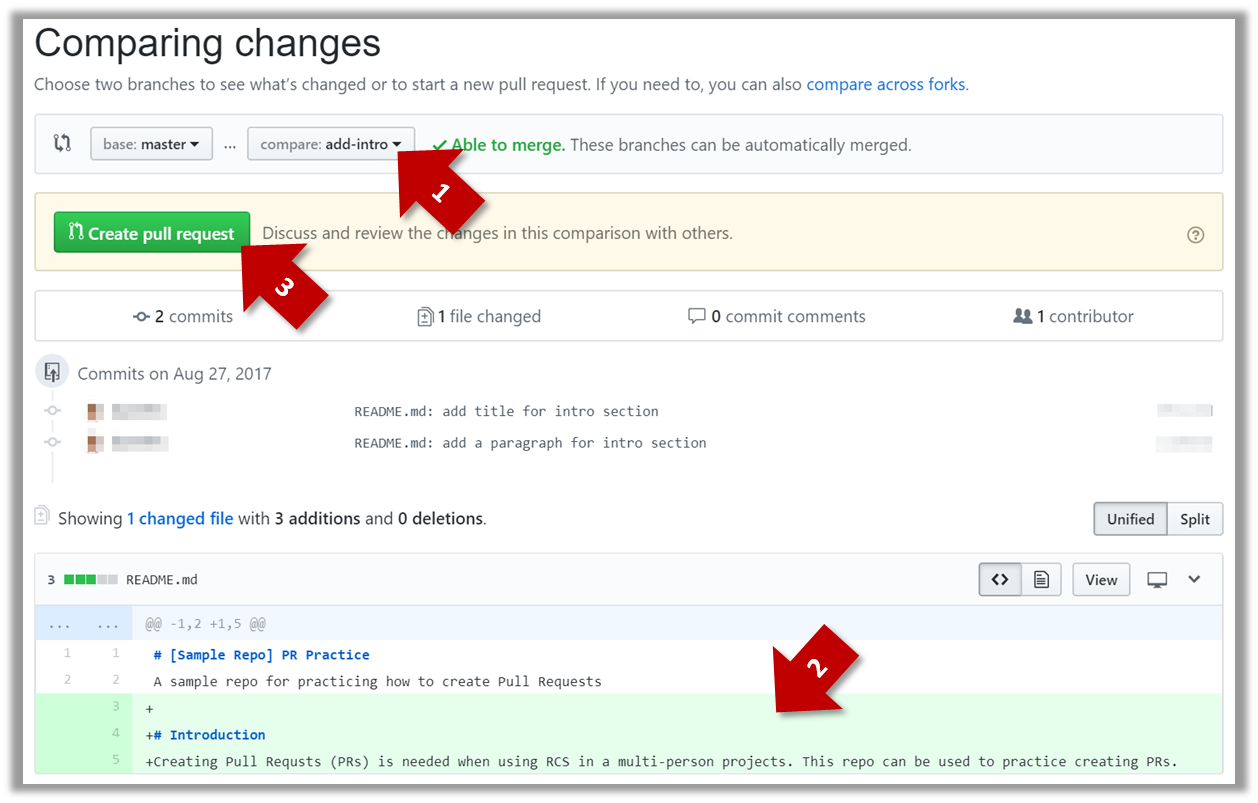
4c. (1) Set the base branch to master and head branch to add-intro, (2) confirm the diff contains the changes you propose to merge in this PR (i.e. confirm that you did not accidentally include extra commits in the branch),
and (3) click the Create pull request button.
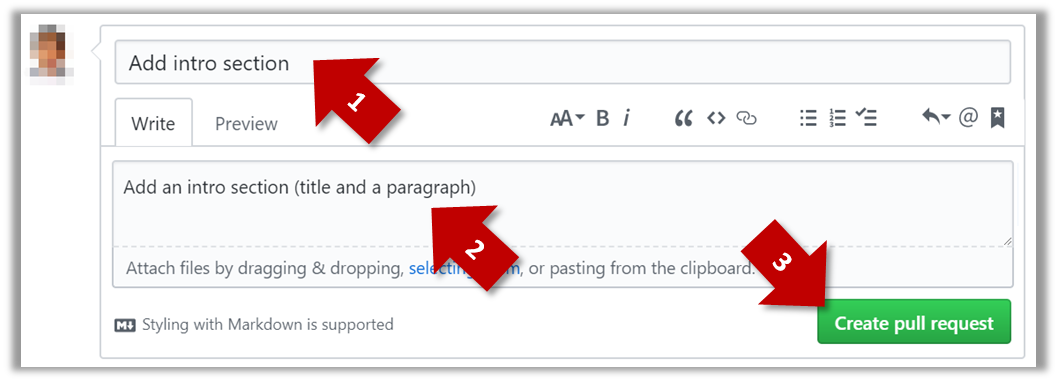
4d. (1) Set PR name, (2) set PR description, and (3) Click the Create pull request button.
A common newbie mistake when creating branch-based PRs is to mix commits of one PR with another. To learn how to avoid that mistake, you are encouraged to continue and create another PR as explained below.
5. In your local repo, create a new branch add-summary off the master branch.
When creating the new branch, it is very important that you switch back to the master branch first. If not, the new branch will be created off the current branch add-intro. And that is how you
end up having commits of the first PR in the second PR as well.
6. Add a commit in the add-summary branch that adds a Summary section to the README.md, in exactly the same place you added the Introduction section earlier.

7. Push the add-summary to your fork and create a new PR similar to before.
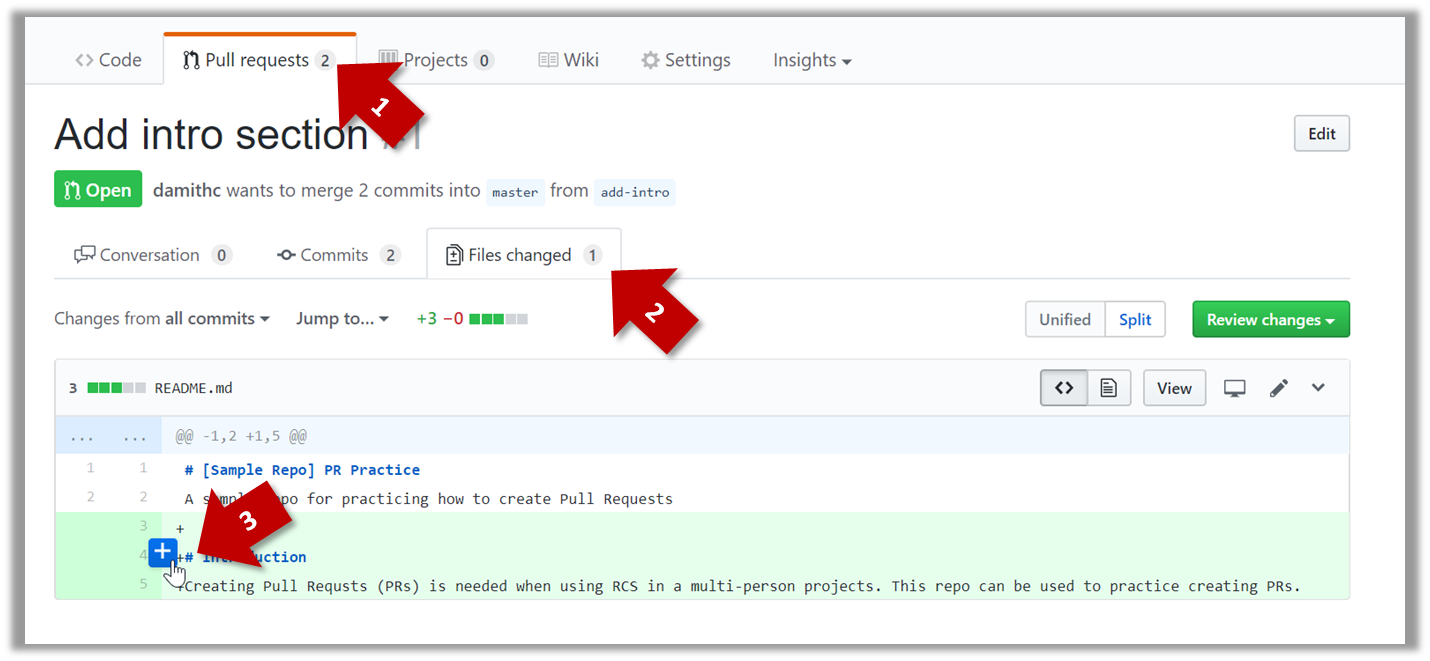
1a. Go to the respective PR page and click on the Files changed tab. Hover over the line you want to comment on and click on the icon that
appears on the left margin. That should create a text box for you to enter your comment.
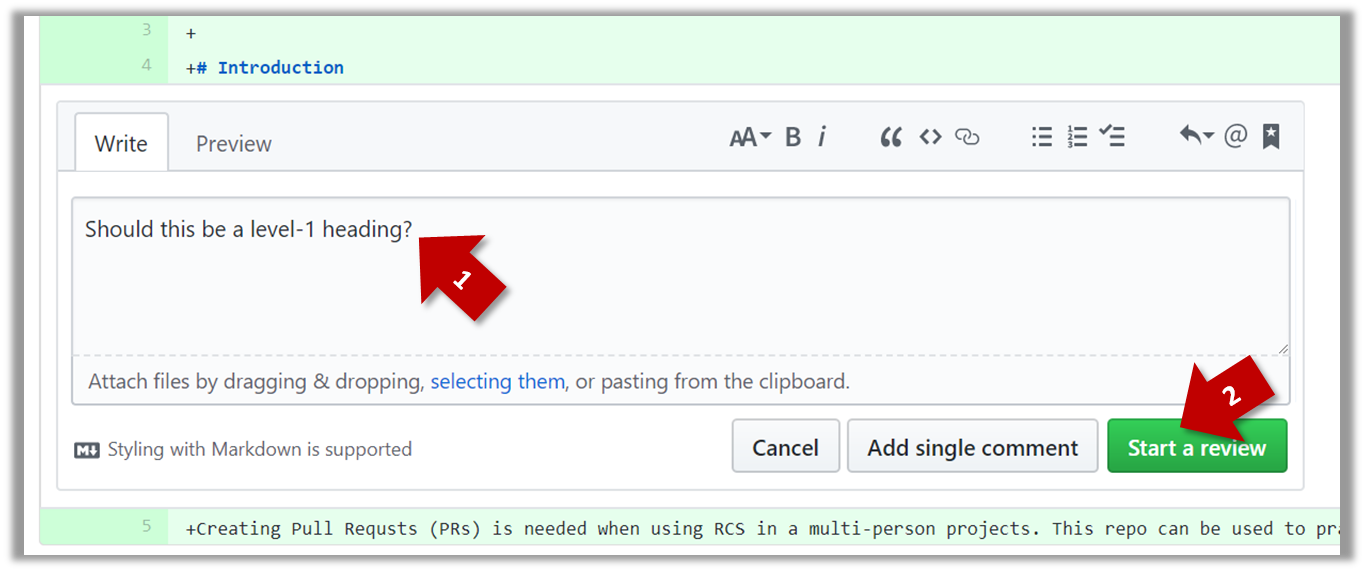
1b. Enter some dummy comment and click on Start a review button.
1c. Add a few more comments in other places of the code.
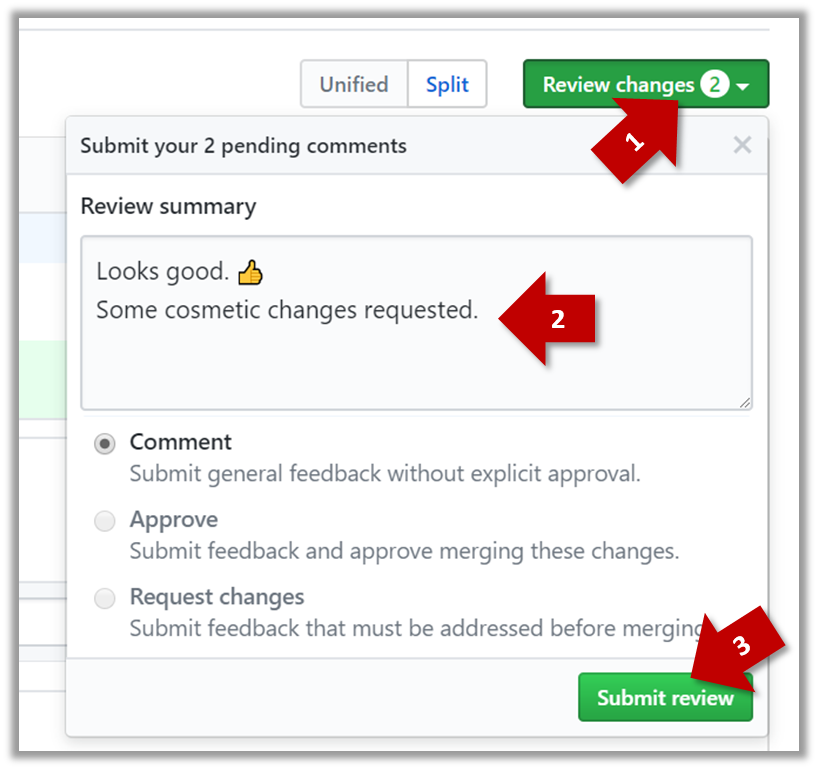
1d. Click on the Review Changes button, enter an overall comment, and click on the Submit review button.
2. Update the PR to simulate revising the code based on reviewer comments. Add some more commits to the add-intro branch and push the new commits to the fork. Observe how the PR is updated automatically
to reflect the new code.
3. Merge the PR. Go to the GitHub page of the respective PR, scroll to the bottom of the Conversation tab, and click on the Merge pull request button, followed by the Confirm merge button. You should see a Pull request successfully merged and closed message after the PR is merged.

4. Sync the local repo with the remote repo. Because of the merge you did on the GitHub, the master branch of your fork is now ahead of your local repo by one commit. To sync the local repo with the
remote repo, pull the master branch to the local repo.
git checkout master
git pull origin master
Observe how the add-intro branch is now merged to the master branch in your local repo as well.
5. De-conflict the add-summary PR
add-summary PR is now showing a conflict (when you scroll to the bottom of that page, you should see a message This branch has conflicts that must be resolved).
You can resolve it locally and update the PR accordingly, as explained below.
5a. Switch to the add-summary branch. To make that branch up-to-date with the master branch, merge the master branch to it, which will surface the merge conflict. Resolve it and complete the
merge.
5b. Push the updated add-summary branch to the fork. That will remove the 'merge conflicts' warning in the GitHub page of the PR.
6. Merge the add-summary PR using the GitHub interface, similar to how you merged the previous PR.
Note that you could have merged the add-summary branch to the master branch locally before pushing it to GitHub. In that case, the PR will be merged on GitHub automatically
to reflect that the branch has been merged already.
Evidence:
Acceptable: PRs you merged in any repo.
Suggested: Evidence of following the steps in the LO.
Submission: Show your merged PRs during the tutorial.
🅿️ Project
W5.11 Can work with a 2KLoC code base
This LO can earn you 3 participation marks, 2 mark for the individual component and 1 for the team component. You can omit either one of them.
💡 When working with existing code, a safe approach is to change the code in very small steps, each resulting in a verifiable change without breaking the app. For example, when adding a new sort command, the first
few steps can be,
- Teach the app to accept a
sortcommand but ignore it. - Next, teach the app to direct the
sortcommand to an existing command e.g.sortcommand simply invokes thelistcommand internally. - Add a
SortCommandclass but make it simply a copy of the the existingListCommand. Direct thesortcommand to the newSortCommand. - ...
💡 Note that you can reuse the code you write here in your final project, if applicable.
Individual component:
Requirements: Do an enhancement to [AddressBook - Level2] e.g. add a new command. It can be the same enhancement you did to AddressBook Level1 (at the 1KLoC milestone in week 3). The size of the enhancement does not matter but you must,
- update the User Guide
- update existing tests and add new tests if necessary, for both JUnit tests and I/O tests
- follow the coding standard
- follow the OOP style
Optional but encouraged:
- Update the Developer Guide
Submission:
- Options 1 (discouraged): Show the relevant code during the tutorial.
- Options 2 (preferred): Create a PR against Addressbook-Level2 by following the instructions below.
If you choose option 2, we recommend that you complete this week's Project Management LOs first; there are many ways to create PRs but we expect you to create PRs in a specific way, as specified in the LOs.
Team component:
The team component is to be done by all members, including those who didn't do the individual component.
-
Review PRs created by team members in the Individual Component above i.e. add review comments in the PR created against module repo. You can either give suggestions to improve, or ask questions to understand, the code written by the team member.
-
Requirements: Try to ensure that each PR reviewed by at least one team member and each team member's PR is reviewed by at least one other team member.
-
Submission: Just update PR created in the individual component by adding comments/commits to it.
W5.12 Can conceptualize a product
Covered by:
Tutorial 5
Suggested activity to do in the tutorial
-
Explain the class diagram of the [AddressBook-Level2]. You may ignore the
ReadOnlyPersoninterface (we have not covered interfaces yet) -
Go through the provided Java coding standard. Identify and fix any violations of basic style rules in local copy of addressbook-level1 code base. Commit after each fix and push to your own fork.
W5.1a Can explain single responsibility principle
Supplmentary → Principles →
Single Responsibility Principle
Single Responsibility Principle (SRP): A class should have one, and only one, reason to change. -- Robert C. Martin
If a class has only one responsibility, it needs to change only when there is a change to that responsibility.
Consider a TextUi class that does parsing of the user commands as well as interacting with the user. That class needs to change when the formatting of the UI changes as well as when
the syntax of the user command changes. Hence, such a class does not follow the SRP.
- An explanation of the SRP from www.oodesign.com
- Another explanation (more detailed) by Patkos Csaba
- A book chapter on SRP - A book chapter on SRP, written by the father of the principle itself Robert C Martin.
Evidence:
Acceptable: Evidence of having used SRP in some project.
Suggested: Do the exercise in [Addressbook-Level2: LO-SRP]
Submission: Create a PR against Addressbook-Level2. Only clean PRs (i.e. free of unrelated code modifications) will be accepted.
W5.2a Can explain associations
Paradigms → Object Oriented Programming → Associations →
Basic
Objects in an OO solution need to be connected to each other to form a network so that they can interact with each other. Such connections between objects are called associations.
Suppose an OOP program for managing a learning management system creates an object structure to represent the related objects. In that object structure we can expect to have associations between
aCourse object that represents a specific course and Student objects that represents students taking that course.
Associations in an object structure can change over time.
To continue the previous example, the associations between a Course object and Student objects can change as students enroll in the module or drop the module over time.
Associations among objects can be generalized as associations between the corresponding classles too.
In our example, as some Course objects can have associations with some Student objects, we can view it as an association between the Course class and the
Student class.
Implementing associations
We use instance level variables to implement associations.
Evidence:
Covered in:
Suppose we wrote a program to follow the class structure given in this class diagram:

Draw object diagrams to represent the object structures after each of these steps below. Assume that we are trying to minimize the number of total objects.
i.e. apply step 1 → [diagram 1] → apply step 2 on diagram 1 → [diagram 2] and so on.
-
There are no persons.
-
Alfredis the Guardian ofBruce. -
Bruce's contact number is the same asAlfred's. -
Alfredis also the guardian of another person. That person listsAlfreds home address as his home address as well as office address. -
Alfredhas a an office address atWayne Industriesbuilding which is different from his home address (i.e.Bat Cave).
After step 2, the diagram should be like this:

W5.6a Can explain the meaning of inheritance
Paradigms → Object Oriented Programming → Inheritance →
What
The OOP concept Inheritance allows you to define a new class based on an existing class.
For example, you can use inheritance to define an EvaluationReport class based on an existing Report class so that the EvaluationReport class does not have
to duplicate code that is already implemented in the Report class. The EvaluationReport can inherit the wordCount attribute and the print() method from the base class Report.
- Other names for Base class: Parent class, Super class
- Other names for Derived class: Child class, Sub class, Extended class
A superclass is said to be more general than the subclass. Conversely, a subclass is said to be more specialized than the superclass.
Applying inheritance on a group of similar classes can result in the common parts among classes being extracted into more general classes.
Man and Woman behaves the same way for certain things. However, the two classes cannot be simply replaced with a more general class Person because of the
need to distinguish between Man and Woman for certain other things. A solution is to add the Person class as a superclass (to contain the code common to men and woment) and let Man and Woman inherit from Person class.
Inheritance implies the derived class can be considered as a sub-type of the base class (and the base class is a super-type of the derived class), resulting in an is a relationship.
Inheritance does not necessarily mean a sub-type relationship exists. However, the two often go hand-in-hand. For simplicity, at this point let us assume inheritance implies a sub-type relationship.
To continue the previous example,
Womanis aPersonManis aPerson
Inheritance relationships through a chain of classes can result in inheritance hierarchies (aka inheritance trees).
Two inheritance hierarchies/trees are given below. Note that the triangle points to the parent class. Observe how the Parrot is a Bird as well as it is an Animal.

Multiple Inheritance is when a class inherits directly from multiple classes. Multiple inheritance among classes is allowed in some languages (e.g., Python, C++) but not in other languages (e.g., Java, C#).
The Honey class inherits from the Food class and the Medicine class because honey can be consumed as a food as well as a medicine (in some oriental medicine practices).
Similarly, a Car is an Vehicle, an Asset and a Liability.

Which of these are correct?
- a. Superclass is more general than the subclass.
- b. Child class is more specialized than the parent class.
- c. A class can inherit behavior from its ancestor classes (ancestor classes = classes above it in the inheritance hierarchy).
- d. Code reuse can be one benefit of inheritance.
- e. A change to the superclass will not affect its subclasses.
(a) (b) (c) (d)
Explanation: (e) is incorrect. Because subclasses inherit behavior from the superclass, any changes to the superclass could affect subclasses.
Evidence:
Acceptable: Evidence of having used Java inheritance in some project.
Suggested: Do the exercise in [Addressbook-Level2: LO-Inheritance]
Submission: Create a PR against Addressbook-Level2. Only clean PRs (i.e. free of unrelated code modifications) will be accepted.
W5.7b Can explain the need for following a standard
Implementation → Code Quality → Style →
Introduction
One essential way to improve code quality is to follow a consistent style. That is why software engineers follow a strict coding standard (aka style guide).
The aim of a coding standard is to make the entire code base look like it was written by one person. A coding standard is usually specific to a programming language and specifies guidelines such as the location of opening and closing braces, indentation styles and naming styles (e.g. whether to use Hungarian style, Pascal casing, Camel casing, etc.). It is important that the whole team/company use the same coding standard and that standard is not generally inconsistent with typical industry practices. If a company's coding standards is very different from what is used typically in the industry, new recruits will take longer to get used to the company's coding style.
💡 IDEs can help to enforce some parts of a coding standard e.g. indentation rules.
What is the recommended approach regarding coding standards?
c
What is the aim of using a coding standard? How does it help?
Evidence:
What is the aim of using a coding standard? How does it help?
W5.9b Can follow Forking Workflow
Tools → Git and GitHub →
Forking Workflow
This activity is best done as a team. If you are learning this alone, you can simulate a team by using two different browsers to log into GitHub using two different accounts.
-
One member: set up the team org and the team repo.
- Create a GitHub organization for your team. The org name is up to you. We'll refer to this organization as team org from now on.
- Add a team called
developersto your team org. - Add your team members to the
developersteam. - Fork se-edu/samplerepo-workflow-practice to your team org. We'll refer to this as the team repo.
- Add the forked repo to the
developersteam. Give write access.
-
Each team member: create PRs via own fork
- Fork that repo from your team org to your own GitHub account.
- Create a PR to add a file
yourName.md(e.g.jonhDoe.md) containing a brief resume of yourself (branch → commit → push → create PR)
-
For each PR: review, update, and merge.
- A team member (not the PR author): Review the PR by adding comments (can be just dummy comments).
- PR author: Update the PR by pushing more commits to it, to simulate updating the PR based on review comments.
- Another team member: Merge the PR using the GitHub interface.
- All members: Sync your local repo (and your fork) with upstream repo. In this case, your upstream repo is the repo in your team org.
-
Create conflicting PRs.
- Each team member: Create a PR to add yourself under the
Team Memberssection in theREADME.md. - One member: in the
masterbranch, remove John Doe and Jane Doe from theREADME.md, commit, and push to the main repo.
- Each team member: Create a PR to add yourself under the
-
Merge conflicting PRs one at a time. Before merging a PR, you’ll have to resolve conflicts. Steps:
- [Optional] A member can inform the PR author (by posting a comment) that there is a conflict in the PR.
- PR author: Pull the
masterbranch from the repo in your team org. Merge the pulledmasterbranch to your PR branch. Resolve the merge conflict that crops up during the merge. Push the updated PR branch to your fork. - Another member or the PR author: When GitHub does not indicate a conflict anymore, you can go ahead and merge the PR.
Evidence:
Acceptable: Evidence of following the forking workflow with the current team members using any repo.
Suggested: Evidence of following the steps in the LO with current team members.
Submission: Show during the tutorial.
W5.10a Can use Git to resolve merge conflicts
Tools → Git and GitHub →
Merge Conflicts
1. Start a branch named fix1 in a local repo. Create a commit that adds a line with some text to one of the files.
2. Switch back to master branch. Create a commit with a conflicting change i.e. it adds a line with some different text in the exact location the previous line was added.

3. Try to merge the fix1 branch onto the master branch. Git will pause mid-way during the merge and report a merge conflict. If you open the conflicted file, you will see something like
this:
COLORS
------
blue
<<<<<<< HEAD
black
=======
green
>>>>>>> fix1
red
white
4. Observe how the conflicted part is marked between a line starting with <<<<<<< and a line starting with >>>>>>>, separated by another line
starting with =======.
This is the conflicting part that is coming from the master branch:
<<<<<<< HEAD
black
=======
This is the conflicting part that is coming from the fix1 branch:
=======
green
>>>>>>> fix1
5. Resolve the conflict by editing the file. Let us assume you want to keep both lines in the merged version. You can modify the file to be like this:
COLORS
------
blue
black
green
red
white
6. Stage the changes, and commit.
Evidence:
Acceptable: Merge conflicts resolved in any repo.
Suggested: Evidence of following the steps in the LO.
Submission: Show your merge commit during the tutorial.
W5.10b Can review and merge PRs on GitHub
Tools → Git and GitHub →
Manage PRs
1. Go to GitHub page of your fork and review the add-intro PR you created previously in [
1. Fork the samplerepo-pr-practice onto your GitHub account. Clone it onto your computer.
2. Create a branch named add-intro in your clone. Add a couple of commits which adds/modifies an Introduction section to the README.md. Example:
# Introduction
Creating Pull Requsts (PRs) is needed when using RCS in a multi-person projects.
This repo can be used to practice creating PRs.
3. Push the add-intro branch to your fork.

git push origin add-intro
4. Create a Pull Request from the add-intro branch in your fork to the master branch of the same fork (i.e. your-user-name/samplerepo-pr-practice, not se-edu/samplerepo-pr-practice),
as described below.
4a. Go to the GitHub page of your fork (i.e. https://github.com/{your_username}/samplerepo-pr-practice), click on the Pull Requests tab, and then click on New Pull Request button.

4b. Select base fork and head fork as follows:
base fork: your own fork (i.e.{your user name}/samplerepo-pr-practice, NOTse-edu/samplerepo-pr-practice)head fork: your own fork.

The base fork is where changes should be applied. The head fork contains the changes you would like to be applied.
4c. (1) Set the base branch to master and head branch to add-intro, (2) confirm the diff contains the changes you propose to merge in this PR (i.e. confirm that you did not accidentally include extra commits in the branch),
and (3) click the Create pull request button.

4d. (1) Set PR name, (2) set PR description, and (3) Click the Create pull request button.

A common newbie mistake when creating branch-based PRs is to mix commits of one PR with another. To learn how to avoid that mistake, you are encouraged to continue and create another PR as explained below.
5. In your local repo, create a new branch add-summary off the master branch.
When creating the new branch, it is very important that you switch back to the master branch first. If not, the new branch will be created off the current branch add-intro. And that is how you
end up having commits of the first PR in the second PR as well.
6. Add a commit in the add-summary branch that adds a Summary section to the README.md, in exactly the same place you added the Introduction section earlier.

7. Push the add-summary to your fork and create a new PR similar to before.
1a. Go to the respective PR page and click on the Files changed tab. Hover over the line you want to comment on and click on the icon that
appears on the left margin. That should create a text box for you to enter your comment.

1b. Enter some dummy comment and click on Start a review button.

1c. Add a few more comments in other places of the code.
1d. Click on the Review Changes button, enter an overall comment, and click on the Submit review button.

2. Update the PR to simulate revising the code based on reviewer comments. Add some more commits to the add-intro branch and push the new commits to the fork. Observe how the PR is updated automatically
to reflect the new code.
3. Merge the PR. Go to the GitHub page of the respective PR, scroll to the bottom of the Conversation tab, and click on the Merge pull request button, followed by the Confirm merge button. You should see a Pull request successfully merged and closed message after the PR is merged.

4. Sync the local repo with the remote repo. Because of the merge you did on the GitHub, the master branch of your fork is now ahead of your local repo by one commit. To sync the local repo with the
remote repo, pull the master branch to the local repo.
git checkout master
git pull origin master
Observe how the add-intro branch is now merged to the master branch in your local repo as well.
5. De-conflict the add-summary PR
add-summary PR is now showing a conflict (when you scroll to the bottom of that page, you should see a message This branch has conflicts that must be resolved).
You can resolve it locally and update the PR accordingly, as explained below.
5a. Switch to the add-summary branch. To make that branch up-to-date with the master branch, merge the master branch to it, which will surface the merge conflict. Resolve it and complete the
merge.
5b. Push the updated add-summary branch to the fork. That will remove the 'merge conflicts' warning in the GitHub page of the PR.
6. Merge the add-summary PR using the GitHub interface, similar to how you merged the previous PR.
Note that you could have merged the add-summary branch to the master branch locally before pushing it to GitHub. In that case, the PR will be merged on GitHub automatically
to reflect that the branch has been merged already.
Evidence:
Acceptable: PRs you merged in any repo.
Suggested: Evidence of following the steps in the LO.
Submission: Show your merged PRs during the tutorial.
W5.11 Can work with a 2KLoC code base
This LO can earn you 3 participation marks, 2 mark for the individual component and 1 for the team component. You can omit either one of them.
💡 When working with existing code, a safe approach is to change the code in very small steps, each resulting in a verifiable change without breaking the app. For example, when adding a new sort command, the
first few steps can be,
- Teach the app to accept a
sortcommand but ignore it. - Next, teach the app to direct the
sortcommand to an existing command e.g.sortcommand simply invokes thelistcommand internally. - Add a
SortCommandclass but make it simply a copy of the the existingListCommand. Direct thesortcommand to the newSortCommand. - ...
💡 Note that you can reuse the code you write here in your final project, if applicable.
Individual component:
Requirements: Do an enhancement to [AddressBook - Level2] e.g. add a new command. It can be the same enhancement you did to AddressBook Level1 (at the 1KLoC milestone in week 3). The size of the enhancement does not matter but you must,
- update the User Guide
- update existing tests and add new tests if necessary, for both JUnit tests and I/O tests
- follow the coding standard
- follow the OOP style
Optional but encouraged:
- Update the Developer Guide
Submission:
- Options 1 (discouraged): Show the relevant code during the tutorial.
- Options 2 (preferred): Create a PR against Addressbook-Level2 by following the instructions below.
If you choose option 2, we recommend that you complete this week's Project Management LOs first; there are many ways to create PRs but we expect you to create PRs in a specific way, as specified in the LOs.
Team component:
The team component is to be done by all members, including those who didn't do the individual component.
-
Review PRs created by team members in the Individual Component above i.e. add review comments in the PR created against module repo. You can either give suggestions to improve, or ask questions to understand, the code written by the team member.
-
Requirements: Try to ensure that each PR reviewed by at least one team member and each team member's PR is reviewed by at least one other team member.
-
Submission: Just update PR created in the individual component by adding comments/commits to it.
W5.12 Can conceptualize a product
Covered by:
Lecture 5
Slides: Uploaded on IVLE.